HashiCorp Vault and TLS Certificate Authentication for .NET Applications (Comprehensive guide)

HashiCorp Vault is a tool for secrets management, encryption as a service, and privileged access management. It is quite popular nowadays, especially if you own your own infrastructure, private cloud or just cannot store your secrets using Key Vault services provided by Azure/AWS/GCP.

I assume that you already have one up and running instance of HashiCorp Vault, otherwise you may install one using official Installing Vault guide.

Why TLS certificate authentication?

Vault supports many Auth Methods. But what if you are still deploying your app on plain old Windows Server VMs or develop SharePoint application (like I am 😝).

The challenge in this case, that you have to authenticate in Vault in order to get a secret. This means that we need to choose auth method that protects our auth secrets from an  accident IT guys who may login on the VM (or malicious code that may find it on file system)

TLS Certificate Auth is a good solution candidate, because we can install certificate into windows certificate store, protect private key (mark it as not-exportable) and even specify list of service accounts, allowed to use this certificate for authentication.

TLS certificate generation

I will be using ssh command on my macOS for certificate generation and Vault configuration, but you can repeat the same step from Window for sure.

For our needs we will use self-signed certificate. You can generate one using OpenSSL. If you do not have OpenSSL installed, you can install from Homebrew.

brew install openssl

First of all we generate private key (it is highly secured, do not share it)

openssl genrsa 2048 > vault_private.pem

Then we generate public part of the key in .pem format (.pem file will be uploaded to Vault for client validation during authentication)

openssl req -x509 -new -key vault_private.pem -out vault_public.pem -days 365

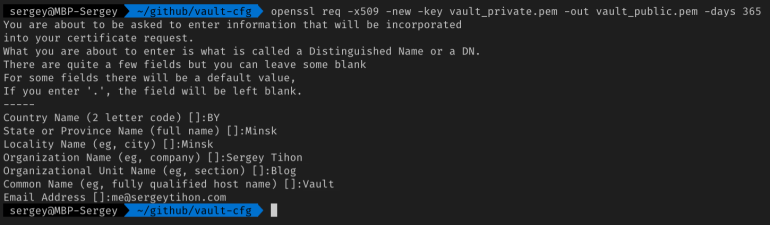
Answer all questions properly, it will help you identify this certificate in future (I’ve created certificate that is valid for 365 days, but you should follow security standards defined in you company).
vault-cfg_sh_—_private-key.png

Note: Common Name cannot be empty, otherwise you will not be able to use this certificate to retrieve the secret (Vault returns ‘missing name in alias’ error). Thank you  Vadzim Makarchyk for this note.

The final step is to archive both parts in .pfx format (.pfx file will be deployed into Windows Server certificate store on all machines from where our code should have access to Vault)

openssl pkcs12 -export -in vault_public.pem -inkey vault_private.pem -out vault.pfx

vault-cfg_sh_—_vault-cfg.png

Remember the password entered during *.pfx creation, you’re gonna need it every time you decide to install it on Windows machine.

Vault configuration

In order to configure HashiCorp Vault we will use Vault CLI interface, that can be installed from Homebrew on macOS.

brew install vault

Vault CLI uses environment variables for configuration. My Vault server is hosted on different machine so I need to provide server Url.

VAULT_ADDR=https://my.server.com:8200

export VAULT_ADDR
I uses Enterprise version of Vault that is used by several teams, that it why I also specify namespace (aka folder for my secrets)
VAULT_NAMESPACE=dev/my-team

export VAULT_NAMESPACE

I am lazy to properly setup certificates for Vault CLI, that is why I skip certificate validation (never repeat it in production 😉)

VAULT_SKIP_VERIFY=true

export VAULT_SKIP_VERIFY

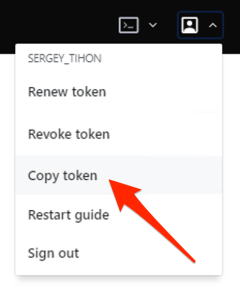
We are almost ready to login. The easiest option is to login using Web UI and then reuse issued token in the terminal. Login using your favorite browser, pass authentication and copy token in buffer.
EPAM_Laptop

vault login s.fJTY5S51oIfXKnBAG3Qq5eWp.9GKyY

That is it! Token is saved into ~/.vault-token and CLI is ready to use!

Key/Value secret engine creation

Vault supports multiple Secret Engines, but for our demo we create simple Key/Value storage for secrets (for example to store logins and passwords)

vault secrets enable -path=kv kv
This command enable key/value engine (V1) and name kv (-path param)
NOTE: The kv secrets engine has two versions: kv and kv-v2. To enable versioned kv secrets engine, pass kv-v2 instead.

Engine is ready, but it is empty – let’s fix it.

vault write kv/my-secret value="s3c(eT"

This command effectively creates my-secret secret inside kv secret engine and store one key/value pair inside value=”s3c(eT”

ACL Policy creation

Secret engine is secured, nobody (except you, admin) has access to secrets. We need to create rules/policy that define what access we want to provide. Create new files policy-file.hcl and put following content inside.

path "kv/*" {
  capabilities = ["read", "list"]
}

This policy allows to read and list all secrets inside kv secret engine. All users with this policy will be able to read secrets from our engine. Read more about policies.

Write this policy to the server (and name it policy-name)

vault policy write policy-name policy-file.hcl

TLS Certificates – Auth Method

The last step is to assign this policy. But we want to assign it to all clients authenticated in Vault using TLS certificate created by us earlier.

Fist of all we need to enable certificate authentication in our namespace

vault auth enable cert

and create certificate auth in Vault (name it app), assign policy-name to it and upload the public part of generated key (vault_public.pem)

vault write auth/cert/certs/app policies=policy-name certificate=@vault_public.pem

That is it! Vault is configured and waiting for first connection.

TLS certificate deployment

TLS certificate allows us to deploy it to certain set of machines that should have access to the Vault and then specify which accounts (on these machines) may use it for authentication.

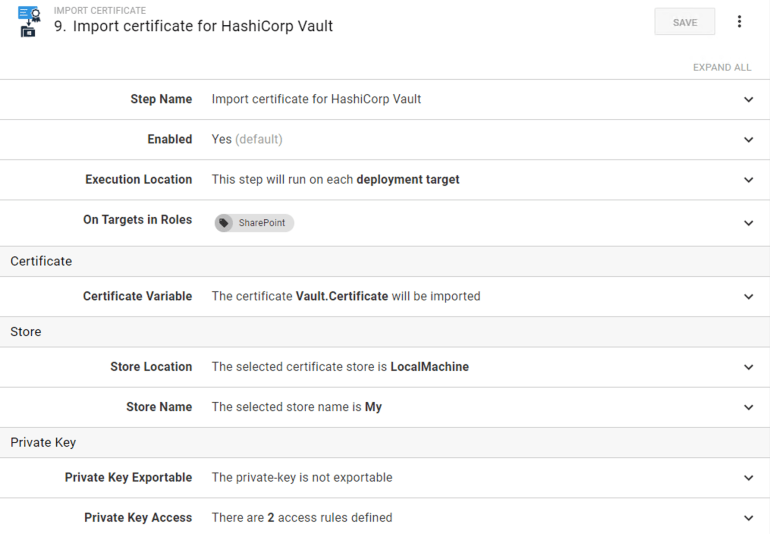
If you are lucky enough and your deployment is automated you can add one more build step in your deployment process that ensures that certificate is provisioned on all target machines. Octopus Deploy is one of such tools that provides built-in template for certificate provisioning. (BTW, it is free for small teams starting from Sept 2, 2019)
importcert.png

On the screenshot you see the step that imports certificate on all target machines with tag SharePoint (in my case) to LocalMachine certificate store to My/Personal store, mark private-key as not exportable and provide access to private key to 2 service accounts.

If your deployment is not automated, you may script the same steps using PowerShell and run it on all machines.


#Import certificate to local machine personal folder
$root = Set-Location -PassThru $PSScriptRoot
$cert = Get-ChildItem -Path $root | where {$_.Extension -like "*.pfx"}
$PlainTextPass = Read-Host -Prompt "Type .pfx password for '$cert' certificate"
$pfxpass = $PlainTextPass | ConvertTo-SecureString -AsPlainText -Force
$cert = $cert | Import-PfxCertificate -CertStoreLocation Cert:\LocalMachine\My -Exportable -Password $pfxpass
Write-Host "Certificate is imported"
#Grant permission to selected account on private key and MachineKeys folder
$fileName = $cert.PrivateKey.CspKeyContainerInfo.UniqueKeyContainerName
$path = "$env:ALLUSERSPROFILE\Microsoft\Crypto\RSA\MachineKeys\$fileName"
function SetPermissions([string[]]$accountNames)
{
$acl = Get-Acl -Path $path
# Add the new user and preserve all current permissions: SetAccessRuleProtection(False, X)
# Add the new user and remove all inherited permissions: SetAccessRuleProtection(True, False)
# Add the new user and convert all inherited permissions to explicit permissions: SetAccessRuleProtection(True, True)
$acl.SetAccessRuleProtection($True, $False)
foreach ($accountName in $accountNames) {
$rule = New-Object System.Security.AccessControl.FileSystemAccessRule($accountName,"Full","Allow")
$acl.AddAccessRule($rule)
}
Set-Acl -Path $path -AclObject $acl
Write-Host "Access to certificate is granted for $accountNames"
}
SetPermissions(@(
"[email protected]",
"[email protected]"
))

If you are brave, you can click it even manually! 🙈

  1. Double click on vault.pfx file and choose LocalMachine store location

    store.png
  2. Click Next, Next and type password used during *.pfx creation and Next again.
  3. Choose Personal certificate store.
    EPAM_Laptop
  4. Click Next, Finish, OK – your certificated in the store!
  5. Execute mmc (Microsoft Managed Console) from start menu.
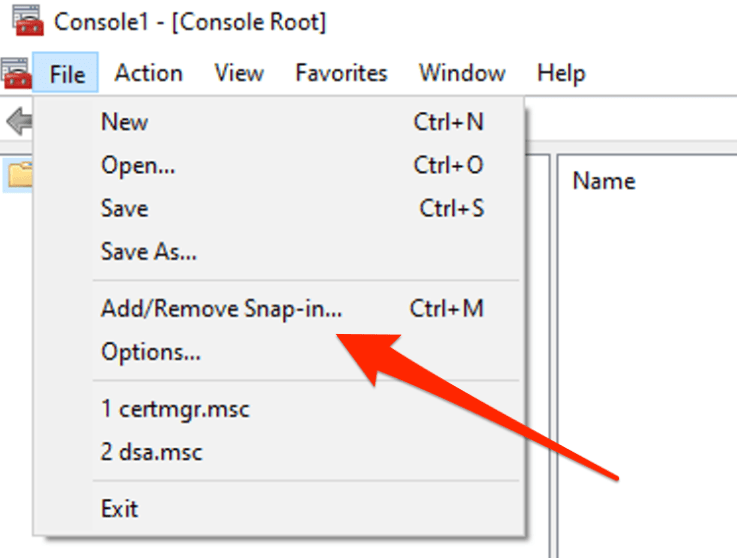
  6. File -> Add/Remove Snap-in …
    addmmc.png
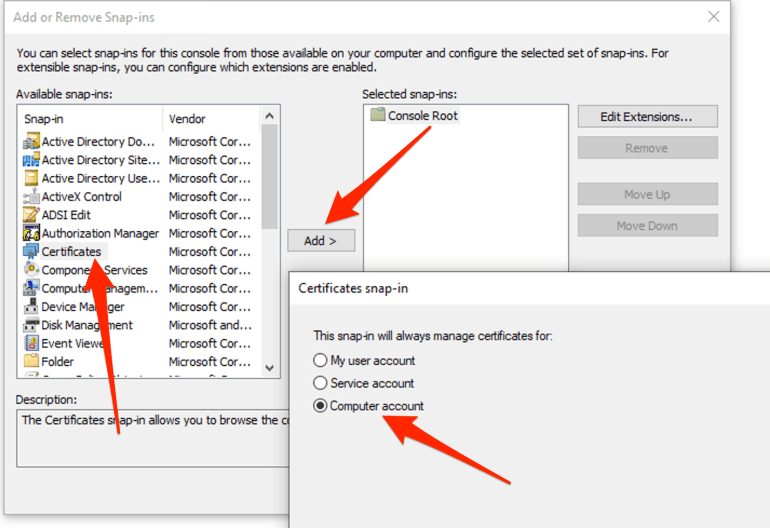
  7. Certificate, Add, Computer account and click Next & Ok
    certaddacc.png
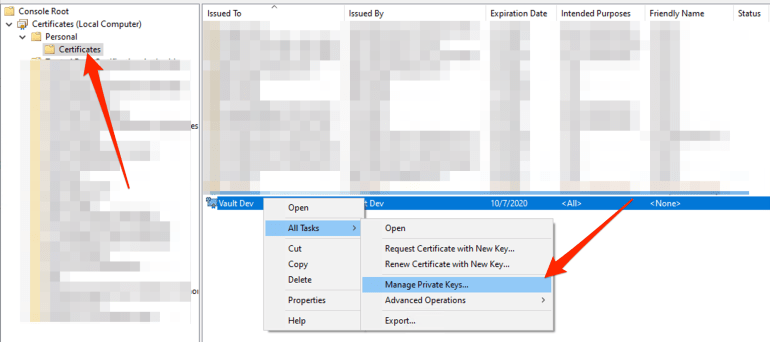
  8. Find our certificate and click Manage Private Keys…
    prk.png
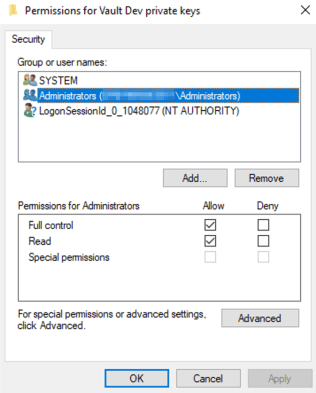
  9. On this screen you can manage the list of accounts that will be able to  use this certificate for authentication on the current machine.
    acl.png

.NET client application

Vault is ready, machine is ready (service account / current user is allowed to use certificate from the LocalMachine/Personal store).  Few lines of code are separating us from success 😊.

I will use VaultSharp NuGet Package. It is more or less up to date, it supports namespaces feature and starting from next release usage of namespaces will become even more intuitive.


using System;
using System.Collections.Generic;
using System.Data;
using System.Linq;
using System.Threading.Tasks;
using System.Security.Cryptography.X509Certificates;
using VaultSharp;
using VaultSharp.V1.AuthMethods.Cert;
namespace SergeyTihon.App.Configuration
{
public class VaultSecretProvider
{
public VaultSecretProvider(string vaultUrl, string vaultNamespace, string certificateThumbprint)
{
var clientCertificate = GetCertificate(certificateThumbprint);
var authMethod = new CertAuthMethodInfo(clientCertificate);
_vaultClient = new VaultClient(new VaultClientSettings(vaultUrl, authMethod)
{
BeforeApiRequestAction = (httpClient, httpRequestMessage) =>
{
httpRequestMessage.Headers.Add("X-Vault-Namespace", vaultNamespace);
}
});
}
public static X509Certificate2 GetCertificate(string certThumbprint)
{
var store = new X509Store(StoreName.My, StoreLocation.LocalMachine);
store.Open(OpenFlags.ReadOnly);
var certCollection = store.Certificates;
// Find unexpired certificates.
var currentCerts = certCollection.Find(X509FindType.FindByTimeValid, DateTime.Now, false);
// From the collection of unexpired certificates, find the ones with the correct thumbprint.
var signingCert = currentCerts.Find(X509FindType.FindByThumbprint, certThumbprint, false);
// Return the first certificate in the collection, has the right name and is current.
var cert = signingCert.OfType<X509Certificate2>().OrderByDescending(c => c.NotBefore).FirstOrDefault();
store.Close();
if (cert is null)
{
throw new DataException($"Cannot find valid certificate with thumbprint {certThumbprint}");
}
return cert;
}
private readonly VaultClient _vaultClient;
public async Task<Dictionary<string, object>> GetValue(string path, string mountPoint)
{
var secret = await _vaultClient.V1.Secrets.KeyValue.V1.ReadSecretAsync(path, mountPoint);
return secret.Data;
}
}
}

VaultSecretProvider find X509 certificate in StoreName.My / StoreLocation.LocalMachine, then create CertAuthMethodInfo using certificate and VaultClient that X-Vault-Namespace header to each request with vaultNamespace name.

Using configured instance of VaultClient we can request our secret from Vault _vaultClient.V1.Secrets.KeyValue.V1.ReadSecretAsync(path, mountPoint) specifying path to the secret and mountPoint (name of secret engine).

We are ready to call and receive secrets


new VaultSecretProvider(
"https://my.server.com:8200&quot;, // VAULT_ADDR
"dev/my-team", // VAULT_NAMESPACE
"877501d5a018e9344088fd5c89580f6b095f5326" // vault.pfx certificate thumbprint
).GetValue("my-secret", "kv") // path to the secret – vault write kv/my-secret value="s3c(eT"

Conclusion

Wow, this became a long read, but I hope it was a good one.

TLS certificate authenctication in Vault is a good option for apps that uses Full .NET Framework and runs inside Windows Server VMs.

Just do not forget renew/replace certificates regularly.
Be better WPF / MvvmLight developer in 2018

It is 2018, the time of .NET Core, x-plat, clouds, microservices, blockchain and shine of JavaScript. But, there are guys, like me, who still maintain and sometimes develop classic  .NET desktop applications for Windows.

I am not a WPF expert, but I spent a couple of days reviewing, testing and fixing one of our desktop apps and I definitely learned a couple of new tips & tricks that worth to share with other non-experts.

Part #1: General Tips

Tip #1.1: Choose right library/framework

It happened that we use MvvmLight. The library is lightweight and already exists for almost 10 years, MVVM pattern is well-known and lets us keep solution code reasonably well-structured.

But this is definitely not the only choice, there are many other different-purpose libraries and frameworks that may suit you better, especially if you do green-field development. So choose carefully:

Tip #1.2: Distribute using Squirrel.Windows

Installers always were hard, the seamless auto-update process is even harder. But, today, we have the solution that works for simple user-oriented applications that don’t do crazy things during installation. This solution is Squirrel.Windows – an installation and update framework for Windows desktop apps, designed for C# apps.

It’s definitely worth to learn it once and use it for all apps that you develop.

Tip #1.3: Think about monitoring

Aggregated analytics from user’s machine is priceless for successful apps. There are plenty amount of data that can help you deliver better apps:

  1. Crash reports
  2. Application version distribution
  3. User’s count / Active user
  4. Performance / Integrations tracking
  5. Custom events / Logs

It is not always possible to collect all kinds of data from user’s machine, but do it if you can. There are a couple of services that may help you, like Application Insights, HockeyApp and others.

Tip #1.4: Use the full power of IDE

Learn tools that MS baked for you and use them

Tip #1.5: Debug Data Binding Issues

When data bindings do not play nice you have a possibility to debug. It is not super intuitive, but there are ways to step into the binding process to better figure out what is actually going on. Check this nice article from Mike Woelmer – How To Debug Data Binding Issues in WPF 

Part #2: MVVM Light – Code Tips

C# quickly evolves over time, more and more features become available to us. It is not always obvious how to use new async code with an old API.

Tip #2.1: “New” INotifyPropertyChanged syntax

I think almost any WPF developer knows how to implement INotifyPropertyChanged interface

public class MyViewModel : INotifyPropertyChanged
{
    private string _isBusy;
    public event PropertyChangedEventHandler PropertyChanged;

    public MyViewModel() {}

    public string IsBusy
    {
        get { return _isBusy; }
        set
        {
            _isBusy = value;
            OnPropertyChanged("IsBusy");
        }
    }

    protected void OnPropertyChanged(string name)
    {
        if (PropertyChanged == null)
            return;
        PropertyChanged(this,
            new PropertyChangedEventArgs(name))
    }
}

Using MVVM Light you can do way shorter (such syntax probably exists for a while, but I discovered it only recently)

public class MyViewModel : ViewModelBase
{
    public MyViewModel() {}

    private string _isBusy;
    public string IsBusy
    {
        get => _isBusy;
        set { Set(() => IsBusy, ref _isBusy, value) }
    }
}

All property change events will happen under the hood of Set method. Also, Set method returns true when the value changed so you can use it to do additional actions on property change.

private string _isBusy;
public string IsBusy
{
    get => _isBusy;
    set {
        if (Set(() => IsBusy, ref _isBusy, value)) {
        // Do whatever you need on update
        }
    }
}

Update from Chris Jobson:

There are overloads that allow us to omit first argument – propertyExpression. In this case [CallerMemberName] will be used as the property name, so the code will be even shorter. Not bad for 2018 =)

private string _isBusy;
public string IsBusy
{
    get => _isBusy;
    set => Set(ref _isBusy, value);
}

Tip #2.2: Async to Action glue

C# async was designed to be better compatible with old APIs and consume Action or delegate. Also, it is one of the reasons why async void exists in the language, but we should always use async Task in our own code.

Two following casts are valid

Action task = async () => await Task.Yield();
Func task2 = async () => await Task.Yield();

Read “Do async lambdas return Tasks?” to better understand what’s actually going on here. It means that you can pass your async method as Action to RelayCommand.

new RelayCommand(async() => await Download());

TBH, you should use it like this (explanation in the next tip)

new RelayCommand(async() => await Download(), keepTargetAlive:true);

Tip #2.3: Do not use lambdas with RelayCommand

Lambdas as a parameter for RelayCommand is a bad idea unless you know what can go wrong and use the latest version of MvvmLight.

Actually, I have spent almost 2 days of my life to figure out why at some point of time several buttons in our application stopped working, even though all commands defined in the ViewModel are read-only and assigned once in the constructor.

We had simple commands that do some trivial actions on click, so the developer decided to use lambda in command declaration to save space and simplify the code.

new RelayCommand(() => IsBusy = true);

The code looks simple and correct, but RelayCommand under the hood stores only weak reference to the delegate and any GC cycle can recycle local lambda function. So at some point in time (after next cycle of GC) RelayCommand may not find delegate to call and nothing will happen after the click. For a deeper analysis of this behavior, you can read “RelayCommands and WeakFuncs“.

At the time of writing this post, the issues in MvvmLight library were fixed (Using RelayCommand and Messenger (and WeakAction) with closures) and released in version 5.4.1. But fix does not apply by default.

If you really want to use lambdas with RelayCommandMessenger you should manually set keepTargetAlive:true (false by default), but probably better do not use them at all.

new RelayCommand(() => IsBusy = true, keepTargetAlive:true);

P.S. Worth to mention that Laurent Bugnion has the course on Pluralsight “MVVM Light Toolkit Fundamentals” that provides detailed MVVM Light overview.

IIS hosted products (Office Online Server) monitoring with Application Insights Status Monitor

There are some cases when you host and/or maintain 3rd-party .NET products in IIS and logs are not enough to understand the importance of some issues and find root causes. You may need the high-level view of what’s actually going on live.

Fortunately, Microsoft has a tool called Application Insights Status Monitor that can help you to instrument your IIS site with required configs to start collecting telemetry data into Application Insights.

There are blog posts like “Configure an IIS Server To Use Application Insight” that already provide step by step guide on how to use the tool.

In this post, I want to go one step further and share some tips on how to use it for Microsoft products. So here you can find extra steps which you may need during setup on Office Online Server, but I guess that you can do the same with on-premise SharePoint farm as well.

Configure Telemetry for Office Online Server

  1. Create a new instance of Application Insights
  2. Install Application Insight Status Monitor on machines with Office Online Server. You can do it using the direct link http://go.microsoft.com/fwlink/?LinkID=506648 that will run installation using Web Platform Installer.
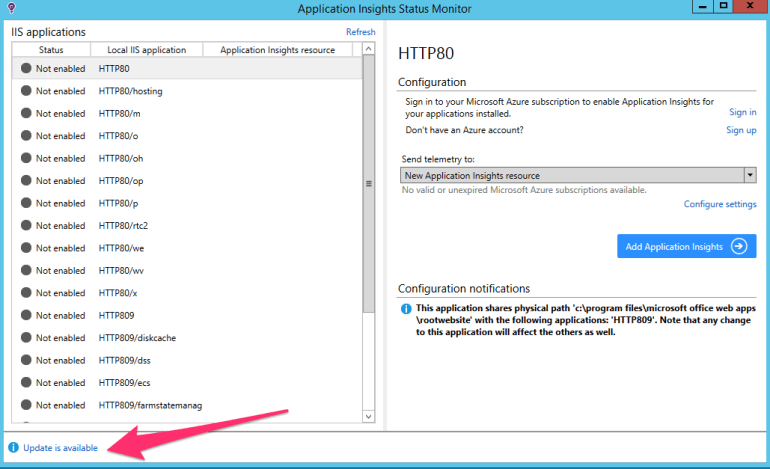
  3. Download update (the latest SDK version from NuGet). Click “Update is available” and then “Install Update”.EPAM_Laptop.png
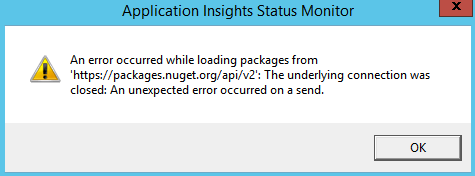
    You may see an error message that app cannot download new SDK from NuGet
    EPAM_Laptop.png
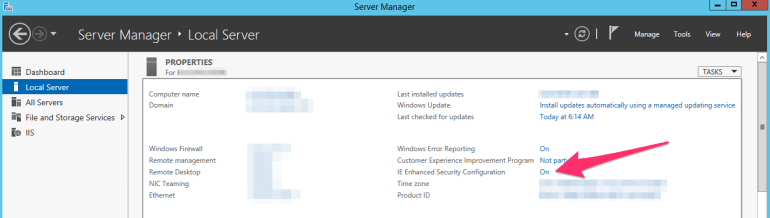
    This can mean that IE Enhanced Security Configuration is enabled on your server, in this case, you need to temporarily turn it off:

    1. Open Server Manager
    2. Go to Local Server, find “IE Enhanced Security Configuration” and turn it off.
      Do not forget to turn it on again when you finish this guide!EPAM_Laptop.png
  4. Sign in using your Azure account
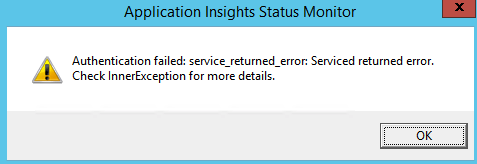
    1. Your sign in flow may end with error “Authentication failed: service_returned_error: Service returned error. Check InnerException for more details
      EPAM_Laptop.png
    2. Go to Event Viewer\Windows Logs\System. If you see Errors from Schannel with a message like “A fatal error occurred while creating an SSL client credential. The internal error state is 10013.” then it is System-wide crypto issue and you need to allow “Use FIPS compliant algorithms for encryption, hashing, and signing” and try to sign in again.
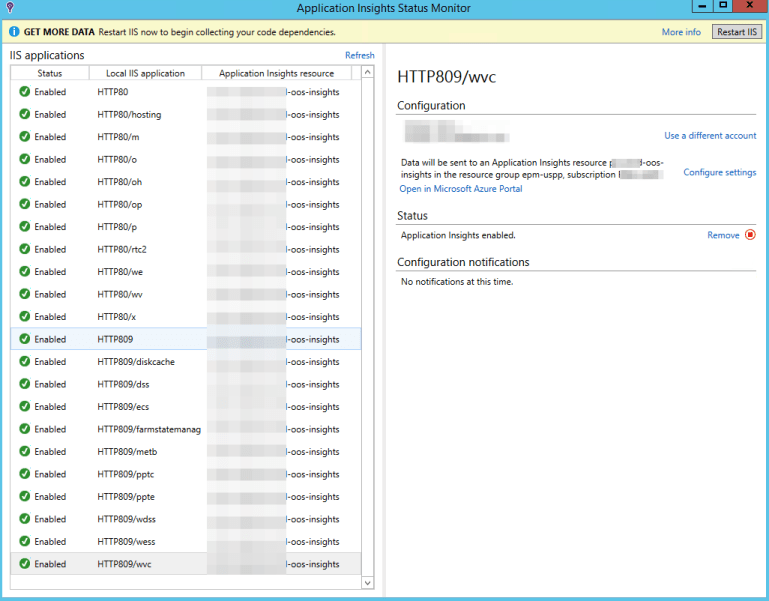
  5. Configure each IIS application to send telemetry to Application Insights resource created in step 1.
    EPAM_Laptop.png
  6. Restart IIS from the Status Monitor app to start collecting telemetry data.
  7. Wait for some time to collect enough data to analyze (for example one day).
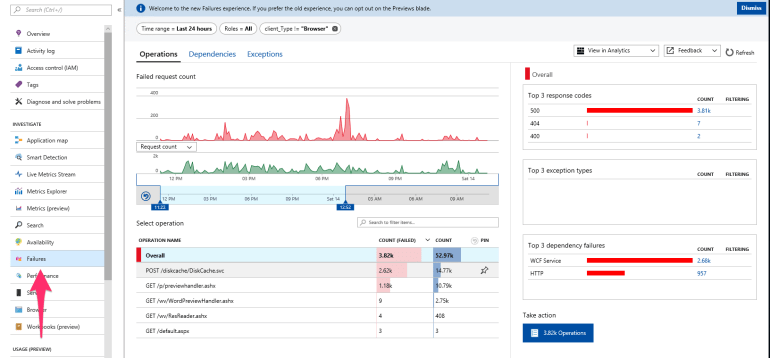
  8. After that, you can start digging deeper into collected stats to better understand what’s actually going on.
    EPAM_Laptop.png
  9. Turn on IE Enhanced Security Configuration.

Performance Counters Note: Actually Application Insights Status Monitor does two simple things: updates web.config to incorporate Application Insights and puts ApplicationInsights.config beside with configuration. By default, it is configured to collect data from performance counters, but it may not work if your Application Pool is running under an account that does not have permissions to access performance counters. Note, that in this case, you have to add App Pool account to Performance Monitor Users group. Read more.

How to restore Visual Studio 2015 after the Update 1 (dependency dance)

Update 12/11/2015: Two issues were opened as a result of investigation “Installing the fsharp power tools before installing adding VS2015 update 1 breaks Roslyn” in Visual F# Power Tools repository and “We read some settings from the devenv.exe.config file — devenv.exe.config is not user mutable” in Visual F# repository.

This post is prepared especially to save F# Advent Calendar in English 2015 schedule.

Short version of the fix posted on Stack Overflow.

Note: Described fix is not permanent, VS may reset your changes in devenv.exe.config file after the new extensions install/update.

Yesterday Microsoft released the first update to Visual Studio 2015 that contains some pretty cool features and improvements, but this update has broken “some” machines.

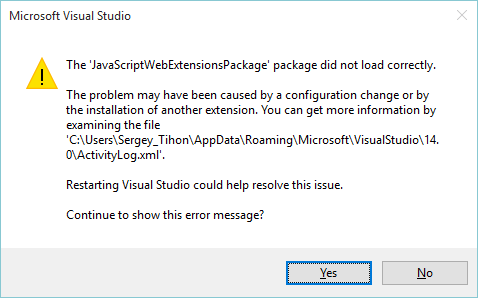
During the first run after the update, you may see errors like this one:

VSexception

or even NullReferenceException when you try to open the list of installed extensions

In order to fix all this stuff you need to check ActivityLog.xml file (c:\Users\{user_name}\AppData\Roaming\Microsoft\VisualStudio\14.0\) and find the exact error message. Most probably, you will see something like this

SetSite failed for package [CSharpPackage][Could not load file or assembly ‘System.Collections.Immutable, Version=1.1.36.0, Culture=neutral, PublicKeyToken=b03f5f7f11d50a3a’ or one of its dependencies. The located assembly’s manifest definition does not match the assembly reference. (Exception from HRESULT: 0x80131040)]:{ at Microsoft.VisualStudio.LanguageServices.Implementation.LanguageService.AbstractPackage`2.Initialize() at Microsoft.VisualStudio.LanguageServices.CSharp.LanguageService.CSharpPackage.Initialize() at Microsoft.VisualStudio.Shell.Package.Microsoft.VisualStudio.Shell.Interop.IVsPackage.SetSite(IServiceProvider sp)}

This error says that bindingRedirect set up incorrectly for VS process. You need to find file devenv.exe.config in c:\Users\{user_name}\AppData\Local\Microsoft\VisualStudio\14.0\ and update it. (Or c:\Program Files (x86)\Microsoft Visual Studio 14.0\Common7\IDE\, depending of location of your devenv.exe file).

For this particular case, you should find rows that setup redirects for System.Collections.Immutable and change newVersion from 1.1.36.0 to 1.1.37.0. Final config should look like this

&lt;dependentAssembly&gt;
  &lt;assemblyIdentity name="System.Collections.Immutable" publicKeyToken="b03f5f7f11d50a3a" culture="neutral"/&gt;
  &lt;bindingRedirect oldVersion="1.0.27.0-1.1.65535.65535" newVersion="1.1.37.0"/&gt;
&lt;/dependentAssembly&gt;

After this fix, I was able to load my IDE and setup latest version of Azure SDK 2.8.1 that reset my changes in .config file and I needed to fix it once again.

Everything was OK, until I have tried to open my web project. This time it crashed with the following error in ActiveLog.xml:

SetSite failed for package [JavaScriptWebExtensionsPackage][Could not load file or assembly &apos;Microsoft.VisualStudio.ProjectSystem.V14Only, Version=14.0.0.0, Culture=neutral, PublicKeyToken=b03f5f7f11d50a3a&apos; or one of its dependencies. The located assembly&apos;s manifest definition does not match the assembly reference. (Exception from HRESULT: 0x80131040)]:{   at Microsoft.VisualStudio.Html.Package.Utilities.ProjectUtilities.IsImmersiveProject(IVsHierarchy hierarchy)   at Microsoft.VisualStudio.Html.Package.Project.WebProjectServices.IsWebProject(IVsHierarchy hierarchy)   at Microsoft.VisualStudio.Html.Package.Project.WebProjectServices.AdviseProject(IVsHierarchy hierarchy)   at Microsoft.VisualStudio.Html.Package.Project.WebProjectServices.AdviseOpenedProjects(IVsSolution solution)   at Microsoft.VisualStudio.Html.Package.Project.WebProjectServices.HookGlobalEvents()   at Microsoft.VisualStudio.Html.Package.Project.WebProjectServices.Microsoft.VisualStudio.Html.Package.Project.IWebProjectServices.get_OpenedProjects()   at Microsoft.VisualStudio.JavaScript.Web.Extensions.ReferenceAutoSync.ProjectServices.Initialize()   at Microsoft.VisualStudio.JavaScript.Web.Extensions.ReferenceAutoSync.ProjectServices..ctor()   at Microsoft.VisualStudio.JavaScript.Web.Extensions.JavaScriptWebExtensionsPackage.Initialize()   at Microsoft.VisualStudio.Shell.Package.Microsoft.VisualStudio.Shell.Interop.IVsPackage.SetSite(IServiceProvider sp)}

After the search on C:\ drive for Microsoft.VisualStudio.ProjectSystem.V14Only.dll I realized that my machine has version 14.1.0.0 instead of 14.0.0.0. So it looks like we need to add one more redirect in devenv.exe.config.

&lt;dependentAssembly&gt;
  &lt;assemblyIdentity name="Microsoft.VisualStudio.ProjectSystem.V14Only" publicKeyToken="b03f5f7f11d50a3a" culture="neutral"/&gt;
  &lt;bindingRedirect oldVersion="14.0.0.0" newVersion="14.1.0.0"/&gt;
&lt;/dependentAssembly&gt;

After these fixes, I have not seen any other errors on my machine (at least for now). I hope that you understand the core idea on how to troubleshoot and fix such errors. So good luck to you and VS team with dependency fighting.

P.S. One more useful advice that can save you time – try to clear Component Model Cache if things start going wrong.

F# Neural Networks with FsLab

nn_previewNeural networks are very powerful tool and at the same time, it is not easy to use all its power. Now we are one step closer to it from F# and .NET. We will delegate model training to R using R Provider. Also we will use Deedle (that was announced some days ago) for handy data manipulation.
Prerequisites:

Learning from Data:

First of all, we need to load required assemblies into our FSI session. It is pretty easy with FsLab because package have bootstrapping script.

#load "..\packages\FsLab.0.1.4\FsLab.fsx"

The next step is to download and install missed R packages. For this demo, we need neuralnet for training neural network model and prediction, caret for data visualization.

open RProvider.utils
R.install_packages("MASS")
R.install_packages("pbkrtest")
R.install_packages("lattice")
R.install_packages("Matrix")
R.install_packages("mgcv")
R.install_packages("grid")
R.install_packages("neuralnet")
R.install_packages("caret")
R.install_packages("zoo")

Now we are ready to start work. We need to open namespaces and load a data set. For this demo, we have chosen iris data set, which is classic for lots of demos.

open Deedle
open RDotNet
open RProvider
open RProvider.``base``
open RProvider.datasets
open RProvider.neuralnet
open RProvider.caret

let iris : Frame<int, string> = R.iris.GetValue()

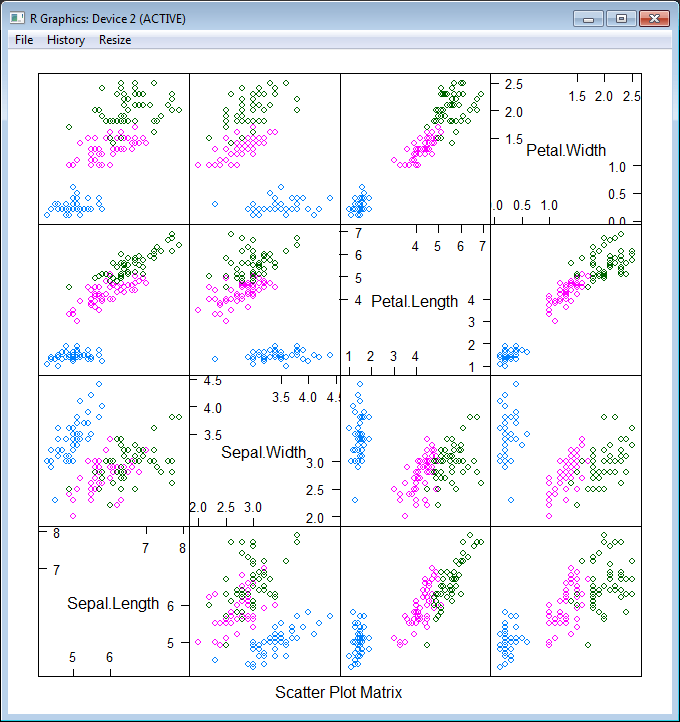
To better understand what we are going to do, let’s plot this data set. First of all, split data into two parts: features (Sepal.Length; Sepal.Width; Petal.Length; Petal.Width) and a target variable (Species). After that plot these data into different dimensions (different colors represent different Species).

let features =
iris
|> Frame.filterCols (fun c _ -> c <> "Species")
|> Frame.mapColValues (fun c -> c.As<double>())
let targets =
R.as_factor(iris.Columns.["Species"])

R.featurePlot(x = features, y = targets, plot = "pairs")

nn_features

As you see, our task is not trivial – we have 3 classes instead of 2 (that is not classic situation) and classes are not clearly separable. Nevertheless let’s try!  First of all, we need to split our data into 2 parts – training and testing data sets (70% vs 30%). The first part will be sent to the neural network for learning, the second one will be used for measuring model quality. Also let’s shuffle data to be honest.

iris.ReplaceColumn("Species", targets.AsNumeric())
let range = [1..iris.RowCount]
let trainingIdxs : int[] = R.sample(range, iris.RowCount*7/10).GetValue()
let testingIdxs : int[] = R.setdiff(range, trainingIdxs).GetValue()
let trainingSet = iris.Rows.[trainingIdxs]
let testingSet = iris.Rows.[testingIdxs]

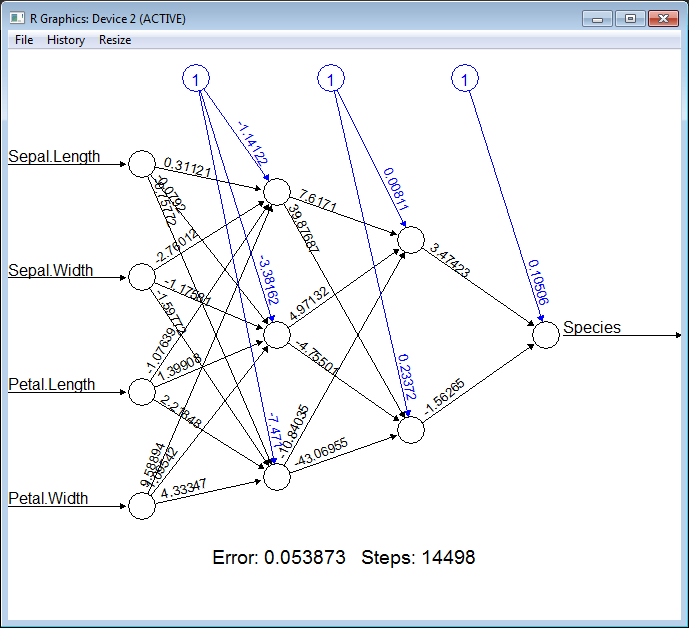
Now we are ready to train a neural network, all we need is to provide a formula (specify what is the input for our model and what is the output) “Species ~ Sepal.Length + Sepal.Width + Petal.Length + Petal.Width”, provide a data set and specify the structure of hidden layers. In the following example, we will train the network with two layers of hidden nodes, the first layer with 3 nodes and the second layer with 2 nodes.

let nn =
R.neuralnet(
"Species ~ Sepal.Length + Sepal.Width + Petal.Length + Petal.Width",
data = trainingSet, hidden = R.c(3,2),
err_fct = "ce", linear_output = true)

// Plot the resulting neural network with coefficients
R.eval(R.parse(text="library(grid)"))
R.plot_nn nn

nn_network

Cool! How simple it is. To be able to measure quality of the classification we need to split our training set into features and targets.

let testingFeatures =
testingSet
|> Frame.filterCols (fun c _ -> c <> "Species")
|> Frame.mapColValues (fun c -> c.As<double>())
let testingTargets =
testingSet.Columns.["Species"].As<int>().Values

To execute the neural network on the new data (apply our classification) we should call R.compute method and pass the training data set there.

let prediction =
R.compute(nn, testingFeatures)
.AsList().["net.result"].AsVector()
|> Seq.cast<double>
|> Seq.map (round >> int))

Finally, let’s compare prediction results with testing values:

let misclassified =
Seq.zip prediction testingTargets
|> Seq.filter (fun (a,b) -> a<>b)
|> Seq.length

printfn "Misclassified irises '%d' of '%d'" misclassified (testingSet.RowCount)

If you execute all these steps one by one, you will see that there are only ~3 misclassifies of 45 samples. Pretty well quality.

Full script:

#load "..\packages\FsLab.0.1.4\FsLab.fsx"

// You need to install 'nnet' and 'caret' packages if you do not have them
open RProvider.utils
R.install_packages("MASS")
R.install_packages("pbkrtest")
R.install_packages("lattice")
R.install_packages("Matrix")
R.install_packages("mgcv")
R.install_packages("grid")
R.install_packages("neuralnet")
R.install_packages("caret")
R.install_packages("zoo")

open Deedle
open RDotNet
open RProvider
open RProvider.``base``
open RProvider.datasets
open RProvider.neuralnet
open RProvider.caret

// Load data from R to Deedle frame
let iris : Frame<int, string> = R.iris.GetValue()

// Observe iris data set
let features =
iris
|> Frame.filterCols (fun c _ -> c <> "Species")
|> Frame.mapColValues (fun c -> c.As<double>())
let targets =
R.as_factor(iris.Columns.["Species"])

R.featurePlot(x = features, y = targets, plot = "pairs")

iris.ReplaceColumn("Species", targets.AsNumeric())
// Split data to training and testing sets (70% vs 30%)
let range = [1..iris.RowCount]
let trainingIdxs : int[] = R.sample(range, iris.RowCount*7/10).GetValue()
let testingIdxs : int[] = R.setdiff(range, trainingIdxs).GetValue()
let trainingSet = iris.Rows.[trainingIdxs]
let testingSet = iris.Rows.[testingIdxs]

// Train neural network
let nn =
R.neuralnet(
"Species ~ Sepal.Length + Sepal.Width + Petal.Length + Petal.Width",
data = trainingSet, hidden = R.c(3,2),
err_fct = "ce", linear_output = true)

// Plot the resulting neural network with coefficients
R.eval(R.parse(text="library(grid)"))
R.plot_nn nn

// Split testing set into features and targets
let testingFeatures =
testingSet
|> Frame.filterCols (fun c _ -> c <> "Species")
|> Frame.mapColValues (fun c -> c.As<double>())
let testingTargets =
testingSet.Columns.["Species"].As<int>().Values

// Predict `Species` for testingFeatures with neural network
let prediction =
R.compute(nn, testingFeatures)
.AsList().["net.result"].AsVector()
|> Seq.cast<double>
|> Seq.map (round >> int))

// Calculate number of misclassified irises
let misclassified =
Seq.zip prediction testingTargets
|> Seq.filter (fun (a,b) -> a<>b)
|> Seq.length

printfn "Misclassified irises '%d' of '%d'" misclassified (testingSet.RowCount)

P.S.

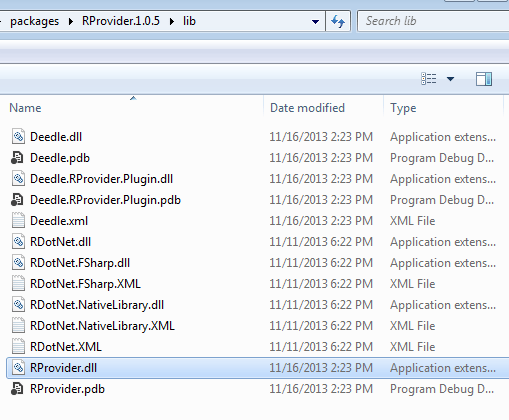
Notice, if you have problems with bootstrapping RProvider and/or converting R data frame to Deedle data frames – you need to verify that during installation of NuGet packages, all assemblies have been copied to RProvider’s lib sub-folder (see in the following picture).

deedle_rprovider

SuperSDG2: The maze game (С++ & OpenGL)

I have found that I have a large set of interesting and maybe sometimes useful applications. I have been programming for 14 years, I started from Pascal and tried Delphi, C++, Java, Perl, Clipper, FoxPro, Lua , JavaScript, C#, Octave, Python, Scala, R, F# (and may be something else that I currently do not remember). Through the years I created set of programs that may be interesting for someone else. These programs may look simple for experts, but I hope that they can be useful for beginners. So, I would like to add a new rubric to my blog, called “Apps”, where I will try to collect and share as much as I can find)

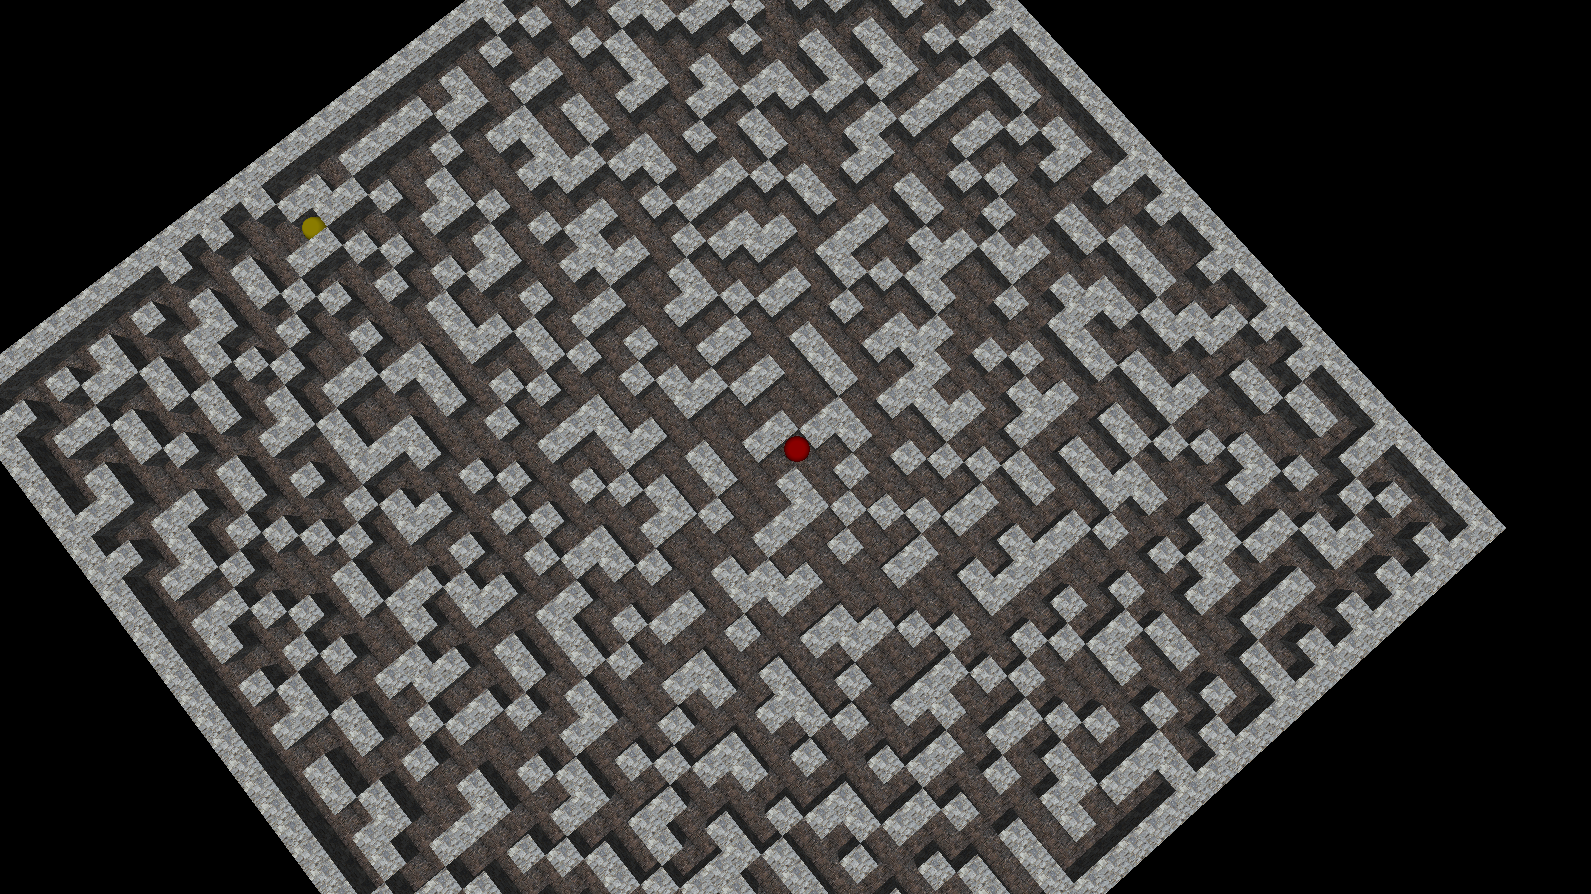
This post is about second version of the small maze game that called SuperSDG2, which was created in 2005 using C++, OpenGL(glut32) and a bit of passion. In the game, you are a lonely red ball in the large terrible maze. Your only wish is to find an exit from the random-generated maze. It is strange, but exit is a  yellow ball ;). The source code and binaries of this application are available on GitHub.

Control keys:

  • Left/Right/Up/Down – move actions
  • A/S – rotate camera
  • Z/X – up/down camera
  • R – reset camera position
  • Esc/Q – exit

Feel free to download binaries, play and modify the source code.

SuperSD2_1

SuperSD2_2

/********************************
* SuperSDG v2.2 release
* Copyright (c) 2002-2008 Ravent
* All rights reserved
*********************************/
#pragma comment (lib,"glut32.lib")
#pragma comment (lib,"glaux.lib")

#include "glaux.h"
#include "glut.h"
#include <stdio.h>
#include <stdlib.h>
#include <conio.h>
#define _USE_MATH_DEFINES
#include <math.h>
#include <time.h>

const int sMax=6, m=40, mm=m+1, direction_parts=36;
int cur_direction=0;
double distance=4.;

unsigned textureId = -1, texFloor = -1;
AUX_RGBImageRec *localTexture = NULL, *localFloor = NULL;
int glWin,pathLen,myLen=0;

struct Tpos
{char x,y;};
struct Player
{
    int x,y,z;
    int dx,dz;
    bool isGo;
}player,ex;

struct Maps
{int x,z;} map;

char data[m+2][m+2], cp[m+2][m+2];

float	lightAmb [] = { 0.03, 0.03, 0.03 };
float	lightDif [] = { 0.95, 0.95, 0.95 };
float	lightPos [] = { (int)m/2,  7,  (int)m/2 };

void display(void);
void halt(bool f=false);

void drawFloor(GLfloat x1, GLfloat x2, GLfloat z1, GLfloat z2, unsigned texture=texFloor)
{
    glBindTexture ( GL_TEXTURE_2D, texture );
    glBegin(GL_POLYGON);
        glNormal3f( 0.0, 1.0, 0.0);
        glTexCoord2f(0,0);
        glVertex3f( x1, 0, z2 );
        glTexCoord2f(1,0);
        glVertex3f( x2, 0, z2 );
        glTexCoord2f(1,1);
        glVertex3f( x2, 0, z1 );
        glTexCoord2f(0,1);
        glVertex3f( x1, 0, z1 );
    glEnd();

}

void drawBox (GLint j, GLint i, unsigned texture=textureId)
{
    GLfloat x1=i, x2=i+1, y1=0, y2=1, z1=j, z2=j+1;
    glBindTexture ( GL_TEXTURE_2D, texture );

    if ((j==map.z+1)||(data[j-1][i]!='x'))
    {
    glBegin(GL_POLYGON); // Back
        glNormal3f( 0.0, 0.0, -1.0);
        glTexCoord2f(0,0);
        glVertex3f( x2, y1, z1 );
        glTexCoord2f(1,0);
        glVertex3f( x1, y1, z1 );
        glTexCoord2f(1,1);
        glVertex3f( x1, y2, z1 );
        glTexCoord2f(0,1);
        glVertex3f( x2, y2, z1 );
    glEnd();
    }
    if ((j==map.z-1)||(data[j+1][i]!='x'))
    {
    glBegin(GL_POLYGON); // Front
        glNormal3f( 0.0, 0.0, 1.0);
        glTexCoord2f(0,0);
        glVertex3f( x1, y1, z2 );
        glTexCoord2f(1,0);
        glVertex3f( x2, y1, z2 );
        glTexCoord2f(1,1);
        glVertex3f( x2, y2, z2 );
        glTexCoord2f(0,1);
        glVertex3f( x1, y2, z2 );
    glEnd();
    }
    if ((i>0)&&(data[j][i-1]!='x'))
    {
    glBegin(GL_POLYGON); // Left
        glNormal3f( -1.0, 0.0, 0.0);
        glTexCoord2f(0,0);
        glVertex3f( x1, y1, z1 );
        glTexCoord2f(1,0);
        glVertex3f( x1, y1, z2 );
        glTexCoord2f(1,1);
        glVertex3f( x1, y2, z2 );
        glTexCoord2f(0,1);
        glVertex3f( x1, y2, z1 );
    glEnd();
    }
    if ((i<map.x)&&(data[j][i+1]!='x'))
    {
    glBegin(GL_POLYGON); // Right
        glNormal3f( 1.0, 0.0, 0.0);
        glTexCoord2f(0,0);
        glVertex3f( x2, y1, z2 );
        glTexCoord2f(1,0);
        glVertex3f( x2, y1, z1 );
        glTexCoord2f(1,1);
        glVertex3f( x2, y2, z1 );
        glTexCoord2f(0,1);
        glVertex3f( x2, y2, z2 );
    glEnd();
    }
    glBegin(GL_POLYGON); // Top
        glNormal3f( 0.0, 1.0, 0.0);
        glTexCoord2f(0,0);
        glVertex3f( x1, y2, z2 );
        glTexCoord2f(1,0);
        glVertex3f( x2, y2, z2 );
        glTexCoord2f(1,1);
        glVertex3f( x2, y2, z1 );
        glTexCoord2f(0,1);
        glVertex3f( x1, y2, z1 );
    glEnd();
}

void animate()
{
    if ((player.x == ex.x)&&(player.z==ex.z))
    {
        halt(true);
    };
    if (player.isGo==true)
    {
        if (player.dx>0)	player.dx+=1; else
        if (player.dz>0)	player.dz+=1; else
        if (player.dx<0)	player.dx-=1; else
        if (player.dz<0)	player.dz-=1;
        if ((player.dx>=sMax)||(player.dz>=sMax))
        {
            player.isGo=false;
            if (player.dx>0)	player.x+=1;
            if (player.dz>0)	player.z+=1;
            player.dx=0; player.dz=0;
        }else
        if ((player.dx<=-sMax)||(player.dz<=-sMax))
        {
            player.isGo=false;
            if (player.dx<0)	player.x-=1;
            if (player.dz<0)	player.z-=1;
            player.dx=0; player.dz=0;
        }
    }
    glutPostRedisplay();
}

void init()
{
    glClearColor( 0.0, 0.0, 0.0, 1.0 );
    glEnable( GL_DEPTH_TEST );
    glEnable( GL_TEXTURE_2D );
    glEnable( GL_CULL_FACE );
    glPixelStorei ( GL_PACK_ALIGNMENT, 1 );
    glPixelStorei ( GL_UNPACK_ALIGNMENT, 1 );
    glShadeModel (GL_SMOOTH);
    glLightfv    ( GL_LIGHT0, GL_AMBIENT,  lightAmb );
    glLightfv    ( GL_LIGHT0, GL_DIFFUSE,  lightDif );
    //glLightfv    ( GL_LIGHT0, GL_POSITION, lightPos );
    glEnable ( GL_LIGHT0 );
    glEnable ( GL_LIGHTING );
    player.dx=0; player.dz=0; player.isGo=false;
    glEnable(GL_COLOR_MATERIAL);
}

void display()
{
    glClear( GL_COLOR_BUFFER_BIT | GL_DEPTH_BUFFER_BIT );

    glMatrixMode( GL_MODELVIEW );
    glLoadIdentity();
    gluLookAt(player.x+(1.0*player.dx/sMax)+0.5f+3*cos(M_PI_2+cur_direction/double(direction_parts)*2.*M_PI),player.y+distance,player.z+(1.0*player.dz/sMax)+0.5f+3*sin(M_PI_2+cur_direction/double(direction_parts)*2.*M_PI),
              player.x+(1.0*player.dx/sMax)+0.5f,player.y+0.5f,player.z+(1.0*player.dz/sMax)+0.5f,
              0,1,0);

    for (int i=0;i<map.x;i++)
        for (int j=0;j<map.z;j++)
            if (data[j][i] == 'x')
            {
                drawBox(j,i);
            } else {
                drawFloor(i,i+1,j,j+1);
            }

    glPushMatrix();
    glTranslatef ( player.x+(1.0*player.dx/sMax)+0.5f, player.y+0.5f, player.z+(1.0*player.dz/sMax)+0.5f);
    glColor3d(1,0,0);
    glutSolidSphere(0.5,100,100);
    glColor3d(1,1,1);
    glPopMatrix(); 

    glPushMatrix();
    glTranslatef ( ex.x +0.5f, ex.y+0.5f, ex.z+0.5f);
    glColor4d(1,1,0.,0.4);
    glutSolidSphere(0.5,100,100);
    glColor3d(1,1,1);
    glPopMatrix(); 

    glutSwapBuffers();
}

void reshape ( int w, int h )
{
    glViewport( 0, 0, (GLsizei)w, (GLsizei)h);
    glMatrixMode( GL_PROJECTION );
    glLoadIdentity();
    gluPerspective( 60.0, (GLfloat)w/(GLfloat)h, 1.0, 60.0);

    glMatrixMode( GL_MODELVIEW );
    glLoadIdentity();
    gluLookAt(0,0,25,0,0,0,0,1,0);
}

void key( unsigned char key, int x, int y)
{
    if ( key=='q' || key=='Q' || key == 27) halt(false);
    if ( key=='a' || key=='A' ) { cur_direction--; if (cur_direction<0) cur_direction+=direction_parts;}
    if ( key=='s' || key=='S' ) { cur_direction++; if (cur_direction==direction_parts) cur_direction=0;}
    if ((key=='z' || key=='Z') && (distance<58.) ) distance+=0.25;
    if ((key=='x' || key=='X') && (distance>3.) ) distance-=0.25;
    if ( key=='r' || key=='R' ) { cur_direction=0; distance=4.;}
}

const int move[4][2]={{-1,0},{0,-1},{1,0},{0,1}};
const int move_key[4] = {GLUT_KEY_UP, GLUT_KEY_LEFT, GLUT_KEY_DOWN, GLUT_KEY_RIGHT };
bool good_move(int z, int x){
    return (0<=z && 0<=x && z<map.z && x<map.x && data[z][x]!='x');
}

void keys( int key, int x, int y)
{
    if (player.isGo) return;
    int dir=int(((direction_parts-cur_direction-1)/double(direction_parts))*4.+0.5);
    for (int i=0; i<4; i++)
        if ( key == move_key[i] ) {
            int newz=player.z+move[(dir+i)%4][0];
            int newx=player.x+move[(dir+i)%4][1];
            if (good_move(newz,newx)) {
                player.isGo=true;
                player.dz+=move[(dir+i)%4][0];
                player.dx+=move[(dir+i)%4][1];
                myLen++;
            }
        }
}

void genMap(void);

int main (int argc, char** argv)
{
    genMap();
    glutInit(&argc,argv);
    glutInitDisplayMode( GLUT_DOUBLE | GLUT_RGB | GLUT_DEPTH );
    glutInitWindowSize(1024,768);

    glWin = glutCreateWindow("SuperSDG 2");
    init();

    glutDisplayFunc(display);
    glutReshapeFunc(reshape);
    glutKeyboardFunc(key);
    glutSpecialFunc(keys);
    glutIdleFunc(animate);

    localTexture = auxDIBImageLoad(L"1.bmp");
    glGenTextures (1,&textureId);
    glBindTexture (GL_TEXTURE_2D,textureId);
    glPixelStorei (GL_UNPACK_ALIGNMENT,1);
    glTexParameteri (GL_TEXTURE_2D, GL_TEXTURE_WRAP_S,GL_REPEAT);
    glTexParameteri (GL_TEXTURE_2D, GL_TEXTURE_WRAP_T,GL_REPEAT);
    gluBuild2DMipmaps( GL_TEXTURE_2D, GL_RGB, localTexture->sizeX, localTexture->sizeY, GL_RGB, GL_UNSIGNED_BYTE, localTexture->data);
    glTexParameteri (GL_TEXTURE_2D, GL_TEXTURE_MAG_FILTER, GL_LINEAR);
    glTexParameteri (GL_TEXTURE_2D, GL_TEXTURE_MIN_FILTER, GL_LINEAR);

    localFloor = auxDIBImageLoad(L"2.bmp");
    glGenTextures (1,&texFloor);
    glBindTexture (GL_TEXTURE_2D,texFloor);
    glPixelStorei (GL_UNPACK_ALIGNMENT,1);
    glTexParameteri (GL_TEXTURE_2D, GL_TEXTURE_WRAP_S,GL_REPEAT);
    glTexParameteri (GL_TEXTURE_2D, GL_TEXTURE_WRAP_T,GL_REPEAT);
    gluBuild2DMipmaps( GL_TEXTURE_2D, GL_RGB, localFloor->sizeX, localFloor->sizeY, GL_RGB, GL_UNSIGNED_BYTE, localFloor->data);
    glTexParameteri (GL_TEXTURE_2D, GL_TEXTURE_MAG_FILTER, GL_LINEAR);
    glTexParameteri (GL_TEXTURE_2D, GL_TEXTURE_MIN_FILTER, GL_LINEAR);

    glutFullScreen();
    glutMainLoop();
    return 0;
}

int step(int y, int x)
{
    int res=0;
    if ((data[y][x]=='x')) res++;
    if ((y<mm)&&(data[y+1][x]=='x')) res++;
    if ((y>0 )&&(data[y-1][x]=='x')) res++;
    if ((x<mm)&&(data[y][x+1]=='x')) res++;
    if ((x>0 )&&(data[y][x-1]=='x')) res++;
    return res;
}

int stepC(int y, int x)
{
    int res=0;
    if ((cp[y][x]=='x')) res++;
    if ((y<mm)&&(cp[y+1][x]=='x')) res++;
    if ((y>0 )&&(cp[y-1][x]=='x')) res++;
    if ((x<mm)&&(cp[y][x+1]=='x')) res++;
    if ((x>0 )&&(cp[y][x-1]=='x')) res++;
    return res;
}

void DataToCp(void)
{
    for(int j=1;j<=mm;j++)
        for (int i=1;i<=mm;i++)
            cp[j][i]=data[j][i];
}

void fill (int y,int x,Tpos *v, int *l)
{
    int st=1,en=0;
    int G[mm*mm],Ll[mm*mm];
    G[0]=y*mm+x; Ll[0]=0;
    cp[y][x]='x';
    while (st!=en)
    {
        if ((G[en]%mm+1<mm)&&(cp[(int)G[en]/mm][G[en]%mm+1]=='.'))
        {
            G[st]=G[en]+1;
            Ll[st]=Ll[en]+1;
            cp[(int)G[st]/mm][G[st]%mm]='x';
            st++;
        }
        if ((G[en]%mm-1>0)&&(cp[(int)G[en]/mm][G[en]%mm-1]=='.'))
        {
            G[st]=G[en]-1;
            Ll[st]=Ll[en]+1;
            cp[(int)G[st]/mm][G[st]%mm]='x';
            st++;
        }
        if ((((int)G[en]/mm)+1<mm)&&(cp[((int)G[en]/mm)+1][G[en]%mm]=='.'))
        {
            G[st]=G[en]+mm;
            Ll[st]=Ll[en]+1;
            cp[(int)G[st]/mm][G[st]%mm]='x';
            st++;
        }
        if ((((int)G[en]/mm)-1>0)&&(cp[((int)G[en]/mm)-1][G[en]%mm]=='.'))
        {
            G[st]=G[en]-mm;
            Ll[st]=Ll[en]+1;
            cp[(int)G[st]/mm][G[st]%mm]='x';
            st++;
        }
        en++;
    }
    int rnd=rand()%5+1;
    (*v).x =(int) G[en-rnd] % mm;
    (*v).y =(int) G[en-rnd] / mm;
    *l=Ll[en-rnd];
}

bool isGood(Tpos a)
{
    DataToCp();
    int k=0,i,j,lt;
    Tpos temp;
    cp[a.y][a.x]='x';
    if ((step(a.y,a.x)>3)||(step(a.y+1,a.x)>3)||(step(a.y-1,a.x)>3)||(step(a.y,a.x+1)>3)||(step(a.y,a.x-1)>3))
        return false;
    for(j=1;j<=m;j++)
        for(i=1;i<=m;i++)
            if (cp[j][i]=='.')
            {
                if (k>0)
                    return false;
                fill(j,i,&temp,&lt);
                k++;
            }
    return true;
}

void genMap()
{
    int i,j;
    map.x=m+2; map.z=m+2;
    printf("Loading... Please Wait.\n");
    srand( (unsigned)time( NULL ) );
    for (j=0;j<map.z;j++)
        for (i=0;i<map.x;i++)
        {
            if ((i==0)||(j==0)||(i==map.x-1)||(j==map.z-1))
                data[j][i]='x';
                else
                data[j][i]='.';
        }

    int k=0;
    Tpos t;
    while (k<(int)m*m/2.5)
    {
        t.x = rand()%mm+1;
        t.y = rand()%mm+1;
        if ((data[t.y][t.x]=='.')&&(isGood(t)))
        {
            data[t.y][t.x]='x';
            k++;
        }
    }
    for (j=1;j<=m;j++)
        for (i=1;i<=m;i++)
            if ((data[j][i]=='x')&&(step(j,i)>3))
            {
                data[j][i]='.';
            }
    for (j=1;j<=m;j++)
        for (i=1;i<=m;i++)
            if ((data[j][i]=='.')&&(step(j,i)<2))
            {
                t.x = i; t.y=j;
                if (isGood(t))
                    data[j][i]='x';
            }

    Tpos ps[11]; k=0;
    while (k<=10)
    {
        t.x = rand()%mm+1;
        t.y = rand()%mm+1;
        if (data[t.y][t.x]=='.')
        {
            ps[k]=t;
            k++;
        }
    }
    k=rand()%11;
    player.x=ps[k].x;
    player.z=ps[k].y;
    DataToCp();
    fill(ps[k].y,ps[k].x,&t,&pathLen);
    ex.x=t.x;
    ex.z=t.y;

    printf("Loading complete.\n");
}

void halt(bool f)
{
        glutDestroyWindow(glWin);
        printf("-----------------------------------------------------\n");
        printf("#                    SuperSDG 2.2                   #\n");
        if (f==true)
        {
        printf("-----------------------------------------------------\n");
        printf("# The shortest path %d.                            #\n",pathLen);
        printf("# Your path %d.                                    #\n",myLen);
        printf("# Congratulate you passed the game.                 #\n");
            if (  1.2*pathLen >= myLen )
            {
                printf("-----------------------------------------------------\n");
                printf("#     YOU ONE OF THE BEST PLAYER OF THE WORLD.      #\n");
            }
        }
        printf("-----------------------------------------------------\n");
        printf("# Developers:                                       #\n");
        printf("#        Ravent     - programmer.                   #\n");
        printf("# Series found:                                     #\n");
        printf("#        Ravent     - Sergey Tihon                  #\n");
        printf("#        MasterZerg - Dima   Rudol                  #\n");
        printf("-----------------------------------------------------\n");
        printf("#          Copyright (c) Ravent 2002-2008.          #\n");
        printf("#               All rights reserved                 #\n");
        printf("-----------------------------------------------------\n");
        getch();
        exit(0);
}

Visual Studio minimap

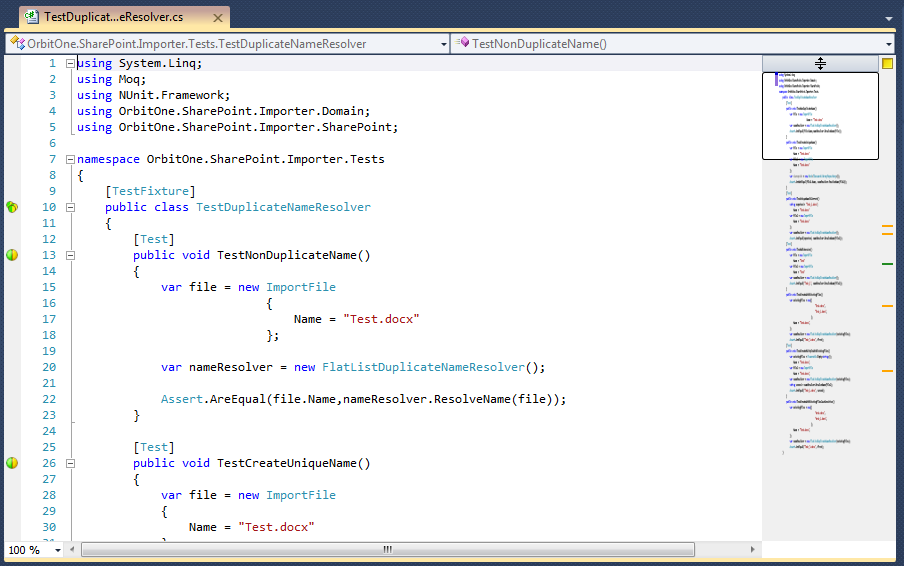
When I saw a Sublime Text 2 with their features at first time – I loved that. One of my favorite feature is a minimap.  It is a simple but very powerful idea to replace scrollbar with minimized code map. Using this feature very easy navigate directly to where you want.

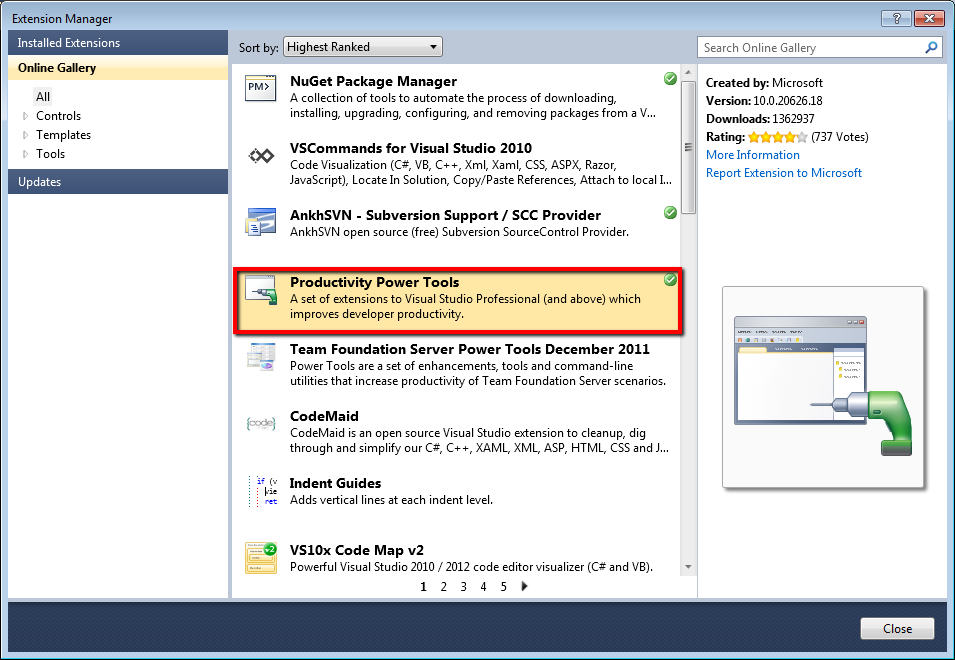
I wanna this feature for Visual Studio for sure. Fortunately, it is already there. It is a part of the Productivity Power Tools.

First of all we need to setup Productivity Power Tool using Visual Studio Extension Manager.

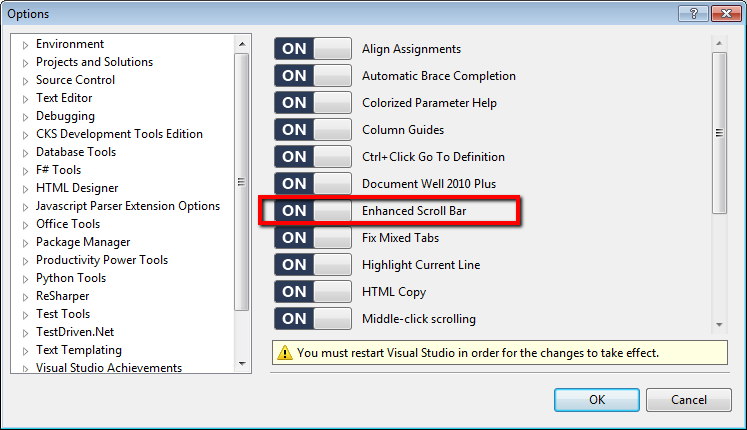
We need to enable this feature, because it is disabled by default.  Open Tool -> Options -> Productivity Power Tools, enable Enhanced Scroll Bar and restart your Visual Studio.

Choose ‘Full map mode‘ in the Productivity Power Tools->Enchanced Scroll Bar section.

You should see minimaps in your Visual Studio now. Enjoy it!!!