F# Type Providers Development Tips (not Tricks)

There are several tips that you probably would like to know if you plan to create a new F# Type Provider(TP) or to contribute to the existing one.

Tip #1: Use FSharp.TypeProviders.StarterPack

Latest version of ProvidedTypes SDK is stored in fsprojects/FSharp.TypeProviders.StarterPack repository and you have to use this version in most cases.

Community agreed to use this repository as master version for the SDK. You may find SDK files committed to other repositories, some of them (like files in FSharp.Data repository) may even be modified, contain new features or latest fixes. Once changes are tested and generalized enough, they will for sure be contributed back to FSharp.TypeProviders.StarterPack. So it is better to use a version from the official repository to be on the safe side.

Tip #2: Use Paket dependency manager

Paket allows you to reference files directly from GitHub and easily keep them up-to-date together with other NuGet dependencies.

All you need is to add two lines to your paket.dependecies files (that tell Paket to download files from GitHub to paket-files folder)

github fsprojects/FSharp.TypeProviders.StarterPack src/ProvidedTypes.fsi
github fsprojects/FSharp.TypeProviders.StarterPack src/ProvidedTypes.fs

and two lines to paket.references file (to tell Paket to insert files into corresponding fsproj files)

File:ProvidedTypes.fsi
File:ProvidedTypes.fs

You can see how it works in ExcelProvider: paket.dependencies + paket.references

Tip #3: Create two solution files (*.sln)

You should not store TP project and projects that use TP in one solution, because when you reference TP dll, IDE/Intellisense loads this assembly and locks file on a disk. After that, you will not be able to rebuild your TP anymore until you close IDE.

So, it does not work in a long run and you have to separate your code to two solutions. The first one (let’s say SwaggerProvider.sln) will contain TP source code, tests for parser and for all components that don’t call TP directly. The second one (let’s say SwaggerProvider.TestsAndDocs.sln) will contain tests, which use TP directly and docs that may also use TP dll.

projects

Tip #4: Automate build (using FAKE)

This tip is quite generic and you have to do it for all projects, but it becomes extremely useful for type providers. It’s tedious to open a new solution (IDE instance), when you want to test latest changes – it is much easier to have a build script that rebuilds and tests everything in one click.

The good start point here is fsprojects/ProjectScaffold that contains most useful generic build automation steps.

Tip #5: Yes, you can debug Type Providers

Debugging of TP does not look an easy task at first sight (and it is really slow in practice), but it is real.

You can start two instances of your IDE. The first one, for a solution with TP code and the second one for code that uses compiled type provider (here is important to check that the second one really references dll compiled by the first one). For the second IDE you can use TestAndDocs solution from Tip #4 or a simple *.fsx script that calls your TP. The last step is to set break point in the first IDE instance and to attach to the second IDE instance process.

This allows you to debug, but you will not be able to modify the code of TP. After each modification, you will need to close 2nd IDE, rebuild dll and repeat all these steps once again.

However, you can automate all manual steps:

  • Open project properties of TP project.
  • Open Debug tab.
  • Select start external program checkpoint
  • Enter path to your VS devenv.exe (For example: “C:\Program Files (x86)\Microsoft Visual Studio 14.0\Common7\IDE\devenv.exe”)
  • Put path to your tests project (file) in command line arguments (For example “d:\GitHub\SwaggerProvider\SwaggerProvider.TestsAndDocs.sln”)

After that, when you press F5 from your TP project, VS will automatically build your TP, start your instance of VS, attach to a new VS process and open your tests solution in it.

projProps

Tip #6: Write tests using FSharp.Compiler.Service

Usefulness of this tip really depends on the TP you are working on, but if you are lucky enough (like I am) and you have an access to a large collection of schemes for your type provider, you can automate testing of compilation of provided types.

There is an awesome resource called APIs.guru (Wikipedia for WEB APIs) that provides an access to several hundred Swagger schemes of real-world Web APIs. For sure, SwaggerProvider uses these schemes to test schema parser and it is relatively easy to do.

But we can go further and check that provided types are “compilable” by F# compiler (there is no collisions in type names, property names, field names and method names).

The one way to do this is to use “Hosted Compiler” feature of F# Compiler Services. This allows us to create a simple script that just instantiates TP for each schema and asks F# Compiler to compile this generated script.

Here is source code from tests:

[<Test; TestCaseSource("JsonSchemasSource")>]
let ``Compile TP`` url =
  let tempFile = Path.GetTempFileName()
  let fs = Path.ChangeExtension(tempFile, ".fs")
  let dll = Path.ChangeExtension(tempFile, ".dll")

  File.WriteAllText(fs, sprintf """
  module TestModule
  open SwaggerProvider
  type ProvidedSwagger = SwaggerProvider<"%s">
  let instance = ProvidedSwagger()
  """ url)

  let errors, exitCode =
    scs.Compile(Array.ofList
      (["fsc.exe"; "-o"; dll; "-a"; fs] @ asms))

  [tempFile; fs; dll]
  |> List.filter File.Exists
  |> List.iter File.Delete

  if exitCode <> 0 then
    let strs = errors |> Array.map(fun x->x.ToString())
    failwithf "Error:\n%s" (String.Join("\n", strs )) 


Tip #7: Handling 3rd party NuGet dependencies

You face a dilemma when your TP needs 3rd party dlls: “How to deliver these dlls to a user?” This is a dilemma, because your IDE will not be able to resolve 3rd party dependencies without your participation if you just add them as dependencies to your NuGet package.

This is the case, for example, when your schema is in JSON format and you decided to use JSON.NET to parse it, or in Yaml format and you want to use YamlDotNet.

Option 1. Pack all dependencies inside your NuGet package.

The simplest solution is to put all required dlls in the folder with your TP dll in NuGet package. In this case, there is nothing to do with assembly resolution and it is definitely a good option to start from.

For example, FSharp.Configuration uses this option and packs SharpYaml.dll inside.

BUT, you have to remember that in this case you limit your users to the exact version of dll packed with your TP. If they reference a newer version from NuGet, it may lead to a run-time error.

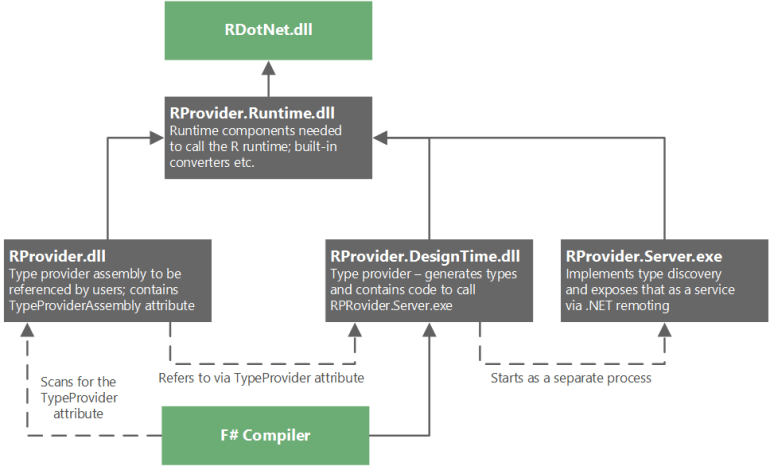
Option 2. Uses AssemblyResolve event handler.

If I am not wrong, this solution was firstly developed in RProvider.

Actually, you split your TP into three assemblies:

  • TP.dll that setups AssemblyResolve event handler that helps IDE find assemblies on a hard drive and tells the compiler that TP will be in TP.DesignTime.dll (but doesn’t reference this assembly directly).
  • TP.DesignTime.dll that contains implementation of TP.
  • TP.Runtime.dll that contains the code that should exist in run-time and may be used by provided methods.

TP.dll references TP.Runtime.dll but uses nothing from it. Such dependencies do not break intellisense (because it does not need this assembly), but in the same time your provided code will be able to call code from TP.Runtime.dll.

Read more about this in RProvider Developer Notes (SwaggerProvider uses the same approach).

rprovider_diagram

Tip #8: Use experience of other TP developers

Creating a Generative Type Provider

Didactic Code

In my recently released Pluralsight course, Building F# Type Providers, I show how to build a type provider that uses erased types. To keep things simple I opted to not include any discussion of generative type providers beyond explaining the difference between type erasure and type generation. I thought I might get some negative feedback regarding that decision but I still believe it was the right decision for the course. That said, while the feedback I’ve received has been quite positive, especially for my first course, I have indeed heard from a few people that they would have liked to see generated types included as well.

There are a number of existing type providers that use generated types, most notably in my opinion is the SqlEnumProvider from FSharp.Data.SqlClient. That particular type provider generates CLI-enum or enum-like types which represent key/value pairs stored in the source database.

Although SqlEnumProvider…

View original post 898 more words

F# Type Providers: News from the battlefields

All your types are belong to us

Don Syme

This post is intended for F# developers, first of all, to show the big picture of The World of F# Type Providers. Here you can find the list of articles/posts about building type providers, list of existing type providers, which probably wait your help and list of open opportunities.

List of materials that can be useful if you want to create a new one:

List of available type providers:

Open opportunities:

Please let me know if I missed something.

Update 1: Build-in Tsunami type providers were added.

Update 2: SqlCommand and Azure were added.

PowerShell Type Provider

FSPSUpdate (3 February 2014): PowerShell Type Provider merged into FSharp.Management.

I am happy to share with you the first version of PowerShell Type Provider. Last days were really hot, but finally the initial version was published.

Lots of different emotions visited me during the work =). Actually, Type Provider API is much harder than I thought. After reading books, it looked easier than it turned out in reality. Type Providers runtime is crafty.

To start you need to download source code and build it – no NuGet package for now. I want to get a portion of feedback and after that publish to the NuGet more consistent version.

Also you need to know that it is developed using PowerShell 3.0 runtime and .NET 4.0/4.5. This means that you can use only PowerShell 3.0 snap-ins.

#r @"C:\WINDOWS\Microsoft.Net\assembly\GAC_MSIL\System.Management.Automation\v4.0_3.0.0.0__31bf3856ad364e35\System.Management.Automation.dll"
#r @"C:\WINDOWS\Microsoft.NET\assembly\GAC_MSIL\Microsoft.PowerShell.Commands.Utility\v4.0_3.0.0.0__31bf3856ad364e35\Microsoft.Powershell.Commands.Utility.dll"
#r @"d:\GitHub\PowerShellTypeProvider\PowerShellTypeProvider\bin\Debug\PowerShellTypeProvider.dll"

type PS = FSharp.PowerShell.PowerShellTypeProvider<PSSnapIns="WDeploySnapin3.0">

As you see in the sample, PowerShellTypeProvider has a single mandatory static parameter PSSnapIns that contains semicolon-separated list of snap-ins that you want to import into PowerShell. If you want to use only default ones, leave the string empty.
PowerShellIntellisenseYou can find list of snap-ins registered on your machine using Get-PSSnapin method.

PS-Get-PSSnapIns

Enjoy it. I will be happy to hear feadback (as well as comments about type provider source code from TP gurus).

Rattle for F# devs

The strange thing happens, Rattle is an awesome tool but it is not so well known for devs as it should be. We definitely need to fix this.

Rattle (the R Analytical Tool To Learn Easily) presents statistical and visual summaries of data, transforms data into forms that can be readily modelled, builds both unsupervised and supervised models from the data, presents the performance of models graphically, and scores new datasets.

At first, we need to install new package from CRAN. To do so, just open R console and type the following:

install.packages("rattle")

Here, you need to check that you have RProvider installed.

Install-Package RProvider

Now we are ready to start.

#I @"..\packages\RProvider.1.0.0\lib"
#r "RDotNet.dll"
#r "RProvider.dll"

open RProvider.rattle
R.rattle() |> ignore

Execute this short snippet and you should see Rattle start screen similar to the following:rattle_start You are ready to study your data without a single line of code.

Load you data from wide range of sources:

rattle_load

Explore your data using strongest statistic technics:

rattle_explore

Test the nature of your data:

rattle_test

Transform your data:

rattle_transform

Cluster your data:

rattle_cluster

Identify relationships or affinities:

rattle_associate

Experiment with different models on your data, before implementing any of them in your favorite language:

rattle_model

Evaluate quality of your model:

rattle_evaluate

Learn your data!

Upd: If you are interested in it, then I can recommend the following book.

Confluence/Jira communication from F# and C#

jira_confluence
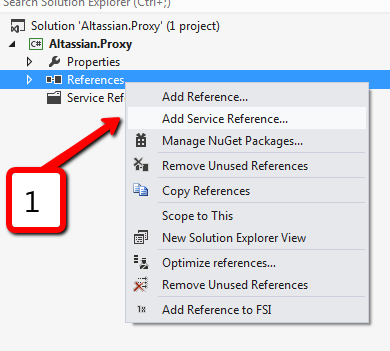
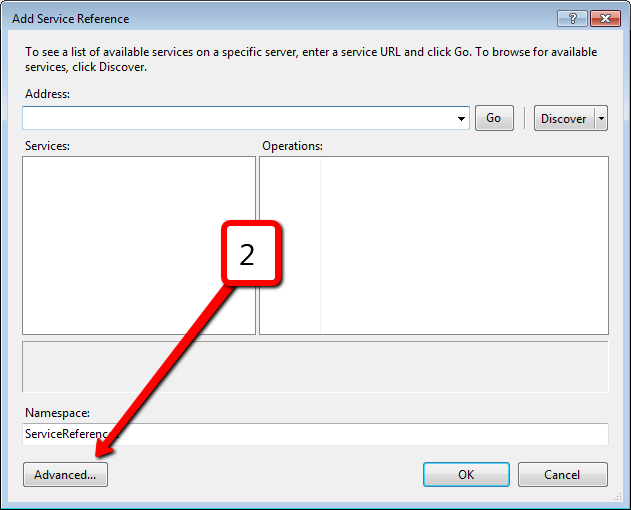
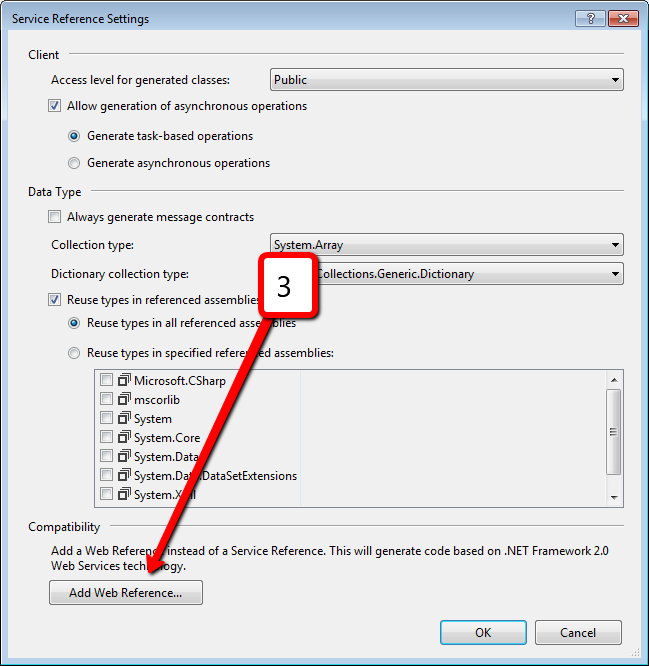
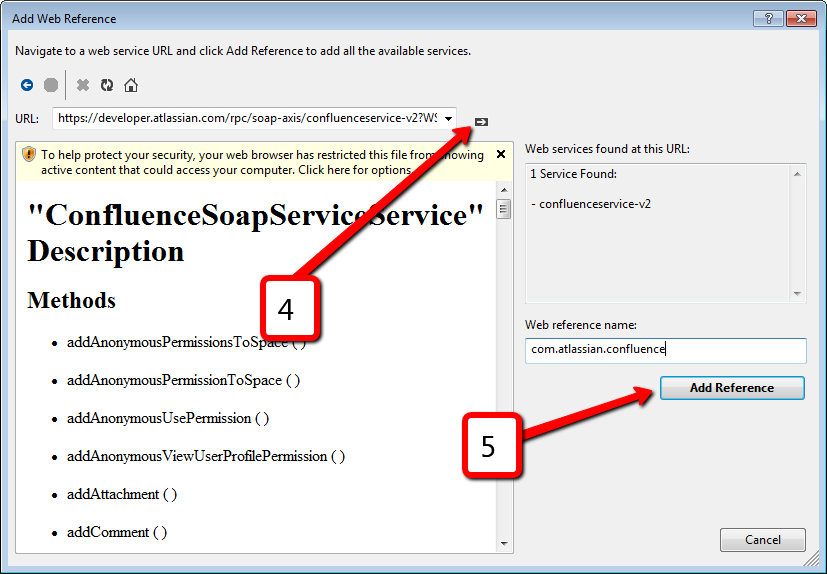
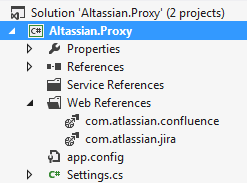
Nowadays, Atlassian products become more and more popular. Different companies and teams start using Jira and Confluence for project management. It would be good to have an ability to communicate with these services from .NET. As you probably know, Jira and Confluence are pure Java applications. Both applications provide SOAP and REST services. REST is a new target for Atlassian, they focused on it and do not touch SOAP anymore. So SOAP services live with all their bugs inside and even deprecated in JIRA 6.0.

It is a bit strange for me. I can understand REST benefits, but it is step backward for developers’ convenience. Each programming language should maintain a client library. Any change in REST API can break all client tools. REST produces a lot of headache for service users. IMHO, REST should be done in OData manner to simplify life for API users. But it is out of topic a bit.

I have tried to use Jira and Confluence web services some time ago, it was harder and more limited then existing SOAP ones. I have not checked the latest ones, you can try if you wish: Confluence REST API documentation and JIRA REST API Tutorials. As I know, there is no mature client libraries for .NET.

I have already tried to get to work F# WSDL Type Provider and Confluence SOAP service. But it does not work, because a Confluence SOAP endpoint is not compatible with WCF. There is a known bug “Creating Service Reference from JIRA WSDL in Visual Studio 2010 generates all methods void“, that would not be fixed.

Workaround for C# guys

The workaround is to create a Web Reference vs Service Reference. Details you can find on StackOverflow: “Web Reference vs. Service Reference“. But I want to repeat these steps here:

  1. Click on ‘Add Service Reference’.atlassian_1
  2. Click on ‘Advanced’ button.altassian_2
  3. Click on ‘Add Web Reference’ button.altassian_3
  4. Paste an URL to the WSDL of Confluence SOAP service and click on the ‘Go to …’. (https://developer.atlassian.com/rpc/soap-axis/confluenceservice-v2?WSDL)atlassian_45
  5. Click on ‘Add reference’ button.
  6. Repeat same steps for Jira SOAP service. (https://jira.atlassian.com/rpc/soap/jirasoapservice-v2?WSDL)
  7. That is all you need to start working with Jira and Confluence. As a result, you should see two web references in your project.atlassian_7

Workaround for F# guys

The easiest way to do it from F# is to build proxy library in C# and reference it from F#. I have already done it and if you wish you can download it from GitHub. There is one issue in such solution – function’s parameters named in not readable way like arg0, arg1 and so on. To understand what actually you should pass to the service you need to check actual parameter names in documentation: JiraSoapService and ConfluenceSoapService.

Confluence sample script:

#r @"..\Altassian.Proxy\bin\Release\Altassian.Proxy.dll"
open Altassian.Proxy.com.atlassian.confluence

let service = new ConfluenceSoapServiceService(Url = @"https://SERVER_NAME/rpc/soap-axis/confluenceservice-v2?WSDL")
let token = service.login("LOGIN","PASSWORD")

service.getSpaces(token)
|> Seq.iter (fun x-> printfn "%s" x.name )

service.Dispose()

Jira sample script:

#r @"..\Altassian.Proxy\bin\Release\Altassian.Proxy.dll"
open Altassian.Proxy.com.atlassian.jira

let service = new JiraSoapServiceService(Url = @"https://SERVER_NAME/rpc/soap/jirasoapservice-v2?wsdl")
let token = service.login("LOGIN","PASSWORD")

service.getIssuesFromJqlSearch(token, "status = open", 10)
|> Seq.iter (fun x-> printfn "%s" x.summary )

service.Dispose()

All source code is available on GitHub.

WPF MVVM with Xaml Type Provider

About a year ago XAML type provider (that now a part of fsharpx project) was born. First of all, happy birthday XAML type provider and thank you everyone who was involved.

Up to XAML type provider release the best option for F# WPF development was to split app into two parts: C# project with all XAML stuff for best tooling support and F# project with all source code. Daniel Mohl have created a project template “F# and C# Win App (WPF, MVVM)” that illustrates this approach end to end (read more about this in his blog).

XAML type provider is an amazing thing that makes available full-featured WPF development completely in F#. Steffen Forkmann has an excellent blog post about its usage “WPF Designer for F#“. It is probably one of my favorite posts about F# at all, it shows a real beauty and excellence of the technology.  This approach was already templated by Daniel Mohl – “F# Empty Windows App (WPF)“.

I think that a natural desire is to have an F# MVVM app using XAML type provider. It can be done by  combining these two templates. At the first step, create a new project from “F# Empty Windows App (WPF)” template, and leave App.fs file without any changes.

module MainApp

open System
open System.Windows
open System.Windows.Controls
open FSharpx

type MainWindow = XAML<"MainWindow.xaml">

let loadWindow() =
   let window = MainWindow()
   window.Root

[<STAThread>]
(new Application()).Run(loadWindow()) |> ignore

Now we need to define a ViewModel for MainWindow. I have reused BaseViewModel and RelayCommand from polyglot approach template.

namespace ViewModels

open System
open System.Windows
open System.Windows.Input
open System.ComponentModel

type ViewModelBase() =
    let propertyChangedEvent = new DelegateEvent<PropertyChangedEventHandler>()
    interface INotifyPropertyChanged with
        [<CLIEvent>]
        member x.PropertyChanged = propertyChangedEvent.Publish
    member x.OnPropertyChanged propertyName = 
        propertyChangedEvent.Trigger([| x; new PropertyChangedEventArgs(propertyName) |])

type RelayCommand (canExecute:(obj -> bool), action:(obj -> unit)) =
    let event = new DelegateEvent<EventHandler>()
    interface ICommand with
        [<CLIEvent>]
        member x.CanExecuteChanged = event.Publish
        member x.CanExecute arg = canExecute(arg)
        member x.Execute arg = action(arg)

type MainViewModel () = 
    inherit ViewModelBase()

    let mutable name = "Noname"
    member x.Name 
        with get () = name
        and set value = name <- value
                        x.OnPropertyChanged "Name"

    member x.OkCommand = 
        new RelayCommand ((fun canExecute -> true), 
            (fun action -> MessageBox.Show(sprintf "Hello, %s" x.Name) |> ignore)) 

The last and probably most tricky part is a XAML. Pay attention to the row number four (local namespace definition). You need to specify assembly part even if your view model located in the same assembly as XAML. It happens because type provider works in another one.

<Window
        xmlns="http://schemas.microsoft.com/winfx/2006/xaml/presentation"
        xmlns:x="http://schemas.microsoft.com/winfx/2006/xaml"
        xmlns:local="clr-namespace:ViewModels;assembly=FsharpMVVMWindowsApp" 
        Title="MVVM and XAML Type provider" Height="120" Width="300">
    <Window.DataContext>
        <local:MainViewModel></local:MainViewModel>
    </Window.DataContext>
    <Grid >
        <Grid.RowDefinitions>
            <RowDefinition/>
            <RowDefinition/>
            <RowDefinition/>
        </Grid.RowDefinitions>
        <Label FontSize="16">What is your name?</Label>
        <TextBox Grid.Row="1" FontSize="16" Text="{Binding Name, Mode=TwoWay}"/>
        <Button Grid.Row="2" FontSize="16" Command="{Binding OkCommand}">Ok</Button>
    </Grid>
</Window>

Voila, it works now.

HelloSergey