ML.NET Recommendation Engine: Pitfall of One-Class Matrix Factorization

During the weekends I decided to take a look at what ML.NET can propose in the area of recommendation engine.

I found a nice picture in Mark Farragher’s blog post that explains three available options:

The choice depends on what information you have.

  • If you have sophisticated user feedback like rating (or likes and most importantly dislikes) then we can use Matrix Factorization algorithm to estimate unknown ratings.
  • If we have not only rating but other product fields, we can use more advanced algorithm called “Field-Aware Factorization Machine”
  • If we have no rating at all then “One Class Matrix Factorization” is the only option for us.

In this post I would like to focus on the last option.

One-Class Matrix Factorization

This algorithm can be used when data is limited. For example:

  • Books store: We have history of purchases (list of pairs userId + bookId) without user’s feedback and want to recommend new books for existing users.
  • Amazon store: We have history of co-purchases (list of pairs productId + productId) and want to recommend products in section “Customers Who Bought This Item Also Bought”.
  • Social network: We have information about user friendship (list of pairs userId + userId) and want to recommend users in section “People You May Know”.

As you already understood, it is applicable for a pair of 2 categorical variables, not only for userId + productId pairs.

Google showed several relevant posts about the usage of ML.NET One Class Matrix Factorizarion:

After reading all these 3 samples I realised that I do not fully understand what is Label column is used for. Later I came to a conclusion that all three samples most likely are incorrect and here is why.

Mathematical details

Let’s take a look at excellent documentation of MatrixFactorizationTrainer class. The first gem is

There are three input columns required, one for matrix row indexes, one for matrix column indexes, and one for values (i.e., labels) in matrix. They together define a matrix in COO format. The type for label column is a vector of Single (float) while the other two columns are key type scalar.

COO stores a list of (row, column, value) tuples. Ideally, the entries are sorted first by row index and then by column index, to improve random access times. This is another format that is good for incremental matrix construction

So anyway we need three columns. If in the classic Matrix Factorization the Label column is the rating, then for One-Class Matrix Factorization we need to fill it with something else.

The second gem is

The coordinate descent method included is specifically for one-class matrix factorization where all observed ratings are positive signals (that is, all rating values are 1). Notice that the only way to invoke one-class matrix factorization is to assign one-class squared loss to loss function when calling MatrixFactorization(Options). See Page 6 and Page 28 here for a brief introduction to standard matrix factorization and one-class matrix factorization. The default setting induces standard matrix factorization. The underlying library used in ML.NET matrix factorization can be found on a Github repository.

Here is Page 28 from references presentation:

As you see, Label is expected to be always 1, because we watched only One Class (positive rating): user downloaded a book, user purchased 2 items together, there is a friendship between two users.

In the case when data set does not provide rating to us, it is our responsibility to provide 1s to MatrixFactorizationTrainer and specify MatrixFactorizationTrainer.LossFunctionType as loss function.

Here you can find fixes for samples:

Google Cloud Vision API from .NET\F# (OAuth2 with ServiceAccount.json)

Google Cloud Platform provides a wide range of APIs, one of which is Cloud Vision API that allows you to detect faces in images, extract sentiments, detect landmark, OCR and etc.

One of available annotators is “Logo Detection” that allows you to find company logo in your image and recognize it.

.NET is not the part of mainstream Google Cloud SDK. Google maintains google-api-dotnet-client that should allow you to authenticate to and call all available services. API design looks slightly not intuitive for .NET world (at least from my point of view).

I spent some time on Google/SO/Github trying to understand how to use OAuth2 in server-to-server authentication scenario with ServiceAccount.json file generated by Google API Manager.

s2s

You cannot use this API without billing account, so you have to put your credit card info, if you want to play with this API.

Also, note that you need to have two NuGet packages Google.Apis.Vision.v1Google.Apis.Oauth2.v2 (and a lot of their dependencies)

So, here is the full sample:

#I __SOURCE_DIRECTORY__
#load "Scripts/load-references-debug.fsx"

open System.IO
open Google.Apis.Auth.OAuth2
open Google.Apis.Services
open Google.Apis.Vision.v1
open Google.Apis.Vision.v1.Data

// OAuth2 authentication using service account JSON file
let credentials =
    let jsonServiceAccount = @"d:\ServiceAccount.json"
    use stream = new FileStream(jsonServiceAccount, 
                         FileMode.Open, FileAccess.Read)
    GoogleCredential.FromStream(stream)
        .CreateScoped(VisionService.Scope.CloudPlatform)

let visionService = // Google Cloud Vision Service
    BaseClientService.Initializer(
        ApplicationName = "my-cool-app",
        HttpClientInitializer = credentials)
    |> VisionService

// Logo detection request for one image
let createRequest content = 
  let wrap (xs:'a list) = System.Collections.Generic.List(xs)
  BatchAnnotateImagesRequest(
    Requests = wrap
      [AnnotateImageRequest(
        Features = wrap [Feature(Type = "LOGO_DETECTION")],
        Image = Image(Content = content))
      ])
  |> visionService.Images.Annotate


let call fileName = // Call and interpret results
    let request =
        File.ReadAllBytes fileName
        |> System.Convert.ToBase64String
        |> createRequest
    let response = request.Execute()

    [ for x in response.Responses do
        for y in x.LogoAnnotations do
          yield y.Description
    ] |> List.toArray


let x = call "D:\\fsharp256.png"
// val x : string [] = [|"F#"|]

R for the .NET Developer

Jamie Dixon's Home

clip_image002clip_image004clip_image006clip_image008

clip_image010imageimageimageimage

clip_image012

clip_image014

1setwd("C:GitR4DotNet") 2 3#y = x1 + x2 + x3 + E 4#y is what you are trying explain 5#x1, x2, x3 are the variables that cause/influence y 6#E is things that we are not measuring/ using for calculations 7 8fuel.efficiency <- read.csv("C:/Git/R4DotNet/Data/FuelEfficiency.csv") 9summary(fuel.efficiency) 1011#MPG = Miles per gallon12#GPM = Gallons per 100 miles13#WT = Weight of car in 1000 lbs14#DIS = Displacment in cubic inches15#NC = number of cylinders16#HP = Horsepower17#ACC = Acceleration in seconds from 0-6018#ET = Engine Type 0 = V, 1 = Straight1920plot(GPM~WT,data=fuel.efficiency) 21plot(GPM~DIS,data=fuel.efficiency) 2223fuel.efficiency$NC <- factor(fuel.efficiency$NC) 24fuel.efficiency$ET <-

View original post 333 more words

R-Fiddle: An online playground for R code

r-fiddle_logowww.R-fiddle.org is an early stage beta that provides you with a free and powerful environment to write, run and share R-code right inside your browser. It even offers the option to include packages. Since a couple of days it’s gaining more and more traction, and was mentioned on the frontpage of Hacker News.

We designed it for those situations where you have code that you need to prototype quickly and then possibly share it with others for feedback. All this without needing a user account, or any scrap projects or files! We even included a very-easy-to-use ’embed’ function for blogs and website, so your visitors can edit and run R code on your own website or blog. This is the first version of R-fiddle, so do not hesitate to give us feedback.

Working together with the help of R-fiddle

You can use R-fiddle to share code snippets with colleagues…

View original post 526 more words

F# Neural Networks with FsLab

nn_previewNeural networks are very powerful tool and at the same time, it is not easy to use all its power. Now we are one step closer to it from F# and .NET. We will delegate model training to R using R Provider. Also we will use Deedle (that was announced some days ago) for handy data manipulation.

Prerequisites:

Learning from Data:

First of all, we need to load required assemblies into our FSI session. It is pretty easy with FsLab because package have bootstrapping script.

#load "..\packages\FsLab.0.1.4\FsLab.fsx"

The next step is to download and install missed R packages. For this demo, we need neuralnet for training neural network model and prediction, caret for data visualization.

open RProvider.utils
R.install_packages("MASS")
R.install_packages("pbkrtest")
R.install_packages("lattice")
R.install_packages("Matrix")
R.install_packages("mgcv")
R.install_packages("grid")
R.install_packages("neuralnet")
R.install_packages("caret")
R.install_packages("zoo")

Now we are ready to start work. We need to open namespaces and load a data set. For this demo, we have chosen iris data set, which is classic for lots of demos.

open Deedle
open RDotNet
open RProvider
open RProvider.``base``
open RProvider.datasets
open RProvider.neuralnet
open RProvider.caret

let iris : Frame<int, string> = R.iris.GetValue()

To better understand what we are going to do, let’s plot this data set. First of all, split data into two parts: features (Sepal.Length; Sepal.Width; Petal.Length; Petal.Width) and a target variable (Species). After that plot these data into different dimensions (different colors represent different Species).

let features =
iris
|> Frame.filterCols (fun c _ -> c <> "Species")
|> Frame.mapColValues (fun c -> c.As<double>())
let targets =
R.as_factor(iris.Columns.["Species"])

R.featurePlot(x = features, y = targets, plot = "pairs")

nn_features

As you see, our task is not trivial – we have 3 classes instead of 2 (that is not classic situation) and classes are not clearly separable. Nevertheless let’s try!  First of all, we need to split our data into 2 parts – training and testing data sets (70% vs 30%). The first part will be sent to the neural network for learning, the second one will be used for measuring model quality. Also let’s shuffle data to be honest.

iris.ReplaceColumn("Species", targets.AsNumeric())
let range = [1..iris.RowCount]
let trainingIdxs : int[] = R.sample(range, iris.RowCount*7/10).GetValue()
let testingIdxs : int[] = R.setdiff(range, trainingIdxs).GetValue()
let trainingSet = iris.Rows.[trainingIdxs]
let testingSet = iris.Rows.[testingIdxs]

Now we are ready to train a neural network, all we need is to provide a formula (specify what is the input for our model and what is the output) “Species ~ Sepal.Length + Sepal.Width + Petal.Length + Petal.Width”, provide a data set and specify the structure of hidden layers. In the following example, we will train the network with two layers of hidden nodes, the first layer with 3 nodes and the second layer with 2 nodes.

let nn =
R.neuralnet(
"Species ~ Sepal.Length + Sepal.Width + Petal.Length + Petal.Width",
data = trainingSet, hidden = R.c(3,2),
err_fct = "ce", linear_output = true)

// Plot the resulting neural network with coefficients
R.eval(R.parse(text="library(grid)"))
R.plot_nn nn

nn_network

Cool! How simple it is. To be able to measure quality of the classification we need to split our training set into features and targets.

let testingFeatures =
testingSet
|> Frame.filterCols (fun c _ -> c <> "Species")
|> Frame.mapColValues (fun c -> c.As<double>())
let testingTargets =
testingSet.Columns.["Species"].As<int>().Values

To execute the neural network on the new data (apply our classification) we should call R.compute method and pass the training data set there.

let prediction =
R.compute(nn, testingFeatures)
.AsList().["net.result"].AsVector()
|> Seq.cast<double>
|> Seq.map (round >> int))

Finally, let’s compare prediction results with testing values:

let misclassified =
Seq.zip prediction testingTargets
|> Seq.filter (fun (a,b) -> a<>b)
|> Seq.length

printfn "Misclassified irises '%d' of '%d'" misclassified (testingSet.RowCount)

If you execute all these steps one by one, you will see that there are only ~3 misclassifies of 45 samples. Pretty well quality.

Full script:

#load "..\packages\FsLab.0.1.4\FsLab.fsx"

// You need to install 'nnet' and 'caret' packages if you do not have them
open RProvider.utils
R.install_packages("MASS")
R.install_packages("pbkrtest")
R.install_packages("lattice")
R.install_packages("Matrix")
R.install_packages("mgcv")
R.install_packages("grid")
R.install_packages("neuralnet")
R.install_packages("caret")
R.install_packages("zoo")

open Deedle
open RDotNet
open RProvider
open RProvider.``base``
open RProvider.datasets
open RProvider.neuralnet
open RProvider.caret

// Load data from R to Deedle frame
let iris : Frame<int, string> = R.iris.GetValue()

// Observe iris data set
let features =
iris
|> Frame.filterCols (fun c _ -> c <> "Species")
|> Frame.mapColValues (fun c -> c.As<double>())
let targets =
R.as_factor(iris.Columns.["Species"])

R.featurePlot(x = features, y = targets, plot = "pairs")

iris.ReplaceColumn("Species", targets.AsNumeric())
// Split data to training and testing sets (70% vs 30%)
let range = [1..iris.RowCount]
let trainingIdxs : int[] = R.sample(range, iris.RowCount*7/10).GetValue()
let testingIdxs : int[] = R.setdiff(range, trainingIdxs).GetValue()
let trainingSet = iris.Rows.[trainingIdxs]
let testingSet = iris.Rows.[testingIdxs]

// Train neural network
let nn =
R.neuralnet(
"Species ~ Sepal.Length + Sepal.Width + Petal.Length + Petal.Width",
data = trainingSet, hidden = R.c(3,2),
err_fct = "ce", linear_output = true)

// Plot the resulting neural network with coefficients
R.eval(R.parse(text="library(grid)"))
R.plot_nn nn

// Split testing set into features and targets
let testingFeatures =
testingSet
|> Frame.filterCols (fun c _ -> c <> "Species")
|> Frame.mapColValues (fun c -> c.As<double>())
let testingTargets =
testingSet.Columns.["Species"].As<int>().Values

// Predict `Species` for testingFeatures with neural network
let prediction =
R.compute(nn, testingFeatures)
.AsList().["net.result"].AsVector()
|> Seq.cast<double>
|> Seq.map (round >> int))

// Calculate number of misclassified irises
let misclassified =
Seq.zip prediction testingTargets
|> Seq.filter (fun (a,b) -> a<>b)
|> Seq.length

printfn "Misclassified irises '%d' of '%d'" misclassified (testingSet.RowCount)

P.S.

Notice, if you have problems with bootstrapping RProvider and/or converting R data frame to Deedle data frames – you need to verify that during installation of NuGet packages, all assemblies have been copied to RProvider’s lib sub-folder (see in the following picture).

deedle_rprovider

Stanford CoreNLP is available on NuGet for F#/C# devs

Update (2014, January 3): Links and/or samples in this post might be outdated. The latest version of samples are available on new Stanford.NLP.NET site.

nlp-logo-navbar

Stanford CoreNLP provides a set of natural language analysis tools which can take raw English language text input and give the base forms of words, their parts of speech, whether they are names of companies, people, etc., normalize dates, times, and numeric quantities, and mark up the structure of sentences in terms of phrases and word dependencies, and indicate which noun phrases refer to the same entities. Stanford CoreNLP is an integrated framework, which make it very easy to apply a bunch of language analysis tools to a piece of text. Starting from plain text, you can run all the tools on it with just two lines of code. Its analyses provide the foundational building blocks for higher-level and domain-specific text understanding applications.

Stanford CoreNLP integrates all Stanford NLP tools, including the part-of-speech (POS) taggerthe named entity recognizer (NER)the parser, and the coreference resolution system, and provides model files for analysis of English. The goal of this project is to enable people to quickly and painlessly get complete linguistic annotations of natural language texts. It is designed to be highly flexible and extensible. With a single option you can change which tools should be enabled and which should be disabled.

Stanford CoreNLP is here and available on NuGet. It is probably the most powerful package from whole The Stanford NLP Group software packages. Please, read usage overview on Stanford CoreNLP home page to understand what it can do, how you can configure an annotation pipeline, what steps are available for you, what models you need to have and so on.

I want to say thank you to Anonymous 😉 and @OneFrameLink for their contribution and stimulating me to finish this work.

Please follow next steps to get started:

Before using Stanford CoreNLP, we need to define and specify annotation pipeline. For example, annotators = tokenize, ssplit, pos, lemma, ner, parse, dcoref.

The next thing we need to do is to create StanfordCoreNLP pipeline. But to instantiate a pipeline, we need to specify all required properties or at least paths to all models used by pipeline that are specified in annotators string. Before starting samples, let’s define some helper function that will be used across all source code pieces: jarRoot is a path to folder where we extracted files from stanford-corenlp-3.2.0-models.jar; modelsRoot is a path to folder with all models files; ‘!’ is overloaded operator that converts model name to relative path to the model file.

let (@@) a b = System.IO.Path.Combine(a,b)
let jarRoot = __SOURCE_DIRECTORY__ @@ @"..\..\temp\stanford-corenlp-full-2013-06-20\stanford-corenlp-3.2.0-models\"
let modelsRoot = jarRoot @@ @"edu\stanford\nlp\models\"
let (!) path = modelsRoot @@ path

Now we are ready to instantiate the pipeline, but we need to do a small trick. Pipeline is configured to use default model files (for simplicity) and all paths are specified relatively to the root of stanford-corenlp-3.2.0-models.jar. To make things easier, we can temporary change current directory to the jarRoot, instantiate a pipeline and then change current directory back. This trick helps us dramatically decrease the number of code lines.

let props = Properties()
props.setProperty("annotators","tokenize, ssplit, pos, lemma, ner, parse, dcoref") |> ignore
props.setProperty("sutime.binders","0") |> ignore

let curDir = System.Environment.CurrentDirectory
System.IO.Directory.SetCurrentDirectory(jarRoot)
let pipeline = StanfordCoreNLP(props)
System.IO.Directory.SetCurrentDirectory(curDir)

However,  you do not have to do it. You can configure all models manually. The number of properties (especially paths to models) that you need to specify depends on the annotators value. Let’s assume for a moment that we are in Java world and we want to configure our pipeline in a custom way. Especially for this case, stanford-corenlp-3.2.0-models.jar contains StanfordCoreNLP.properties (you can find it in the folder with extracted files), where you can specify new property values out of code. Most of properties that we need to use for configuration are already mentioned in this file and you can easily understand what it what. But it is not enough to get it work, also you need to look into source code of Stanford CoreNLP. By the way, some days ago Stanford was moved CoreNLP source code into GitHub – now it is much easier to browse it.  Default paths to the models are specified in DefaultPaths.java file, property keys are listed in Constants.java file and information about which path match to which property name is contained in Dictionaries.java. Thus, you are able to dive deeper into pipeline configuration and do whatever you want. For lazy people I already have a working sample.

let props = Properties()
let (<==) key value = props.setProperty(key, value) |> ignore
"annotators"    <== "tokenize, ssplit, pos, lemma, ner, parse, dcoref"
"pos.model"     <== ! @"pos-tagger\english-bidirectional\english-bidirectional-distsim.tagger"
"ner.model"     <== ! @"ner\english.all.3class.distsim.crf.ser.gz"
"parse.model"   <== ! @"lexparser\englishPCFG.ser.gz"

"dcoref.demonym"            <== ! @"dcoref\demonyms.txt"
"dcoref.states"             <== ! @"dcoref\state-abbreviations.txt"
"dcoref.animate"            <== ! @"dcoref\animate.unigrams.txt"
"dcoref.inanimate"          <== ! @"dcoref\inanimate.unigrams.txt"
"dcoref.male"               <== ! @"dcoref\male.unigrams.txt"
"dcoref.neutral"            <== ! @"dcoref\neutral.unigrams.txt"
"dcoref.female"             <== ! @"dcoref\female.unigrams.txt"
"dcoref.plural"             <== ! @"dcoref\plural.unigrams.txt"
"dcoref.singular"           <== ! @"dcoref\singular.unigrams.txt"
"dcoref.countries"          <== ! @"dcoref\countries"
"dcoref.extra.gender"       <== ! @"dcoref\namegender.combine.txt"
"dcoref.states.provinces"   <== ! @"dcoref\statesandprovinces"
"dcoref.singleton.predictor"<== ! @"dcoref\singleton.predictor.ser"

let sutimeRules =
    [| ! @"sutime\defs.sutime.txt";
       ! @"sutime\english.holidays.sutime.txt";
       ! @"sutime\english.sutime.txt" |]
    |> String.concat ","
"sutime.rules"      <== sutimeRules
"sutime.binders"    <== "0"

let pipeline = StanfordCoreNLP(props)

As you see, this option is much longer and harder to do. I recommend to use the first one, especially if you do not need to change the default configuration.

And now the fun part. Everything else is pretty easy: we create an annotation from your text, path it through the pipeline and interpret the results.

let text = "Kosgi Santosh sent an email to Stanford University. He didn't get a reply.";

let annotation = Annotation(text)
pipeline.annotate(annotation)
use stream = new ByteArrayOutputStream()
pipeline.prettyPrint(annotation, new PrintWriter(stream))
printfn "%O" (stream.toString())

Certainly, you can extract all processing results from annotated test.

let customAnnotationPrint (annotation:Annotation) =
    printfn "-------------"
    printfn "Custom print:"
    printfn "-------------"
    let sentences = annotation.get(CoreAnnotations.SentencesAnnotation().getClass()) :?> java.util.ArrayList
    for sentence in sentences |> Seq.cast<CoreMap> do
        printfn "\n\nSentence : '%O'" sentence

    let tokens = sentence.get(CoreAnnotations.TokensAnnotation().getClass()) :?> java.util.ArrayList
    for token in (tokens |> Seq.cast<CoreLabel>) do
       let word = token.get(CoreAnnotations.TextAnnotation().getClass())
       let pos  = token.get(CoreAnnotations.PartOfSpeechAnnotation().getClass())
       let ner  = token.get(CoreAnnotations.NamedEntityTagAnnotation().getClass())
       printfn "%O \t[pos=%O; ner=%O]" word pos ner

    printfn "\nTree:"
    let tree = sentence.get(TreeCoreAnnotations.TreeAnnotation().getClass()) :?> Tree
    use stream = new ByteArrayOutputStream()
    tree.pennPrint(new PrintWriter(stream))
    printfn "The first sentence parsed is:\n %O" (stream.toString())

    printfn "\nDependencies:"
    let deps = sentence.get(SemanticGraphCoreAnnotations.CollapsedDependenciesAnnotation().getClass()) :?> SemanticGraph
    for edge in deps.edgeListSorted().toArray() |> Seq.cast<SemanticGraphEdge> do
        let gov = edge.getGovernor()
        let dep = edge.getDependent()
        printfn "%O(%s-%d,%s-%d)"
            (edge.getRelation())
            (gov.word()) (gov.index())
            (dep.word()) (dep.index())

The full code sample is available on GutHub, if you run it, you will see the following result:

Sentence #1 (9 tokens):
Kosgi Santosh sent an email to Stanford University.
[Text=Kosgi CharacterOffsetBegin=0 CharacterOffsetEnd=5 PartOfSpeech=NNP Lemma=Kosgi NamedEntityTag=PERSON] [Text=Santosh CharacterOffsetBegin=6 CharacterOffsetEnd=13 PartOfSpeech=NNP Lemma=Santosh NamedEntityTag=PERSON] [Text=sent CharacterOffsetBegin=14 CharacterOffsetEnd=18 PartOfSpeech=VBD Lemma=send NamedEntityTag=O] [Text=an CharacterOffsetBegin=19 CharacterOffsetEnd=21 PartOfSpeech=DT Lemma=a NamedEntityTag=O] [Text=email CharacterOffsetBegin=22 CharacterOffsetEnd=27 PartOfSpeech=NN Lemma=email NamedEntityTag=O] [Text=to CharacterOffsetBegin=28 CharacterOffsetEnd=30 PartOfSpeech=TO Lemma=to NamedEntityTag=O] [Text=Stanford CharacterOffsetBegin=31 CharacterOffsetEnd=39 PartOfSpeech=NNP Lemma=Stanford NamedEntityTag=ORGANIZATION] [Text=University CharacterOffsetBegin=40 CharacterOffsetEnd=50 PartOfSpeech=NNP Lemma=University NamedEntityTag=ORGANIZATION] [Text=. CharacterOffsetBegin=50 CharacterOffsetEnd=51 PartOfSpeech=. Lemma=. NamedEntityTag=O]
(ROOT
(S
(NP (NNP Kosgi) (NNP Santosh))
(VP (VBD sent)
(NP (DT an) (NN email))
(PP (TO to)
(NP (NNP Stanford) (NNP University))))
(. .)))

nn(Santosh-2, Kosgi-1)
nsubj(sent-3, Santosh-2)
root(ROOT-0, sent-3)
det(email-5, an-4)
dobj(sent-3, email-5)
nn(University-8, Stanford-7)
prep_to(sent-3, University-8)

Sentence #2 (7 tokens):
He didn’t get a reply.
[Text=He CharacterOffsetBegin=52 CharacterOffsetEnd=54 PartOfSpeech=PRP Lemma=he NamedEntityTag=O] [Text=did CharacterOffsetBegin=55 CharacterOffsetEnd=58 PartOfSpeech=VBD Lemma=do NamedEntityTag=O] [Text=n’t CharacterOffsetBegin=58 CharacterOffsetEnd=61 PartOfSpeech=RB Lemma=not NamedEntityTag=O] [Text=get CharacterOffsetBegin=62 CharacterOffsetEnd=65 PartOfSpeech=VB Lemma=get NamedEntityTag=O] [Text=a CharacterOffsetBegin=66 CharacterOffsetEnd=67 PartOfSpeech=DT Lemma=a NamedEntityTag=O] [Text=reply CharacterOffsetBegin=68 CharacterOffsetEnd=73 PartOfSpeech=NN Lemma=reply NamedEntityTag=O] [Text=. CharacterOffsetBegin=73 CharacterOffsetEnd=74 PartOfSpeech=. Lemma=. NamedEntityTag=O]
(ROOT
(S
(NP (PRP He))
(VP (VBD did) (RB n’t)
(VP (VB get)
(NP (DT a) (NN reply))))
(. .)))

nsubj(get-4, He-1)
aux(get-4, did-2)
neg(get-4, n’t-3)
root(ROOT-0, get-4)
det(reply-6, a-5)
dobj(get-4, reply-6)

Coreference set:
(2,1,[1,2)) -> (1,2,[1,3)), that is: “He” -> “Kosgi Santosh”

C# Sample

C# samples are also available on GitHub.

Stanford Temporal Tagger(SUTime)

nlp-logo-navbar

SUTime is a library for recognizing and normalizing time expressions. SUTime is available as part of the Stanford CoreNLP pipeline and can be used to annotate documents with temporal information. It is a deterministic rule-based system designed for extensibility.

There is one more useful thing that we can do with CoreNLP – time extraction. The way that we use CoreNLP is pretty similar to the previous sample. Firstly, we create an annotation pipeline and add there all required annotators. (Notice that this sample also use the operator defined at the beginning of the post)

let pipeline = AnnotationPipeline()
pipeline.addAnnotator(PTBTokenizerAnnotator(false))
pipeline.addAnnotator(WordsToSentencesAnnotator(false))

let tagger = MaxentTagger(! @"pos-tagger\english-bidirectional\english-bidirectional-distsim.tagger")
pipeline.addAnnotator(POSTaggerAnnotator(tagger))

let sutimeRules =
    [| ! @"sutime\defs.sutime.txt";
       ! @"sutime\english.holidays.sutime.txt";
       ! @"sutime\english.sutime.txt" |]
    |> String.concat ","
let props = Properties()
props.setProperty("sutime.rules", sutimeRules ) |> ignore
props.setProperty("sutime.binders", "0") |> ignore
pipeline.addAnnotator(TimeAnnotator("sutime", props))

Now we are ready to annotate something. This part is also equal to the same one from the previous sample.

let text = "Three interesting dates are 18 Feb 1997, the 20th of july and 4 days from today."
let annotation = Annotation(text)
annotation.set(CoreAnnotations.DocDateAnnotation().getClass(), "2013-07-14") |> ignore
pipeline.annotate(annotation)

And finally, we need to interpret annotating results.

printfn "%O\n" (annotation.get(CoreAnnotations.TextAnnotation().getClass()))
let timexAnnsAll = annotation.get(TimeAnnotations.TimexAnnotations().getClass()) :?> java.util.ArrayList
for cm in timexAnnsAll |> Seq.cast<CoreMap> do
    let tokens = cm.get(CoreAnnotations.TokensAnnotation().getClass()) :?> java.util.List
    let first = tokens.get(0)
    let last = tokens.get(tokens.size() - 1)
    let time = cm.get(TimeExpression.Annotation().getClass()) :?> TimeExpression
    printfn "%A [from char offset '%A' to '%A'] --> %A"
        cm first last (time.getTemporal())

The full code sample is available on GutHub, if you run it you will see the following result:

18 Feb 1997 [from char offset ’18’ to ‘1997’] –> 1997-2-18
the 20th of july [from char offset ‘the’ to ‘July’] –> XXXX-7-20
4 days from today [from char offset ‘4’ to ‘today’] –> THIS P1D OFFSET P4D

C# Sample

C# samples are also available on GitHub.

Conclusion

There is a pretty awesome library. I hope you enjoy it. Try it out right now!

There are some other more specific Stanford packages that are already available on NuGet:

Stanford Word Segmenter is available on NuGet

Update (2014, January 3): Links and/or samples in this post might be outdated. The latest version of samples are available on new Stanford.NLP.NET site.

nlp-logo-navbar

Tokenization of raw text is a standard pre-processing step for many NLP tasks. For English, tokenization usually involves punctuation splitting and separation of some affixes like possessives. Other languages require more extensive token pre-processing, which is usually called segmentation.

The Stanford Word Segmenter currently supports Arabic and Chinese. The provided segmentation schemes have been found to work well for a variety of applications.

One more tool from Stanford NLP Software Package become ready on NuGet today. It is a Stanford Word Segmenter. This is a fourth one Stanford NuGet package published by me, previous ones were a “Stanford Parser“, “Stanford Named Entity Recognizer (NER)” and “Stanford Log-linear Part-Of-Speech Tagger“. Please follow next steps to get started:

F# Sample

For more details see source code on GitHub.

open java.util
open edu.stanford.nlp.ie.crf

[<EntryPoint>]
let main argv =
if (argv.Length <> 1) then
printf "usage: StanfordSegmenter.Csharp.Samples.exe filename"
else
let props = Properties();
props.setProperty("sighanCorporaDict", @"..\..\..\..\temp\stanford-segmenter-2013-06-20\data") |> ignore
props.setProperty("serDictionary", @"..\..\..\..\temp\stanford-segmenter-2013-06-20\data\dict-chris6.ser.gz") |> ignore
props.setProperty("testFile", argv.[0]) |> ignore
props.setProperty("inputEncoding", "UTF-8") |> ignore
props.setProperty("sighanPostProcessing", "true") |> ignore

let segmenter = CRFClassifier(props)
segmenter.loadClassifierNoExceptions(@"..\..\..\..\temp\stanford-segmenter-2013-06-20\data\ctb.gz", props)
segmenter.classifyAndWriteAnswers(argv.[0])
0

C# Sample

For more details see source code on GitHub.

using java.util;
using edu.stanford.nlp.ie.crf;

namespace StanfordSegmenter.Csharp.Samples
{
class Program
{
static void Main(string[] args)
{
if (args.Length != 1)
{
System.Console.WriteLine("usage: StanfordSegmenter.Csharp.Samples.exe filename");
return;
}

var props = new Properties();
props.setProperty("sighanCorporaDict", @"..\..\..\..\temp\stanford-segmenter-2013-06-20\data");
props.setProperty("serDictionary", @"..\..\..\..\temp\stanford-segmenter-2013-06-20\data\dict-chris6.ser.gz");
props.setProperty("testFile", args[0]);
props.setProperty("inputEncoding", "UTF-8");
props.setProperty("sighanPostProcessing", "true");

var segmenter = new CRFClassifier(props);
segmenter.loadClassifierNoExceptions(@"..\..\..\..\temp\stanford-segmenter-2013-06-20\data\ctb.gz", props);
segmenter.classifyAndWriteAnswers(args[0]);
}
}
}

MSR-SPLAT Overview for F# (.NET NLP)

Some weeks ago, Microsoft Research announced NLP toolkit called MSR SPLAT. It is time to play with it and take a look what it can do.

Statistical Parsing and Linguistic Analysis Toolkit is a linguistic analysis toolkit. Its main goal is to allow easy access to the linguistic analysis tools produced by the Natural Language Processing group at Microsoft Research. The tools include both traditional linguistic analysis tools such as part-of-speech taggers and parsers, and more recent developments, such as sentiment analysis (identifying whether a particular of text has positive or negative sentiment towards its focus)

SPLAT has a nice Silverlight DEMO app that lets you try all available functionality.

splat-demo

SPLAT also has WCF and RESTful endpoints, but if you want to use them, you need to request an access key(please email to Pallavi Choudhury). For more details, please read an overview article “MSR SPLAT, a language analysis toolkit“.

Important links:

Test Drive

I have received my GUID with example of using Json service from C# that you can find below.

private static void CallSplatJsonService()
{
    var requestStr = String.Format("http://msrsplat.cloudapp.net/SplatServiceJson.svc/Analyzers?language={0}&json=x", "en");

    string language = "en";
    string input = "I live in Seattle";
    string analyzerList = "POS_tags,Tokens";
    string appId = "XXXXXXXX-XXXX-XXXX-XXXX-XXXXXXXXXXXX";

    string requestAnanlyse = String.Format("http://msrsplat.cloudapp.net/SplatServiceJson.svc/Analyze?language={0}&analyzers={1}&appId={2}&json=x&input={3}",
        language, analyzerList, appId, input);

    var request = WebRequest.Create(requestAnanlyse);
    request.ContentType = "application.json; charset=utf-8";
    request.Method = "GET";
    string postData = String.Format("/{0}?language={1}&json=x","Analyzers", "en");

    using(Stream s = request.GetResponse().GetResponseStream())
    {
        using(StreamReader sr = new StreamReader(s))
        {
            var jsonData = sr.ReadToEnd();
            Console.WriteLine(jsonData);
        }
    }
}

In following samples, I used WCF endpoint since WsdlService Type Provider can dramatically simplify access to the service.

#r "FSharp.Data.TypeProviders.dll"
#r "System.ServiceModel.dll"
#r "System.Runtime.Serialization.dll"
open System
open Microsoft.FSharp.Data.TypeProviders

type MSRSPLAT = WsdlService<"http://msrsplat.cloudapp.net/SplatService.svc?wsdl">
let splat = MSRSPLAT.GetBasicHttpBinding_ISplatService()

In the first call we ask the SPLAT to return list of supported languages splat.Languages() and you will see [|”en”; “bg”|] (English and Bulgarian). The mystical Bulgaria… I do not know why, but NLP guys like Bulgaria. There is something special for NLP :).

The next call is splat.Analyzers(“en”) that returns list of all analyzers that are available for English language (All of them are available from DEMO app)

  • Base Forms-LexToDeriv-DerivFormsC#”
  • Chunker-SpecializedChunks-ChunkerC++”
  • Constituency_Forest-PennTreebank3-SplitMerge”
  • Constituency_Tree-PennTreebank3-SplitMerge”
  • Constituency_Tree_Score-Score-SplitMerge”
  • CoRef-PennTreebank3-UsingMentionsAndHeadFinder”
  • Dependency_Tree-PennTreebank3-ConvertFromConstTree”
  • Katakana_Transliterator-Katakana_to_English-Perceptron”
  • Lemmas-LexToLemma-LemmatizerC#”
  • Named_Entities-CONLL-CRF”
  • POS_Tags-PennTreebank3-cmm”
  • Semantic_Roles-PropBank-kristout”
  • Semantic_Roles_Scores-PropBank-kristout”
  • Sentiment-PosNeg-MaxEntClassifier”
  • Stemmer-PorterStemmer-PorterStemmerC#”
  • Tokens-PennTreebank3-regexes”
  • Triples-SimpleTriples-ExtractFromDeptree”

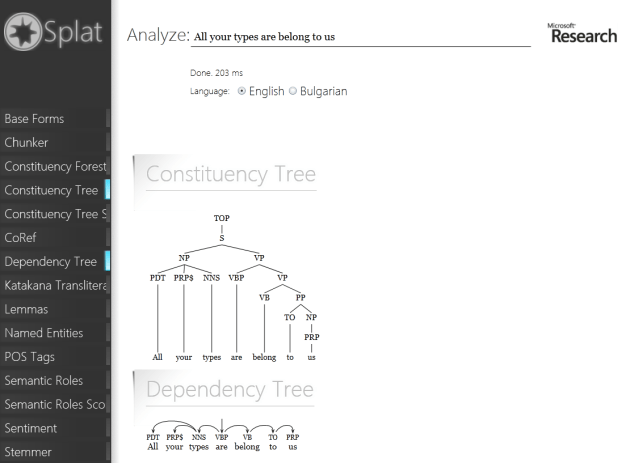
This is a list of full names of analyzers that are available for now. The part of the analyzer’s name that you have to pass to the service to perform corresponding analysis is highlighted in bold. To perform the analysis, you need to have an access guid and pass it as an email to splat.Analyze method. It is probably a typo, but as it is.  Let’s call all analyzers on the one of our favorite sentences “All your types are belong to us” and look at the result.

let appId = "XXXXXXXX-XXXX-XXXX-XXXX-XXXXXXXXXXXX"

let analyzers = String.Join(",", splat.Analyzers("en")
                |> Array.map (fun s -> s.Split([|'-'|]).[0]))
let text = "All your types are belong to us"
let bag = splat.Analyze("en", analyzers, text, appId)

bag.Analyses

The result is

[["0-all","1-you","2-types","3-are","4-belong","5-to","6-us"]]";
  "["[NP All your types] [VP are] [VP belong] [PP to] [NP us] \u000a"]";
  "["@@All your types are belong to us\u000d\u000a0\u0009G_DT..."]";
  "["(TOP (S (NP (PDT All) (PRP$ your) (NNS types)) (VP (VBP are) (VP (VB belong) (PP (TO to) (NP (PRP us)))))))"]";
  "[-2.2476917857427452]";
  "[[{"LengthInTokens":3,"Sentence":0,"StartTokenOffset":0}],[{"LengthInTokens":1,"Sentence":0,"StartTokenOffset":1}],[{"LengthInTokens":1,"Sentence":0,"StartTokenOffset":6}]]";
  "[[{"Parent":3,"Tag":"PDT","Word":"All"},{"Parent":3,"Tag":"PRP$","Word":"your"},{"Parent":4,"Tag":"NNS","Word":"types"},{"Parent":0,"Tag":"VBP","Word":"are"},{"Parent":4,"Tag":"VB","Word":"belong"},{"Parent":5,"Tag":"TO","Word":"to"},{"Parent":6,"Tag":"PRP","Word":"us"}]]";
  "["14.50%: アリオータイプサレベロングタス","13.27%: オールユアタイプサレベロングタス","13.26%: アルユアタイプサレベロングタス","13.26%: アリオールタイプサレベロングタス","11.34%: アリオウルタイプサレベロングタス","7.81%: アルルユアタイプサレベロングタス","7.10%: アリアウータイプサレベロングタス","6.60%: アリアウルタイプサレベロングタス","6.46%: アリーオータイプサレベロングタス","6.40%: アリオータイプサリベロングタス"]";
  "[["All","your","type","are","belong","to","us"]]";
  "[{"Len":0,"Offset":0,"Tokens":[]}]";
  "[["DT","PRP$","NNS","VBP","IN","TO","PRP"]]";
  "[["4-4\/belong[A1=0-2\/All_your_types, A1=5-6\/to_us]"]]";
  "[[-0.33393750773577313]]";
  "{"Classification":"pos","Probability":0.59141720028208355}";
  "[["All","your","type","ar","belong","to","us"]]";
  "[{"Len":31,"Offset":0,"Tokens":[{"Len":3,"NormalizedToken":"All","Offset":0,"RawToken":"All"},{"Len":4,"NormalizedToken":"your","Offset":4,"RawToken":"your"},{"Len":5,"NormalizedToken":"types","Offset":9,"RawToken":"types"},{"Len":3,"NormalizedToken":"are","Offset":15,"RawToken":"are"},{"Len":6,"NormalizedToken":"belong","Offset":19,"RawToken":"belong"},{"Len":2,"NormalizedToken":"to","Offset":26,"RawToken":"to"},{"Len":2,"NormalizedToken":"us","Offset":29,"RawToken":"us"}]}]";
  "[["are_belong_to(types, us)"]]"|]

As you see, service returns result as string[]. All result strings are readable for human eyes and formatted according to “NLP standards”, but some of them are really hard to parse programmatically. FSharp.Data and JSON Type Provider can help with strings that contain correct Json objects.

For example, if you need to use “Sentiment-PosNeg-MaxEntClassifier” analyzer in strongly typed way, then you can do it as follows:

#r @"..\packages\FSharp.Data.1.1.9\lib\net40\FSharp.Data.dll"
open FSharp.Data

type SentimentsProvider = JsonProvider<""" {"Classification":"pos","Probability":0.59141720028208355} """>

let bag2 = splat.Analyze("en", "Sentiment", "I love F#.", appId)
let sentiments = SentimentsProvider.Parse(bag2.Analyses.[0])

printfn "Class:'%s' Probability:'%M'"
    (sentiments.Classification) (sentiments.Probability)

For analyzers like “Constituency_Tree-PennTreebank3-SplitMerge” you need to write custom parser that proceses bracket expression (“(TOP (S (NP (PDT All) (PRP$ your) (NNS types)) (VP (VBP are) (VP (VB belong) (PP (TO to) (NP (PRP us)))))))”) and builds a tree for you. If you are lazy to do it yourself (you should be so), you can download  SilverlightSplatDemo.xap and decompile source code. All parsers are already implemented there for DEMO app. But this approach is not so easy as it should be.

Summary

MSR SPLAT looks like a really powerful and promising toolkit. I hope that it continues growing.

The only wish is an API improvement. I think there should be possible to use services in a strongly typed way. The easiest way is to add an ability to get all results as Json without any cnf forms and so on. Also it can be achieved by changing WCF service and exposing analysis results in a typed way instead of string[].
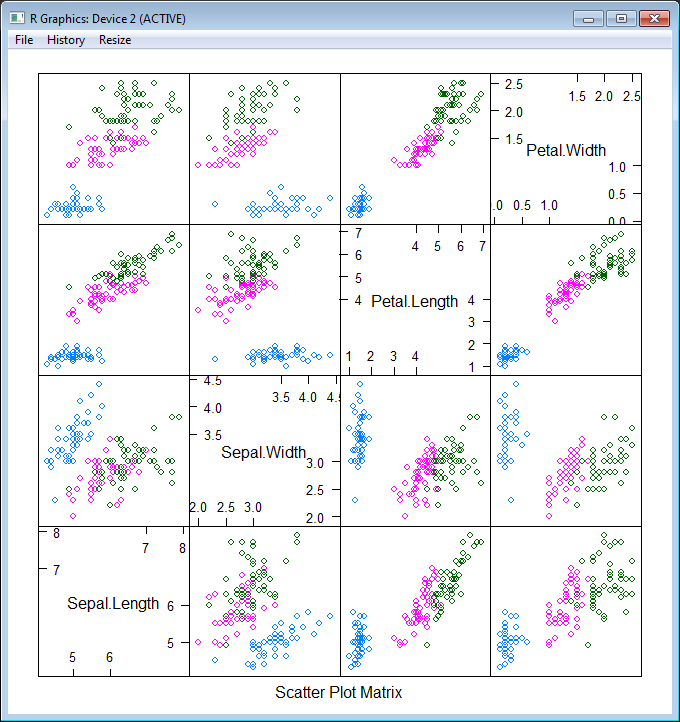
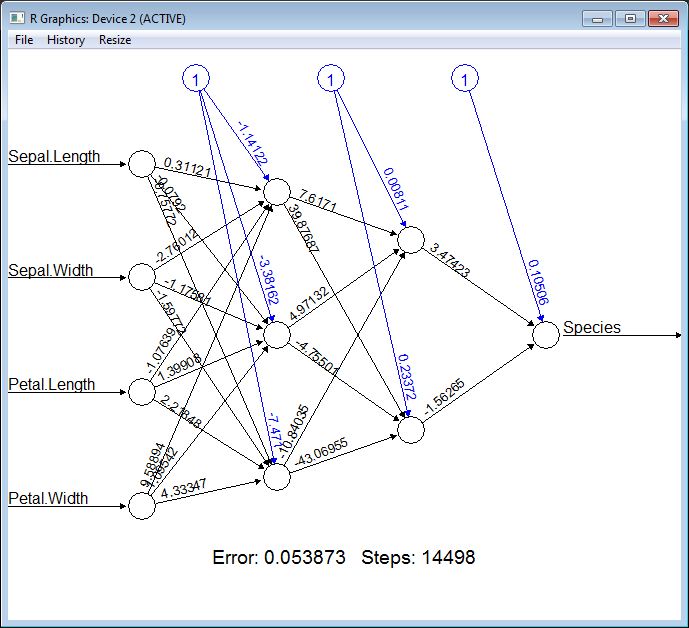
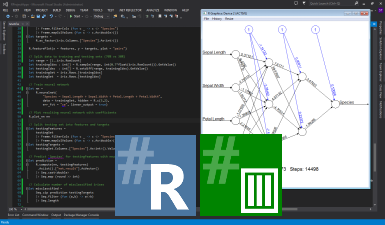