
HashiCorp Vault is a tool for secrets management, encryption as a service, and privileged access management. It is quite popular nowadays, especially if you own your own infrastructure, private cloud or just cannot store your secrets using Key Vault services provided by Azure/AWS/GCP.
I assume that you already have one up and running instance of HashiCorp Vault, otherwise you may install one using official Installing Vault guide.
Why TLS certificate authentication?
Vault supports many Auth Methods. But what if you are still deploying your app on plain old Windows Server VMs or develop SharePoint application (like I am 😝).
The challenge in this case, that you have to authenticate in Vault in order to get a secret. This means that we need to choose auth method that protects our auth secrets from an accident IT guys who may login on the VM (or malicious code that may find it on file system)
TLS Certificate Auth is a good solution candidate, because we can install certificate into windows certificate store, protect private key (mark it as not-exportable) and even specify list of service accounts, allowed to use this certificate for authentication.
TLS certificate generation
I will be using ssh command on my macOS for certificate generation and Vault configuration, but you can repeat the same step from Window for sure.
For our needs we will use self-signed certificate. You can generate one using OpenSSL. If you do not have OpenSSL installed, you can install from Homebrew.
brew install openssl
First of all we generate private key (it is highly secured, do not share it)
openssl genrsa 2048 > vault_private.pem
Then we generate public part of the key in .pem format (.pem file will be uploaded to Vault for client validation during authentication)
openssl req -x509 -new -key vault_private.pem -out vault_public.pem -days 365
Answer all questions properly, it will help you identify this certificate in future (I’ve created certificate that is valid for 365 days, but you should follow security standards defined in you company).
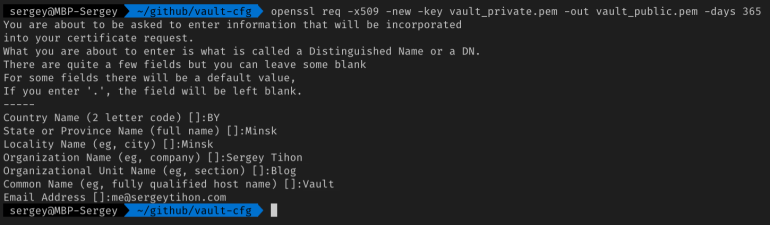
Note: Common Name cannot be empty, otherwise you will not be able to use this certificate to retrieve the secret (Vault returns ‘missing name in alias’ error). Thank you Vadzim Makarchyk for this note.
The final step is to archive both parts in .pfx format (.pfx file will be deployed into Windows Server certificate store on all machines from where our code should have access to Vault)
openssl pkcs12 -export -in vault_public.pem -inkey vault_private.pem -out vault.pfx

Remember the password entered during *.pfx creation, you’re gonna need it every time you decide to install it on Windows machine.
Vault configuration
In order to configure HashiCorp Vault we will use Vault CLI interface, that can be installed from Homebrew on macOS.
brew install vault
Vault CLI uses environment variables for configuration. My Vault server is hosted on different machine so I need to provide server Url.
VAULT_ADDR=https://my.server.com:8200

export VAULT_ADDR
VAULT_NAMESPACE=dev/my-team

export VAULT_NAMESPACE
I am lazy to properly setup certificates for Vault CLI, that is why I skip certificate validation (never repeat it in production 😉)
VAULT_SKIP_VERIFY=true

export VAULT_SKIP_VERIFY
We are almost ready to login. The easiest option is to login using Web UI and then reuse issued token in the terminal. Login using your favorite browser, pass authentication and copy token in buffer.

vault login s.fJTY5S51oIfXKnBAG3Qq5eWp.9GKyY
That is it! Token is saved into ~/.vault-token and CLI is ready to use!
Key/Value secret engine creation
Vault supports multiple Secret Engines, but for our demo we create simple Key/Value storage for secrets (for example to store logins and passwords)
vault secrets enable -path=kv kv
NOTE: The kv secrets engine has two versions: kv and kv-v2. To enable versioned kv secrets engine, pass kv-v2 instead.
Engine is ready, but it is empty – let’s fix it.
vault write kv/my-secret value="s3c(eT"
This command effectively creates my-secret secret inside kv secret engine and store one key/value pair inside value=”s3c(eT”
ACL Policy creation
Secret engine is secured, nobody (except you, admin) has access to secrets. We need to create rules/policy that define what access we want to provide. Create new files policy-file.hcl and put following content inside.
path "kv/*" {
  capabilities = ["read", "list"]
}
This policy allows to read and list all secrets inside kv secret engine. All users with this policy will be able to read secrets from our engine. Read more about policies.
Write this policy to the server (and name it policy-name)
vault policy write policy-name policy-file.hcl
TLS Certificates – Auth Method
The last step is to assign this policy. But we want to assign it to all clients authenticated in Vault using TLS certificate created by us earlier.
Fist of all we need to enable certificate authentication in our namespace
vault auth enable cert
and create certificate auth in Vault (name it app), assign policy-name to it and upload the public part of generated key (vault_public.pem)
vault write auth/cert/certs/app policies=policy-name certificate=@vault_public.pem
That is it! Vault is configured and waiting for first connection.
TLS certificate deployment
TLS certificate allows us to deploy it to certain set of machines that should have access to the Vault and then specify which accounts (on these machines) may use it for authentication.
If you are lucky enough and your deployment is automated you can add one more build step in your deployment process that ensures that certificate is provisioned on all target machines. Octopus Deploy is one of such tools that provides built-in template for certificate provisioning. (BTW, it is free for small teams starting from Sept 2, 2019)

On the screenshot you see the step that imports certificate on all target machines with tag SharePoint (in my case) to LocalMachine certificate store to My/Personal store, mark private-key as not exportable and provide access to private key to 2 service accounts.
If your deployment is not automated, you may script the same steps using PowerShell and run it on all machines.
This file contains hidden or bidirectional Unicode text that may be interpreted or compiled differently than what appears below. To review, open the file in an editor that reveals hidden Unicode characters.
Learn more about bidirectional Unicode characters
| #Import certificate to local machine personal folder | |
| $root = Set-Location -PassThru $PSScriptRoot | |
| $cert = Get-ChildItem -Path $root | where {$_.Extension -like "*.pfx"} | |
| $PlainTextPass = Read-Host -Prompt "Type .pfx password for '$cert' certificate" | |
| $pfxpass = $PlainTextPass | ConvertTo-SecureString -AsPlainText -Force | |
| $cert = $cert | Import-PfxCertificate -CertStoreLocation Cert:\LocalMachine\My -Exportable -Password $pfxpass | |
| Write-Host "Certificate is imported" | |
| #Grant permission to selected account on private key and MachineKeys folder | |
| $fileName = $cert.PrivateKey.CspKeyContainerInfo.UniqueKeyContainerName | |
| $path = "$env:ALLUSERSPROFILE\Microsoft\Crypto\RSA\MachineKeys\$fileName" | |
| function SetPermissions([string[]]$accountNames) | |
| { | |
| $acl = Get-Acl -Path $path | |
| # Add the new user and preserve all current permissions: SetAccessRuleProtection(False, X) | |
| # Add the new user and remove all inherited permissions: SetAccessRuleProtection(True, False) | |
| # Add the new user and convert all inherited permissions to explicit permissions: SetAccessRuleProtection(True, True) | |
| $acl.SetAccessRuleProtection($True, $False) | |
| foreach ($accountName in $accountNames) { | |
| $rule = New-Object System.Security.AccessControl.FileSystemAccessRule($accountName,"Full","Allow") | |
| $acl.AddAccessRule($rule) | |
| } | |
| Set-Acl -Path $path -AclObject $acl | |
| Write-Host "Access to certificate is granted for $accountNames" | |
| } | |
| SetPermissions(@( | |
| "[email protected]", | |
| "[email protected]" | |
| )) |
If you are brave, you can click it even manually! 🙈
- Double click on vault.pfx file and choose LocalMachine store location
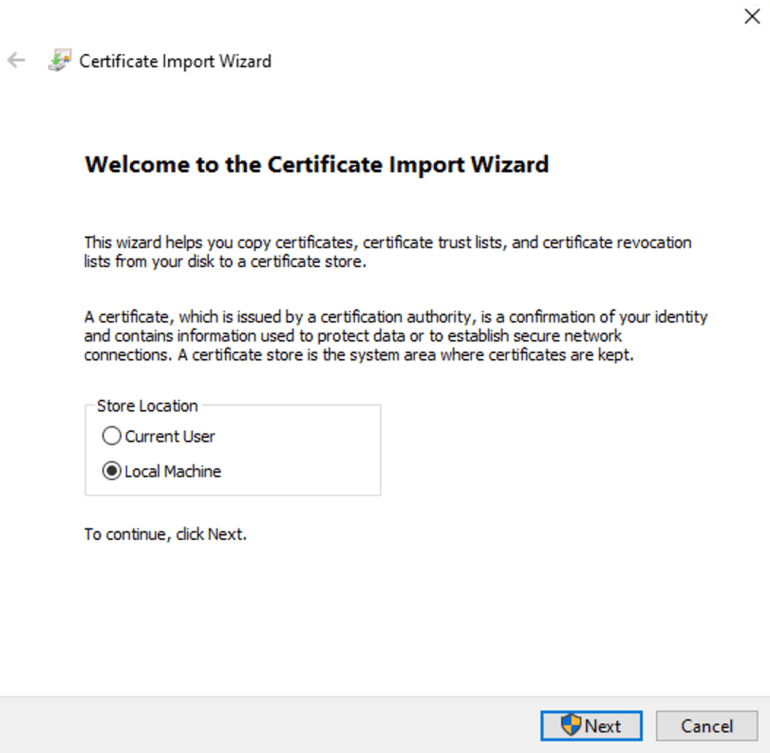
- Click Next, Next and type password used during *.pfx creation and Next again.
- Choose Personal certificate store.
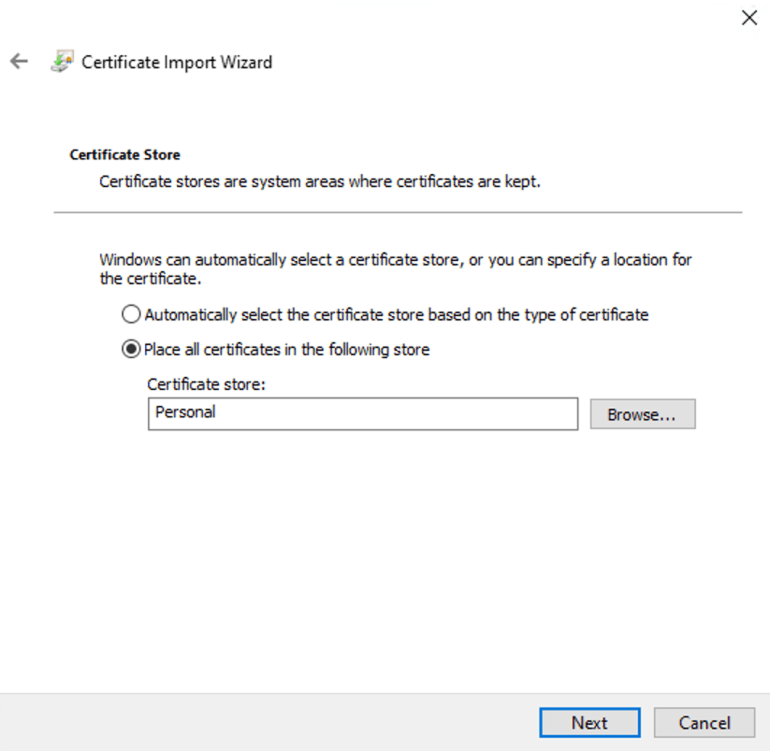
- Click Next, Finish, OK – your certificated in the store!
- Execute mmc (Microsoft Managed Console) from start menu.
- File -> Add/Remove Snap-in …
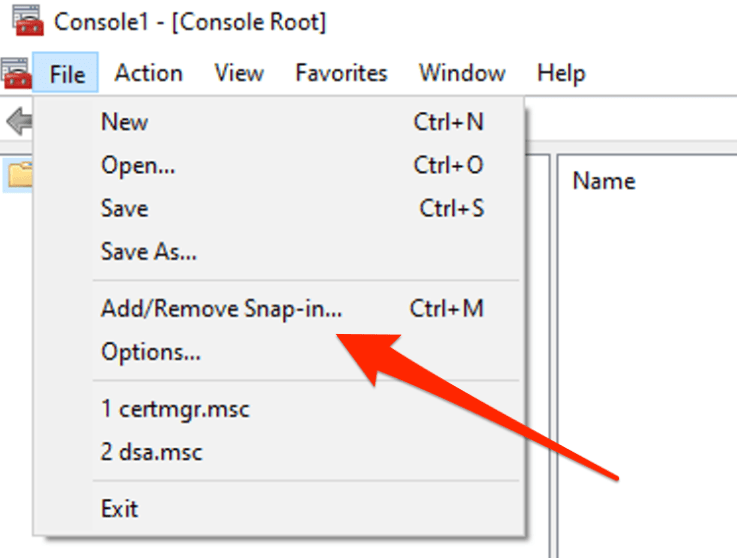
- Certificate, Add, Computer account and click Next & Ok
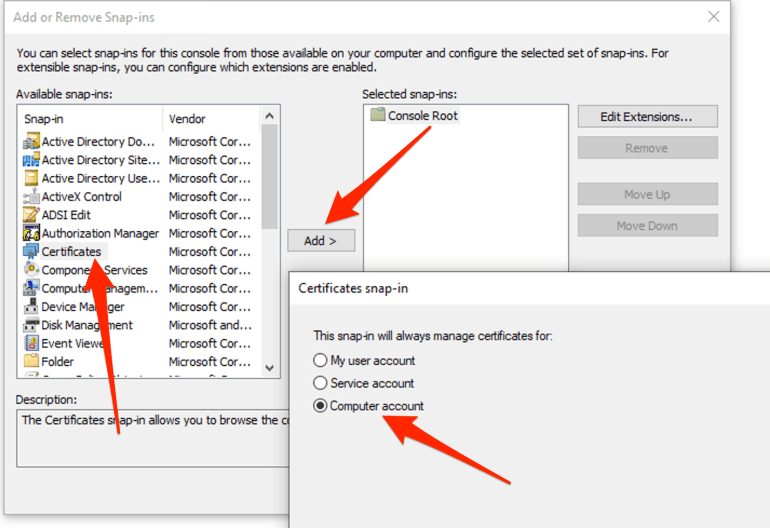
- Find our certificate and click Manage Private Keys…
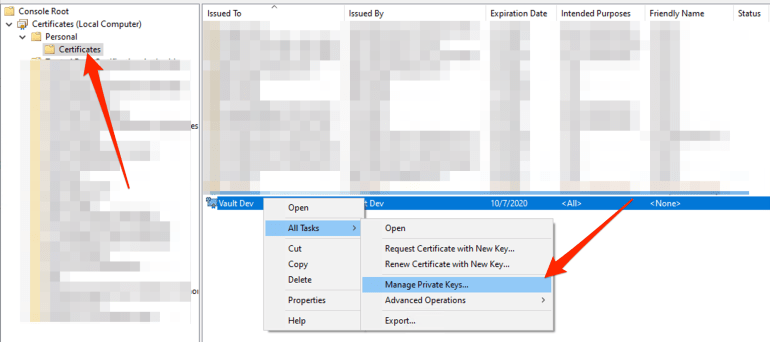
- On this screen you can manage the list of accounts that will be able to use this certificate for authentication on the current machine.

.NET client application
Vault is ready, machine is ready (service account / current user is allowed to use certificate from the LocalMachine/Personal store). Few lines of code are separating us from success 😊.
I will use VaultSharp NuGet Package. It is more or less up to date, it supports namespaces feature and starting from next release usage of namespaces will become even more intuitive.
This file contains hidden or bidirectional Unicode text that may be interpreted or compiled differently than what appears below. To review, open the file in an editor that reveals hidden Unicode characters.
Learn more about bidirectional Unicode characters
| using System; | |
| using System.Collections.Generic; | |
| using System.Data; | |
| using System.Linq; | |
| using System.Threading.Tasks; | |
| using System.Security.Cryptography.X509Certificates; | |
| using VaultSharp; | |
| using VaultSharp.V1.AuthMethods.Cert; | |
| namespace SergeyTihon.App.Configuration | |
| { | |
| public class VaultSecretProvider | |
| { | |
| public VaultSecretProvider(string vaultUrl, string vaultNamespace, string certificateThumbprint) | |
| { | |
| var clientCertificate = GetCertificate(certificateThumbprint); | |
| var authMethod = new CertAuthMethodInfo(clientCertificate); | |
| _vaultClient = new VaultClient(new VaultClientSettings(vaultUrl, authMethod) | |
| { | |
| BeforeApiRequestAction = (httpClient, httpRequestMessage) => | |
| { | |
| httpRequestMessage.Headers.Add("X-Vault-Namespace", vaultNamespace); | |
| } | |
| }); | |
| } | |
| public static X509Certificate2 GetCertificate(string certThumbprint) | |
| { | |
| var store = new X509Store(StoreName.My, StoreLocation.LocalMachine); | |
| store.Open(OpenFlags.ReadOnly); | |
| var certCollection = store.Certificates; | |
| // Find unexpired certificates. | |
| var currentCerts = certCollection.Find(X509FindType.FindByTimeValid, DateTime.Now, false); | |
| // From the collection of unexpired certificates, find the ones with the correct thumbprint. | |
| var signingCert = currentCerts.Find(X509FindType.FindByThumbprint, certThumbprint, false); | |
| // Return the first certificate in the collection, has the right name and is current. | |
| var cert = signingCert.OfType<X509Certificate2>().OrderByDescending(c => c.NotBefore).FirstOrDefault(); | |
| store.Close(); | |
| if (cert is null) | |
| { | |
| throw new DataException($"Cannot find valid certificate with thumbprint {certThumbprint}"); | |
| } | |
| return cert; | |
| } | |
| private readonly VaultClient _vaultClient; | |
| public async Task<Dictionary<string, object>> GetValue(string path, string mountPoint) | |
| { | |
| var secret = await _vaultClient.V1.Secrets.KeyValue.V1.ReadSecretAsync(path, mountPoint); | |
| return secret.Data; | |
| } | |
| } | |
| } |
VaultSecretProvider find X509 certificate in StoreName.My / StoreLocation.LocalMachine, then create CertAuthMethodInfo using certificate and VaultClient that X-Vault-Namespace header to each request with vaultNamespace name.
Using configured instance of VaultClient we can request our secret from Vault _vaultClient.V1.Secrets.KeyValue.V1.ReadSecretAsync(path, mountPoint) specifying path to the secret and mountPoint (name of secret engine).
We are ready to call and receive secrets
This file contains hidden or bidirectional Unicode text that may be interpreted or compiled differently than what appears below. To review, open the file in an editor that reveals hidden Unicode characters.
Learn more about bidirectional Unicode characters
| new VaultSecretProvider( | |
| "https://my.server.com:8200", // VAULT_ADDR | |
| "dev/my-team", // VAULT_NAMESPACE | |
| "877501d5a018e9344088fd5c89580f6b095f5326" // vault.pfx certificate thumbprint | |
| ).GetValue("my-secret", "kv") // path to the secret – vault write kv/my-secret value="s3c(eT" |
Conclusion
Wow, this became a long read, but I hope it was a good one.
TLS certificate authenctication in Vault is a good option for apps that uses Full .NET Framework and runs inside Windows Server VMs.
Just do not forget renew/replace certificates regularly.
Discover more from Sergey Tihon's Blog
Subscribe to get the latest posts sent to your email.

Hi,
Nice Article, but one thing I would like to know. So vault generates a pem files. How you store them in windows cert store. Because it will accept only .pfx files but not pem.
Could you please guide me on that.
You can use openssl to to generate private key (pem), then public key (pem) and combine them into pfx, like this (3 commands)
openssl genrsa 2048 > vault-qa_private.pem
openssl req -x509 -new -key vault-qa_private.pem -out vault-qa_public.pem -days 365
openssl pkcs12 -export -in vault-qa_public.pem -inkey vault-qa_private.pem -out vault-qa.pfx