NDepend for F# code or FSharp.Compiler.Service ‘code review’.

ndepend_logoI had the opportunity to play with NDepend and could not keep from trying it on F# code. It is interesting to see how analysis rules that designed for languages like C# apply to functional-first F#.

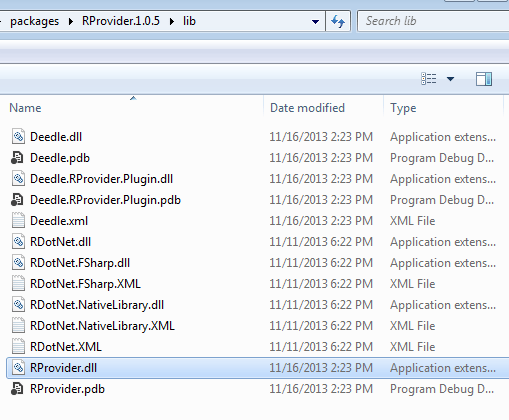
When I downloaded NDepend from the official site, I expected to get regular msi installer with wizard that passes me through all steps and does everything it needs. But it was not true, I got a zip archive with binaries that I needed to unzip manually and execute some binaries that integrate NDepend with my Visual Studio 2013 and Reflector. Installation guide is simple enough and detailed, I have no problems to follow it step by step and configure everything. Nevertheless, installation process seems rather unusual for today.

When I executed a standalone version of NDepend(VisualNDepend) and opened first project that I found – I got stuck! So much information on my screen, I could not understand where to look. My screen looked like a spaceship control panel and I was afraid to touch it ;). I decided to go back to Getting Started page and watch the introduction video. Luckily, NDepend looks pretty well documented.

Now I needed to choose some F# project to do “a code review”. I wanted to find something cool, large and complicated for clarity. And here was my first problem… The first condition is ‘cool’, but most of open source F# projects are cool. This constrain did not help me to reduce number of choices. The next condition is ‘large’, but we do not have really huge F# projects. Pithiness is one of the main F# advantages (F# helps to dramatically decrease code size and code complexity by design). Even F# Compiler is not so big; it is much smaller than my usual C# project. The last condition is ‘complexity’; here situation is similar to ‘size’. F# really helps to keep complexity at manageable level. Anyway, I needed to choose one…

Finally, I have chosen FSharp.Compiler.Service project for analysis (It is a relatively new project). I have no idea what is inside, so it will be more interesting to explore source code in such unusual(for me) way. It is an extremely cool project, which is probably one step further for F# and a fundamental improvement that will open a lot of new doors. (You can read more about what it for and what it can do on the official F# Compiler Services site). This project must be large enough and complicated because it is a brand new extended version of the powerful compiler.

ndepend_homeX

Joking aside! Let’s go deeper to the code.

ndepend-dependencies

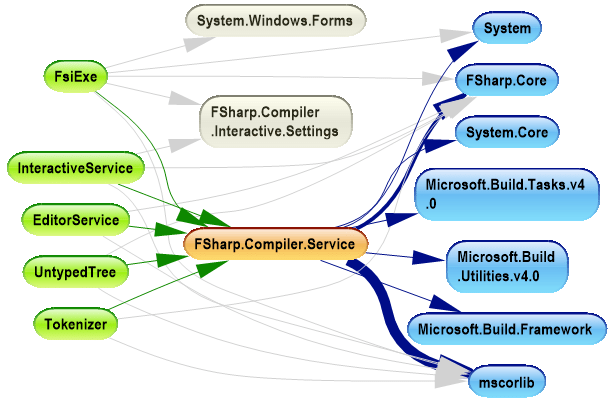
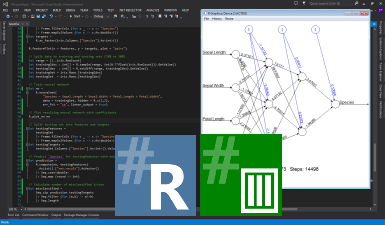
In the dependency graph picture, we see the primary assembly FSharp.Compiler.Service (orange in the picture). This assembly depends on minimal set of assemblies from .NET framework (they are marked blue). Also we see that this GitHub project contains sample projects that are built on top of the compiler service (marked green). So project structure is simple enough and quite clear. The same dependencies we can visualize as a dependency matrix:

ndepend-dependencies-matrix

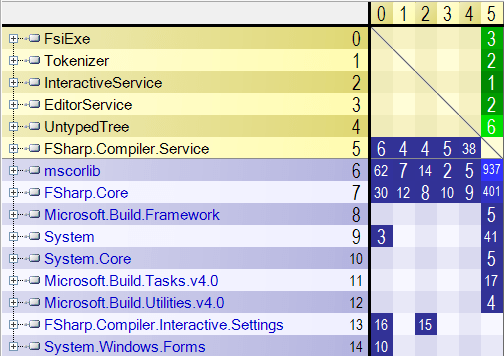
In this matrix, we see more quantitative data about dependencies. Numbers in the cells show the number of assembly members used by one assembly from another. Using these numbers, we can make some conclusions like “UntypedTree sample uses more functionality from FSharp.Compiler.Service than others” or “FsiExe is only one sample that has Windows Forms user interface”.

NDepend also provides one crazy interesting report – Treemap Metric View. This report is able to build a tree of namespaces where size of each node will depend on number of LOC in this namespace. Such plots can show where all complexity is concentrated. To extract more useful information from this plot, you need to have an understanding of the code.

VisualNDependView

Finally, the most intriguing part, the analysis dashboard:

NDependDashboard

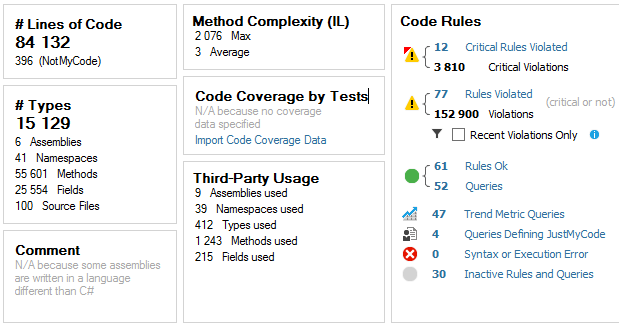
Based on these stats, we see that FSharp.Compiler.Service contains more than 84.000 lines of code, which is really a lot for F# project; the average method complexity is 3 that is pretty nice. Also NDepend found violations of 12 critical rules, let’s see deeper what they are.

NDepend_violatedRules

Unfortunately, NDepend does not support navigation to method declaration for non-C# compiled source code and this fact complicates observion of F# code.

NDependSourceDeclaration
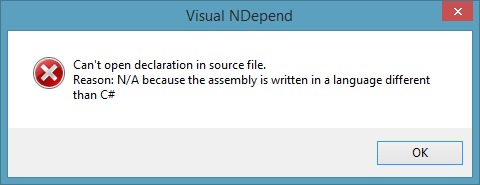
To avoid this error (for methods) you need to open instance of VS with your solution and NDepend navigate you directly where you wish.

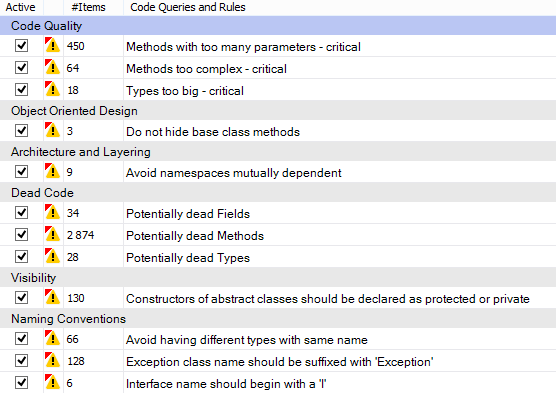
Let’s dwell on critical violated rules:

Code Quality:

Methods with too many parameters – critical

This rule is violated when methods contain more than 8 parameters. I am going to agree here with NDepend – F# compiler source code has such sin. I do not know exact reason of it, but it should be reasonably for compiler/parser source code.

Methods too complex – critical

This rule is violated when methods have ILCyclomaticComplexity > 40 and ILNestingDepth > 4. As I see this happens mostly because NDepend does not understand definition of functions inside other functions (That does not supported by C#). Most of the code that violate this rule is pretty readable. Yes, functionality is wrapped into one large method, but inside it is split into small handy readable functions.

Types too big – critical

This rule is violated when types contain more than 500 lines of code. This story mostly not about F# too. F# compiles modules to the .NET classes. You are allowed to have as large modules as you need. Modules are more like namespaces than classes and constrain with 500 LOC is not applicable for them.

Object Oriented Design

Do not hide base class methods

The rule is self-explanatory. But in current case we should not pay attention because these 3 violations happened in source code of ProvidedType where this is a part of magic of type providers.

Architecture and Layering

Avoid namespaces mutually dependent

I am not sure here, but it also looks like issue related to the F# modules. NDepend reasoning about namespace dependencies without regards to that namespaces are divided into modules.

Dead Code

Potentially dead Types, Methods and Fields

Hmm… It really looks like that there are some methods inside the compiler that were implemented but not used inside and not exposed to external world. It is probably a secret weapon of F#, sketches of new coming features.

Visibility

Constructors of abstract classes should be declared as protected or private

This issue is related to uses of F# discriminated unions. F# compiles discriminated unions into class hierarchy, where root abstract class has a default parameter-less constructor with default visibility (that is internal for F#)

Naming Conventions

Note that C# and F# have a different development guides with a bit different naming conventions.

Avoid having different types with same name

Mostly this rule is also violated by F# modules. It is side effect of F# modules compilation.

Exception class name should be suffixed with ‘Exception’

Exception suffix is rarely used in F# because language has a special exception keyword to define F# exceptions.

Interface name should begin with a ‘I’

F# compiles types to interfaces when all members are abstract. Actually, sometimes we forget to mention I.

Conclusion

Finally, NDepend is a really nice tool. It has some barrier of entry that forces you to refer to documentation, but it looks like a very powerful tool in skillful hand. It is absolutely invaluable in C# world when you want to understand what the hell is going on in the code, but also applicable to F# to see the big picture.

NDepend is highly customizable. Default set of code verification rules is targeted to C# source code, but you can modify existing rules and/or create new ones that will be designed to F#.  Hopefully, one day such rules will become available in default distribution and F# will be officially supported by NDepend team.

P.S. I have tried only a basic feature set; you can read more about advanced features in the official documentation.

Twitter Pulse #fsharp 2013

F# Twitter Pulse 2013

Previously I have published statistics about #fsharp twitter hashtag. This one is based on the tweets that I collected throughout the whole 2013 year. Every week while working on the F# weekly I have downloaded all tweets with hashtag #fsharp and pushed them to my local MongoDB. I managed to collect about 24000 tweets from more than 3000 twitter users.

The first picture on the top of this page is based on total twitter activity around #fsharp hashtag. The size of twitter names depends on sum number of people tweets and retweets. Other charts are self descriptive. Thank you guys for your effort, let’s make 2014 even better.

top30writerstop30retweeters

weeklyTwitterActivity

Update:

Michael Newton proposed an interesting idea: “Calculate number that measures F# community love”. I calculated number of retweets for each twitter account and divided it by number of unique tweets from this account (both with #fsharp hash tag). Finally, I excluded accounts who did less than 10 new tweets about F# in a year. Here it is:

rperp2

Twitter Followers Map with RProvider

Today @oppenheimmd re-tweeted a nice tweet about building Twitter Followers Map with R. Certainly, I decided to build my own map and here it is:

twitterMap

Total number of followers on the screen is smaller than in Twitter. I think it happens because not all people specified the location in the account settings. Take a note that to be able execute this script you need to specify the location in your Twitter account.

As you probably understand from the title, I did this picture using RProvider instead of executing existing R code. Actually, use of twitterMap.R is pretty simple, if not to pay attention to difficulties with Twitter authorization and SSL certificate validation (this part is ugly a bit).

For this demo we need two R packages twitteR and RCurl (with all their dependencies). Please install them:

#I @"..\packages\RProvider.1.0.5\"
#load "RProvider.fsx"

//open RProvider.utils
//R.install_packages("twitteR")
//R.install_packages("RCurl")

open RDotNet
open RProvider
open RProvider.utils
open RProvider.``base``
open RProvider.twitteR
open RProvider.RCurl
open RProvider.ROAuth

I am lazy a bit to fight with RProvider syntax in some places. Actually, I do not even know if it is possible to rewrite such R code using RProvider or not… I have decided to cheat a bit and define a function that gets R expression as a string and evaluates it.

let eval (text:string) =
    namedParams ["text", box text] |> R.parse |> R.eval

You need to have consumerKey and consumerSecret from your registered Twitter application. If you do not have such ones yet, please follow the steps from this article that helps you to register a new Twitter application. The following code is tended to authenticate you in Twitter:

let twitCred =
    namedParams [
        // TODO: insert your consumerKey and consumerSecret
        "consumerKey", box "xxxxxxxxxxxxxxxxxxxxxx"
        "consumerSecret", box "xxxxxxxxxxxxxxxxxxxxxxxxxxxxxxxxxxxxxxxxxxx"
        "requestURL", box "https://api.twitter.com/oauth/request_token"
        "accessURL", box "http://api.twitter.com/oauth/access_token"
        "authURL", box "http://api.twitter.com/oauth/authorize" ]
    |> R.OAuthFactory

R.download_file(url = "http://curl.haxx.se/ca/cacert.pem", destfile="cacert.pem")
R.assign("twitCred", twitCred)
eval """twitCred$handshake(cainfo="cacert.pem")"""

Here you need to do some manual work. These are the last authentication steps:

  1. Copy URL from FSI window and paste it in your browser
  2. Allow your twitter app to access your account data
  3. Copy authorization number-code from browser
  4. Paste code in FSI and press Enter

After that, you need to save your authorization data and set SSL certificate to be used globally, which allow twitterMap.R to communicate with Twitter under your account.

R.registerTwitterOAuth(twitCred)
eval """options(RCurlOptions = list(cainfo = system.file("CurlSSL", "cacert.pem", package = "RCurl")))"""

The last step is to run the script and plot your own map:

R.source("http://biostat.jhsph.edu/~jleek/code/twitterMap.R")
// TODO: do not forget to specify your twitter login and increase nMax if you have more than 5000 followers
eval """twitterMap("your_login", fileName="d:\\TwitterMap.pdf", nMax=5000)"""

P.S. If you rewrite this script without eval please post a link in comments 😉

F# Kung Fu #1: Mastering F# Script references.

One of the most boring parts during working with F# Script files is external references. We need to write a lot of directives with paths to the required files.

New Visual Studio 2013 can help here a bit. A new ‘Send to Interactive‘ button is available there.  Now you can avoid typing an extra command to load references for interactive execution of a small part of your application. But what to do if F# script is our goal?

If you are VS2012 user, then one nice plugin from Tao Liu is available for you “AddReferenceInFSI“. It is a really nice extension, but it is still not a silver bullet.

What do real gurus do in such a situation? Tomas Petricek has shared one typing trick. You can find it in his latest Channel 9 video “Understanding the World with F#” starting from 4:40. What?!? How did he open file picker inside the source code file, chose file that he wanted and inserted relative path to the file directly in code? Why do I always type these long and boring paths if it can be done so easy? Today the truth will come true!

Thomas was so kind and revealed the secret of this trick:

The truth is not so magical as on the face of it – just use the power of your file editor. Let’s repeat all steps once again to better remember:

  1. Find a place where you want to insert file path
  2. Press Ctrl+O that should open a standard file picker. By default VS should open a dialog in the directory where your current file is saved in.
  3. Start typing relative or absolute path to your file, BUT do not use mouse – you are able to use only auto-complete in file path edit box.
  4. When you find a file – select path to it (Ctrl+A)
  5. Copy it (Ctrl+C)
  6. Close file picker (Esc)
  7. Insert path in your script (Ctrl+V)

Do not type boring paths – do it like Tomas 😉

Update from Yan Cui: There is one useful script from Gustavo Guerra. You can load it in every FSI session and save your time.

Sharepoint 2013 Search Ranking and Relevancy Part 1: Let’s compare to FS14

Igor Veytskin's avatarSearch Unleashed

I’m very happy to do some “guest” blogging for my good friend Leo and continue diving into various search-related topics.  In this and upcoming posts, I’d like to jump right into something that interests me very much, and that is taking a look at what makes some documents more relevant than others as well as what factors influence rank score calculations.

Since Sharepoint 2013 is already out, I’d like to touch upon a question that comes up often when someone is considering moving from FAST ESP or FAST for Sharepoint 2010 to Sharepoint 2013 :  “So how are rank scores calculated in Sharepoint 2013 Search as opposed to previous FAST versions”?

In upcoming posts, I will go more into “internals” of the current Sharepoint 2013 ranking model as well as introduce the basics of relevancy calculation concepts that apply across many search engines and are not necessarily specific to FAST…

View original post 686 more words

R-Fiddle: An online playground for R code

datamindjo's avatar

r-fiddle_logowww.R-fiddle.org is an early stage beta that provides you with a free and powerful environment to write, run and share R-code right inside your browser. It even offers the option to include packages. Since a couple of days it’s gaining more and more traction, and was mentioned on the frontpage of Hacker News.

We designed it for those situations where you have code that you need to prototype quickly and then possibly share it with others for feedback. All this without needing a user account, or any scrap projects or files! We even included a very-easy-to-use ’embed’ function for blogs and website, so your visitors can edit and run R code on your own website or blog. This is the first version of R-fiddle, so do not hesitate to give us feedback.

Working together with the help of R-fiddle

You can use R-fiddle to share code snippets with colleagues…

View original post 526 more words

F# Neural Networks with FsLab

nn_previewNeural networks are very powerful tool and at the same time, it is not easy to use all its power. Now we are one step closer to it from F# and .NET. We will delegate model training to R using R Provider. Also we will use Deedle (that was announced some days ago) for handy data manipulation.

Prerequisites:

Learning from Data:

First of all, we need to load required assemblies into our FSI session. It is pretty easy with FsLab because package have bootstrapping script.

#load "..\packages\FsLab.0.1.4\FsLab.fsx"

The next step is to download and install missed R packages. For this demo, we need neuralnet for training neural network model and prediction, caret for data visualization.

open RProvider.utils
R.install_packages("MASS")
R.install_packages("pbkrtest")
R.install_packages("lattice")
R.install_packages("Matrix")
R.install_packages("mgcv")
R.install_packages("grid")
R.install_packages("neuralnet")
R.install_packages("caret")
R.install_packages("zoo")

Now we are ready to start work. We need to open namespaces and load a data set. For this demo, we have chosen iris data set, which is classic for lots of demos.

open Deedle
open RDotNet
open RProvider
open RProvider.``base``
open RProvider.datasets
open RProvider.neuralnet
open RProvider.caret

let iris : Frame<int, string> = R.iris.GetValue()

To better understand what we are going to do, let’s plot this data set. First of all, split data into two parts: features (Sepal.Length; Sepal.Width; Petal.Length; Petal.Width) and a target variable (Species). After that plot these data into different dimensions (different colors represent different Species).

let features =
iris
|> Frame.filterCols (fun c _ -> c <> "Species")
|> Frame.mapColValues (fun c -> c.As<double>())
let targets =
R.as_factor(iris.Columns.["Species"])

R.featurePlot(x = features, y = targets, plot = "pairs")

nn_features

As you see, our task is not trivial – we have 3 classes instead of 2 (that is not classic situation) and classes are not clearly separable. Nevertheless let’s try!  First of all, we need to split our data into 2 parts – training and testing data sets (70% vs 30%). The first part will be sent to the neural network for learning, the second one will be used for measuring model quality. Also let’s shuffle data to be honest.

iris.ReplaceColumn("Species", targets.AsNumeric())
let range = [1..iris.RowCount]
let trainingIdxs : int[] = R.sample(range, iris.RowCount*7/10).GetValue()
let testingIdxs : int[] = R.setdiff(range, trainingIdxs).GetValue()
let trainingSet = iris.Rows.[trainingIdxs]
let testingSet = iris.Rows.[testingIdxs]

Now we are ready to train a neural network, all we need is to provide a formula (specify what is the input for our model and what is the output) “Species ~ Sepal.Length + Sepal.Width + Petal.Length + Petal.Width”, provide a data set and specify the structure of hidden layers. In the following example, we will train the network with two layers of hidden nodes, the first layer with 3 nodes and the second layer with 2 nodes.

let nn =
R.neuralnet(
"Species ~ Sepal.Length + Sepal.Width + Petal.Length + Petal.Width",
data = trainingSet, hidden = R.c(3,2),
err_fct = "ce", linear_output = true)

// Plot the resulting neural network with coefficients
R.eval(R.parse(text="library(grid)"))
R.plot_nn nn

nn_network

Cool! How simple it is. To be able to measure quality of the classification we need to split our training set into features and targets.

let testingFeatures =
testingSet
|> Frame.filterCols (fun c _ -> c <> "Species")
|> Frame.mapColValues (fun c -> c.As<double>())
let testingTargets =
testingSet.Columns.["Species"].As<int>().Values

To execute the neural network on the new data (apply our classification) we should call R.compute method and pass the training data set there.

let prediction =
R.compute(nn, testingFeatures)
.AsList().["net.result"].AsVector()
|> Seq.cast<double>
|> Seq.map (round >> int))

Finally, let’s compare prediction results with testing values:

let misclassified =
Seq.zip prediction testingTargets
|> Seq.filter (fun (a,b) -> a<>b)
|> Seq.length

printfn "Misclassified irises '%d' of '%d'" misclassified (testingSet.RowCount)

If you execute all these steps one by one, you will see that there are only ~3 misclassifies of 45 samples. Pretty well quality.

Full script:

#load "..\packages\FsLab.0.1.4\FsLab.fsx"

// You need to install 'nnet' and 'caret' packages if you do not have them
open RProvider.utils
R.install_packages("MASS")
R.install_packages("pbkrtest")
R.install_packages("lattice")
R.install_packages("Matrix")
R.install_packages("mgcv")
R.install_packages("grid")
R.install_packages("neuralnet")
R.install_packages("caret")
R.install_packages("zoo")

open Deedle
open RDotNet
open RProvider
open RProvider.``base``
open RProvider.datasets
open RProvider.neuralnet
open RProvider.caret

// Load data from R to Deedle frame
let iris : Frame<int, string> = R.iris.GetValue()

// Observe iris data set
let features =
iris
|> Frame.filterCols (fun c _ -> c <> "Species")
|> Frame.mapColValues (fun c -> c.As<double>())
let targets =
R.as_factor(iris.Columns.["Species"])

R.featurePlot(x = features, y = targets, plot = "pairs")

iris.ReplaceColumn("Species", targets.AsNumeric())
// Split data to training and testing sets (70% vs 30%)
let range = [1..iris.RowCount]
let trainingIdxs : int[] = R.sample(range, iris.RowCount*7/10).GetValue()
let testingIdxs : int[] = R.setdiff(range, trainingIdxs).GetValue()
let trainingSet = iris.Rows.[trainingIdxs]
let testingSet = iris.Rows.[testingIdxs]

// Train neural network
let nn =
R.neuralnet(
"Species ~ Sepal.Length + Sepal.Width + Petal.Length + Petal.Width",
data = trainingSet, hidden = R.c(3,2),
err_fct = "ce", linear_output = true)

// Plot the resulting neural network with coefficients
R.eval(R.parse(text="library(grid)"))
R.plot_nn nn

// Split testing set into features and targets
let testingFeatures =
testingSet
|> Frame.filterCols (fun c _ -> c <> "Species")
|> Frame.mapColValues (fun c -> c.As<double>())
let testingTargets =
testingSet.Columns.["Species"].As<int>().Values

// Predict `Species` for testingFeatures with neural network
let prediction =
R.compute(nn, testingFeatures)
.AsList().["net.result"].AsVector()
|> Seq.cast<double>
|> Seq.map (round >> int))

// Calculate number of misclassified irises
let misclassified =
Seq.zip prediction testingTargets
|> Seq.filter (fun (a,b) -> a<>b)
|> Seq.length

printfn "Misclassified irises '%d' of '%d'" misclassified (testingSet.RowCount)

P.S.

Notice, if you have problems with bootstrapping RProvider and/or converting R data frame to Deedle data frames – you need to verify that during installation of NuGet packages, all assemblies have been copied to RProvider’s lib sub-folder (see in the following picture).

deedle_rprovider

F# Interactive “branding”

FSI console has a pretty small font size by default. It is really uncomfortable to share screen with projector.  Source code in FSI is always small and hard to read. Never thought (until today) that I can configure font, color, font size and etc. In fact, it is very easy to do:

  1. Click Tools -> Options.
  2. Select Environment -> Fonts and Colors.
  3. In the ‘Show setting for‘ drop-down select ‘F# Interactive‘.FSIbranding
  4. Here it is – you can change whatever you want.
  5. That’s wonderful!