Update (2014, January 3): Links and/or samples in this post might be outdated. The latest version of samples are available on new Stanford.NLP.NET site.

Stanford CoreNLP provides a set of natural language analysis tools which can take raw English language text input and give the base forms of words, their parts of speech, whether they are names of companies, people, etc., normalize dates, times, and numeric quantities, and mark up the structure of sentences in terms of phrases and word dependencies, and indicate which noun phrases refer to the same entities. Stanford CoreNLP is an integrated framework, which make it very easy to apply a bunch of language analysis tools to a piece of text. Starting from plain text, you can run all the tools on it with just two lines of code. Its analyses provide the foundational building blocks for higher-level and domain-specific text understanding applications.
Stanford CoreNLP integrates all Stanford NLP tools, including the part-of-speech (POS) tagger, the named entity recognizer (NER), the parser, and the coreference resolution system, and provides model files for analysis of English. The goal of this project is to enable people to quickly and painlessly get complete linguistic annotations of natural language texts. It is designed to be highly flexible and extensible. With a single option you can change which tools should be enabled and which should be disabled.
Stanford CoreNLP is here and available on NuGet. It is probably the most powerful package from whole The Stanford NLP Group software packages. Please, read usage overview on Stanford CoreNLP home page to understand what it can do, how you can configure an annotation pipeline, what steps are available for you, what models you need to have and so on.
I want to say thank you to Anonymous 😉 and @OneFrameLink for their contribution and stimulating me to finish this work.
Please follow next steps to get started:
Before using Stanford CoreNLP, we need to define and specify annotation pipeline. For example, annotators = tokenize, ssplit, pos, lemma, ner, parse, dcoref.
The next thing we need to do is to create StanfordCoreNLP pipeline. But to instantiate a pipeline, we need to specify all required properties or at least paths to all models used by pipeline that are specified in annotators string. Before starting samples, let’s define some helper function that will be used across all source code pieces: jarRoot is a path to folder where we extracted files from stanford-corenlp-3.2.0-models.jar; modelsRoot is a path to folder with all models files; ‘!’ is overloaded operator that converts model name to relative path to the model file.
let (@@) a b = System.IO.Path.Combine(a,b)
let jarRoot = __SOURCE_DIRECTORY__ @@ @"..\..\temp\stanford-corenlp-full-2013-06-20\stanford-corenlp-3.2.0-models\"
let modelsRoot = jarRoot @@ @"edu\stanford\nlp\models\"
let (!) path = modelsRoot @@ path
Now we are ready to instantiate the pipeline, but we need to do a small trick. Pipeline is configured to use default model files (for simplicity) and all paths are specified relatively to the root of stanford-corenlp-3.2.0-models.jar. To make things easier, we can temporary change current directory to the jarRoot, instantiate a pipeline and then change current directory back. This trick helps us dramatically decrease the number of code lines.
let props = Properties()
props.setProperty("annotators","tokenize, ssplit, pos, lemma, ner, parse, dcoref") |> ignore
props.setProperty("sutime.binders","0") |> ignore

let curDir = System.Environment.CurrentDirectory
System.IO.Directory.SetCurrentDirectory(jarRoot)
let pipeline = StanfordCoreNLP(props)
System.IO.Directory.SetCurrentDirectory(curDir)
However, you do not have to do it. You can configure all models manually. The number of properties (especially paths to models) that you need to specify depends on the annotators value. Let’s assume for a moment that we are in Java world and we want to configure our pipeline in a custom way. Especially for this case, stanford-corenlp-3.2.0-models.jar contains StanfordCoreNLP.properties (you can find it in the folder with extracted files), where you can specify new property values out of code. Most of properties that we need to use for configuration are already mentioned in this file and you can easily understand what it what. But it is not enough to get it work, also you need to look into source code of Stanford CoreNLP. By the way, some days ago Stanford was moved CoreNLP source code into GitHub – now it is much easier to browse it. Default paths to the models are specified in DefaultPaths.java file, property keys are listed in Constants.java file and information about which path match to which property name is contained in Dictionaries.java. Thus, you are able to dive deeper into pipeline configuration and do whatever you want. For lazy people I already have a working sample.
let props = Properties()
let (<==) key value = props.setProperty(key, value) |> ignore
"annotators"    <== "tokenize, ssplit, pos, lemma, ner, parse, dcoref"
"pos.model"     <== ! @"pos-tagger\english-bidirectional\english-bidirectional-distsim.tagger"
"ner.model"     <== ! @"ner\english.all.3class.distsim.crf.ser.gz"
"parse.model"   <== ! @"lexparser\englishPCFG.ser.gz"

"dcoref.demonym"            <== ! @"dcoref\demonyms.txt"
"dcoref.states"             <== ! @"dcoref\state-abbreviations.txt"
"dcoref.animate"            <== ! @"dcoref\animate.unigrams.txt"
"dcoref.inanimate"          <== ! @"dcoref\inanimate.unigrams.txt"
"dcoref.male"               <== ! @"dcoref\male.unigrams.txt"
"dcoref.neutral"            <== ! @"dcoref\neutral.unigrams.txt"
"dcoref.female"             <== ! @"dcoref\female.unigrams.txt"
"dcoref.plural"             <== ! @"dcoref\plural.unigrams.txt"
"dcoref.singular"           <== ! @"dcoref\singular.unigrams.txt"
"dcoref.countries"          <== ! @"dcoref\countries"
"dcoref.extra.gender"       <== ! @"dcoref\namegender.combine.txt"
"dcoref.states.provinces"   <== ! @"dcoref\statesandprovinces"
"dcoref.singleton.predictor"<== ! @"dcoref\singleton.predictor.ser"

let sutimeRules =
    [| ! @"sutime\defs.sutime.txt";
       ! @"sutime\english.holidays.sutime.txt";
       ! @"sutime\english.sutime.txt" |]
    |> String.concat ","
"sutime.rules"      <== sutimeRules
"sutime.binders"    <== "0"

let pipeline = StanfordCoreNLP(props)
As you see, this option is much longer and harder to do. I recommend to use the first one, especially if you do not need to change the default configuration.
And now the fun part. Everything else is pretty easy: we create an annotation from your text, path it through the pipeline and interpret the results.
let text = "Kosgi Santosh sent an email to Stanford University. He didn't get a reply.";

let annotation = Annotation(text)
pipeline.annotate(annotation)
use stream = new ByteArrayOutputStream()
pipeline.prettyPrint(annotation, new PrintWriter(stream))
printfn "%O" (stream.toString())
Certainly, you can extract all processing results from annotated test.
let customAnnotationPrint (annotation:Annotation) =
    printfn "-------------"
    printfn "Custom print:"
    printfn "-------------"
    let sentences = annotation.get(CoreAnnotations.SentencesAnnotation().getClass()) :?> java.util.ArrayList
    for sentence in sentences |> Seq.cast<CoreMap> do
        printfn "\n\nSentence : '%O'" sentence

    let tokens = sentence.get(CoreAnnotations.TokensAnnotation().getClass()) :?> java.util.ArrayList
    for token in (tokens |> Seq.cast<CoreLabel>) do
       let word = token.get(CoreAnnotations.TextAnnotation().getClass())
       let pos  = token.get(CoreAnnotations.PartOfSpeechAnnotation().getClass())
       let ner  = token.get(CoreAnnotations.NamedEntityTagAnnotation().getClass())
       printfn "%O \t[pos=%O; ner=%O]" word pos ner

    printfn "\nTree:"
    let tree = sentence.get(TreeCoreAnnotations.TreeAnnotation().getClass()) :?> Tree
    use stream = new ByteArrayOutputStream()
    tree.pennPrint(new PrintWriter(stream))
    printfn "The first sentence parsed is:\n %O" (stream.toString())

    printfn "\nDependencies:"
    let deps = sentence.get(SemanticGraphCoreAnnotations.CollapsedDependenciesAnnotation().getClass()) :?> SemanticGraph
    for edge in deps.edgeListSorted().toArray() |> Seq.cast<SemanticGraphEdge> do
        let gov = edge.getGovernor()
        let dep = edge.getDependent()
        printfn "%O(%s-%d,%s-%d)"
            (edge.getRelation())
            (gov.word()) (gov.index())
            (dep.word()) (dep.index())
The full code sample is available on GutHub, if you run it, you will see the following result:
Sentence #1 (9 tokens):
Kosgi Santosh sent an email to Stanford University.
[Text=Kosgi CharacterOffsetBegin=0 CharacterOffsetEnd=5 PartOfSpeech=NNP Lemma=Kosgi NamedEntityTag=PERSON] [Text=Santosh CharacterOffsetBegin=6 CharacterOffsetEnd=13 PartOfSpeech=NNP Lemma=Santosh NamedEntityTag=PERSON] [Text=sent CharacterOffsetBegin=14 CharacterOffsetEnd=18 PartOfSpeech=VBD Lemma=send NamedEntityTag=O] [Text=an CharacterOffsetBegin=19 CharacterOffsetEnd=21 PartOfSpeech=DT Lemma=a NamedEntityTag=O] [Text=email CharacterOffsetBegin=22 CharacterOffsetEnd=27 PartOfSpeech=NN Lemma=email NamedEntityTag=O] [Text=to CharacterOffsetBegin=28 CharacterOffsetEnd=30 PartOfSpeech=TO Lemma=to NamedEntityTag=O] [Text=Stanford CharacterOffsetBegin=31 CharacterOffsetEnd=39 PartOfSpeech=NNP Lemma=Stanford NamedEntityTag=ORGANIZATION] [Text=University CharacterOffsetBegin=40 CharacterOffsetEnd=50 PartOfSpeech=NNP Lemma=University NamedEntityTag=ORGANIZATION] [Text=. CharacterOffsetBegin=50 CharacterOffsetEnd=51 PartOfSpeech=. Lemma=. NamedEntityTag=O]
(ROOT
(S
(NP (NNP Kosgi) (NNP Santosh))
(VP (VBD sent)
(NP (DT an) (NN email))
(PP (TO to)
(NP (NNP Stanford) (NNP University))))
(. .)))
nn(Santosh-2, Kosgi-1)
nsubj(sent-3, Santosh-2)
root(ROOT-0, sent-3)
det(email-5, an-4)
dobj(sent-3, email-5)
nn(University-8, Stanford-7)
prep_to(sent-3, University-8)
Sentence #2 (7 tokens):
He didn’t get a reply.
[Text=He CharacterOffsetBegin=52 CharacterOffsetEnd=54 PartOfSpeech=PRP Lemma=he NamedEntityTag=O] [Text=did CharacterOffsetBegin=55 CharacterOffsetEnd=58 PartOfSpeech=VBD Lemma=do NamedEntityTag=O] [Text=n’t CharacterOffsetBegin=58 CharacterOffsetEnd=61 PartOfSpeech=RB Lemma=not NamedEntityTag=O] [Text=get CharacterOffsetBegin=62 CharacterOffsetEnd=65 PartOfSpeech=VB Lemma=get NamedEntityTag=O] [Text=a CharacterOffsetBegin=66 CharacterOffsetEnd=67 PartOfSpeech=DT Lemma=a NamedEntityTag=O] [Text=reply CharacterOffsetBegin=68 CharacterOffsetEnd=73 PartOfSpeech=NN Lemma=reply NamedEntityTag=O] [Text=. CharacterOffsetBegin=73 CharacterOffsetEnd=74 PartOfSpeech=. Lemma=. NamedEntityTag=O]
(ROOT
(S
(NP (PRP He))
(VP (VBD did) (RB n’t)
(VP (VB get)
(NP (DT a) (NN reply))))
(. .)))
nsubj(get-4, He-1)
aux(get-4, did-2)
neg(get-4, n’t-3)
root(ROOT-0, get-4)
det(reply-6, a-5)
dobj(get-4, reply-6)
Coreference set:
(2,1,[1,2)) -> (1,2,[1,3)), that is: “He” -> “Kosgi Santosh”
C# Sample
C# samples are also available on GitHub.
Stanford Temporal Tagger(SUTime)

SUTime is a library for recognizing and normalizing time expressions. SUTime is available as part of the Stanford CoreNLP pipeline and can be used to annotate documents with temporal information. It is a deterministic rule-based system designed for extensibility.
There is one more useful thing that we can do with CoreNLP – time extraction. The way that we use CoreNLP is pretty similar to the previous sample. Firstly, we create an annotation pipeline and add there all required annotators. (Notice that this sample also use the operator defined at the beginning of the post)
let pipeline = AnnotationPipeline()
pipeline.addAnnotator(PTBTokenizerAnnotator(false))
pipeline.addAnnotator(WordsToSentencesAnnotator(false))

let tagger = MaxentTagger(! @"pos-tagger\english-bidirectional\english-bidirectional-distsim.tagger")
pipeline.addAnnotator(POSTaggerAnnotator(tagger))

let sutimeRules =
    [| ! @"sutime\defs.sutime.txt";
       ! @"sutime\english.holidays.sutime.txt";
       ! @"sutime\english.sutime.txt" |]
    |> String.concat ","
let props = Properties()
props.setProperty("sutime.rules", sutimeRules ) |> ignore
props.setProperty("sutime.binders", "0") |> ignore
pipeline.addAnnotator(TimeAnnotator("sutime", props))
Now we are ready to annotate something. This part is also equal to the same one from the previous sample.
let text = "Three interesting dates are 18 Feb 1997, the 20th of july and 4 days from today."
let annotation = Annotation(text)
annotation.set(CoreAnnotations.DocDateAnnotation().getClass(), "2013-07-14") |> ignore
pipeline.annotate(annotation)
And finally, we need to interpret annotating results.
printfn "%O\n" (annotation.get(CoreAnnotations.TextAnnotation().getClass()))
let timexAnnsAll = annotation.get(TimeAnnotations.TimexAnnotations().getClass()) :?> java.util.ArrayList
for cm in timexAnnsAll |> Seq.cast<CoreMap> do
    let tokens = cm.get(CoreAnnotations.TokensAnnotation().getClass()) :?> java.util.List
    let first = tokens.get(0)
    let last = tokens.get(tokens.size() - 1)
    let time = cm.get(TimeExpression.Annotation().getClass()) :?> TimeExpression
    printfn "%A [from char offset '%A' to '%A'] --> %A"
        cm first last (time.getTemporal())
The full code sample is available on GutHub, if you run it you will see the following result:
18 Feb 1997 [from char offset ’18’ to ‘1997’] –> 1997-2-18
the 20th of july [from char offset ‘the’ to ‘July’] –> XXXX-7-20
4 days from today [from char offset ‘4’ to ‘today’] –> THIS P1D OFFSET P4D
C# Sample
C# samples are also available on GitHub.
Conclusion
There is a pretty awesome library. I hope you enjoy it. Try it out right now!
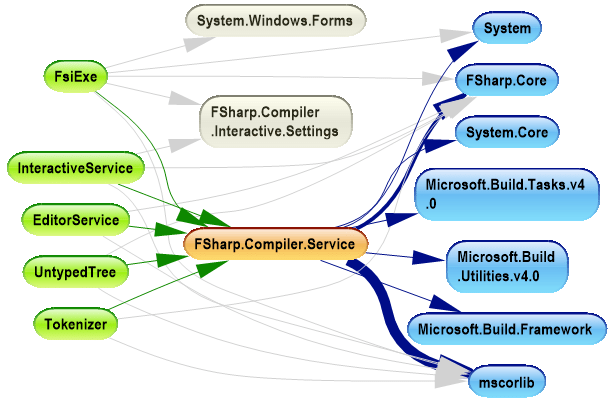
There are some other more specific Stanford packages that are already available on NuGet:


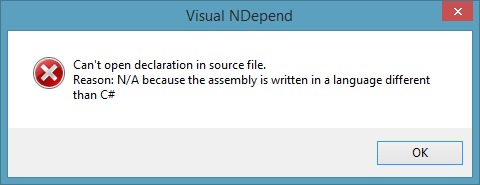 To avoid this error (for methods) you need to open instance of VS with your solution and NDepend navigate you directly where you wish.

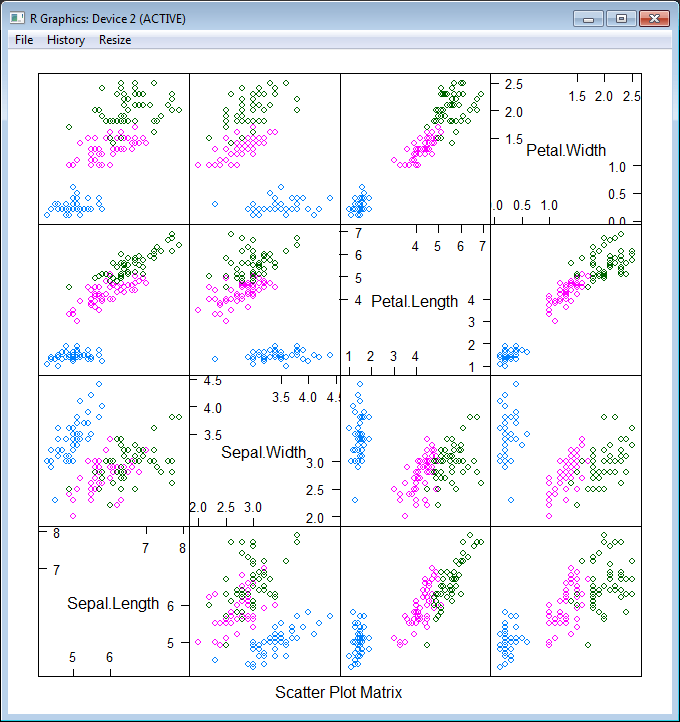
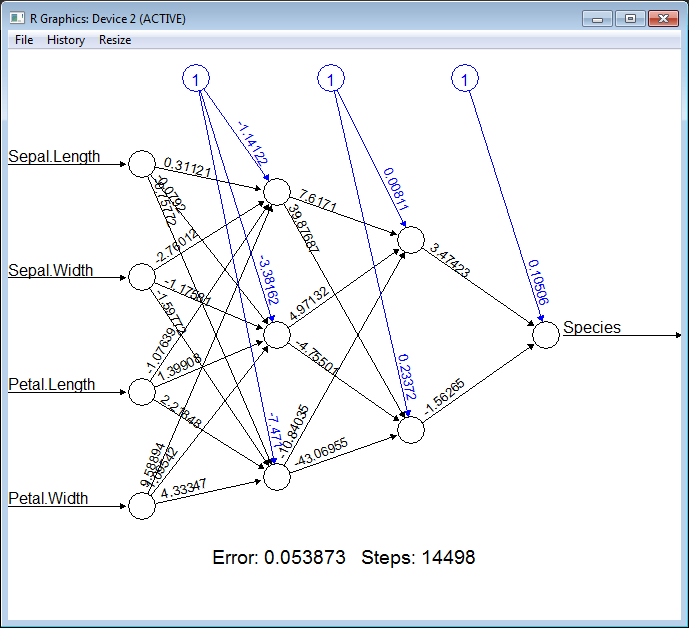
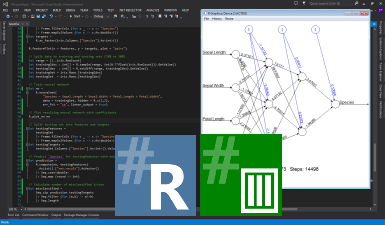 Neural networks are very powerful tool and at the same time, it is not easy to use all its power. Now we are one step closer to it from F# and .NET. We will delegate model training to