My first disappointment on F# type system.

Today I found that there are examples of code that correct for C# and could not be compiled in F#. I was very surprised and upset.

I continued playing with Neo4jClient and tried to implement more complex model. I have found that it  is not possible to define F# type for cross entity relationship. To make such relationship I need to define type that implements two interfaces, like this:

type FollowRelationship(target) =
    inherit Relationship(target)
    interface IRelationshipAllowingSourceNode<Person>
    interface IRelationshipAllowingTargetNode<Company>

    override this.RelationshipTypeKey
        with get() = "follow"

But F# compiler does not allow the creation of such type. I’ve got the following compilation error:

This type implements or inherits the same interface at different generic instantiations ‘IRelationshipAllowingParticipantNode’ and ‘IRelationshipAllowingParticipantNode’. This is not permitted in this version of F#.

It happens because IRelationshipAllowingSourceNode and IRelationshipAllowingTargetNode inherited from a single generic interface IRelationshipAllowingParticipantNode and F# does not allow to implement the same interface in different generic instantiations.

Here is an implementation of these interfaces from Neo4jClient source code.

public interface IRelationshipAllowingParticipantNode<out TNode>
{
}
public interface IRelationshipAllowingSourceNode<out TNode>
    : IRelationshipAllowingParticipantNode<TNode>
{
}
public interface IRelationshipAllowingTargetNode<out TNode>
    : IRelationshipAllowingParticipantNode<TNode>
{
}

As I found, there is actually no way to do it in F#. An only option is to write such types in C#. We have a similar question about this on StackOverflow: “Implementing the same interface at different generic instantiations“.

May be it is not a real constrain of F#, but it adds a noise to C#/F# integration. It is means that not all C# design patterns are integrable with F#.

It can be one more answer to

Using Neo4j Graph DB With F#

Neo4j_logo

Today, I have found Neo4j and could do nothing but play with it. It looks extremely attractive(for example, for enterprise social data).

Neo4j is an open-source, high-performance, enterprise-grade NOSQL graph database.

Neo4j stores data in nodes connected by directed, typed relationships with properties on both, also known as a Property Graph.

First good news, Neo4j has REST API and .NET client library that is available on NuGet. Let’s download it and reference from our script.

#r "System.Net.Http.dll"
#r "System.Net.Http.WebRequest.dll"
#r "Neo4jClient.dll"
#r "Newtonsoft.Json.dll"

open System
open Neo4jClient
open System.Linq

Than, we model a twitter data with following and friendship relationships. Let’s define a Person entity, we need to do nothing more than define a new .NET type.

[<CLIMutable>]
type Person = { Name:string; Twitter:string }

We also need to define relationships. Let’s start from following relationship that is simple and does not store any extra data. To define such relationship we need to write new type that inherits Relationship then implement two interfaces which constrain types of source and target entities that can be connected by this relationship. The last step is to define RelationshipTypeKey property that helps us to identify this relationship in graph.

type FollowRelationship(target) =
    inherit Relationship(target)
    interface IRelationshipAllowingSourceNode<Person>
    interface IRelationshipAllowingTargetNode<Person>

    override this.RelationshipTypeKey
        with get() = "follows"

We also can define relationship that store any extra data. To do so, we need to create a new class for metadata and pass it into Relationship constructor.

[<CLIMutable>]
type KnowsData = { Details:string }

type KnowsRelationship(target, data) =
    inherit Relationship(target, data)
    interface IRelationshipAllowingSourceNode<Person>
    interface IRelationshipAllowingTargetNode<Person>

    override this.RelationshipTypeKey
        with get() = "knows"

So, we are ready to build a graph. Let’s setup a connection to DB and create data.

let client = new GraphClient(new Uri("http://localhost:7474/db/data"));
client.Connect();

let createPerson person =
    client.Create person

let pA = createPerson { Name = "Person A"; Twitter="tA"}
let pB = createPerson { Name = "Person B"; Twitter="tB"}
let pC = createPerson { Name = "Person C"; Twitter="tC"}
let pD = createPerson { Name = "Person D"; Twitter="tD"}

let follows target source =
    client.CreateRelationship(source, FollowRelationship target)

pB |> follows pA
pC |> follows pA
pD |> follows pB
pD |> follows pC

let knows target details source =
  client.CreateRelationship(source,KnowsRelationship(target,{Details=details}))

pB |> knows pC "colleagues"

We have built the graph. It’s time to make a query to search something. Neo4j supports a special graph oriented query language – Cypher that looks readable even for analysts, not only for programmers. Neo4jClient has a LINQ-like query builder for Cypher.

let pAfollowers =
    client.Cypher
        .Start("n", pA)
        .Match("n<-[r:follows]-e")
        .Return<Person>("e")
        .Results
        .Select(fun x -> x.Name)

If you execute this query, you will see a list of followers of “Person A“. It is [“Person B”; “Person C”].

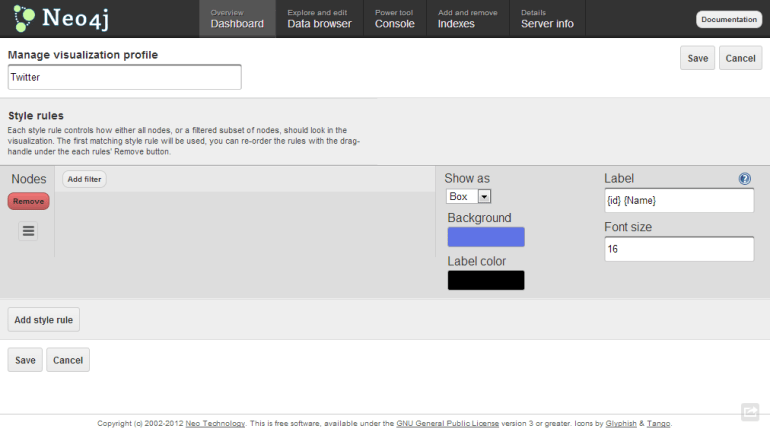
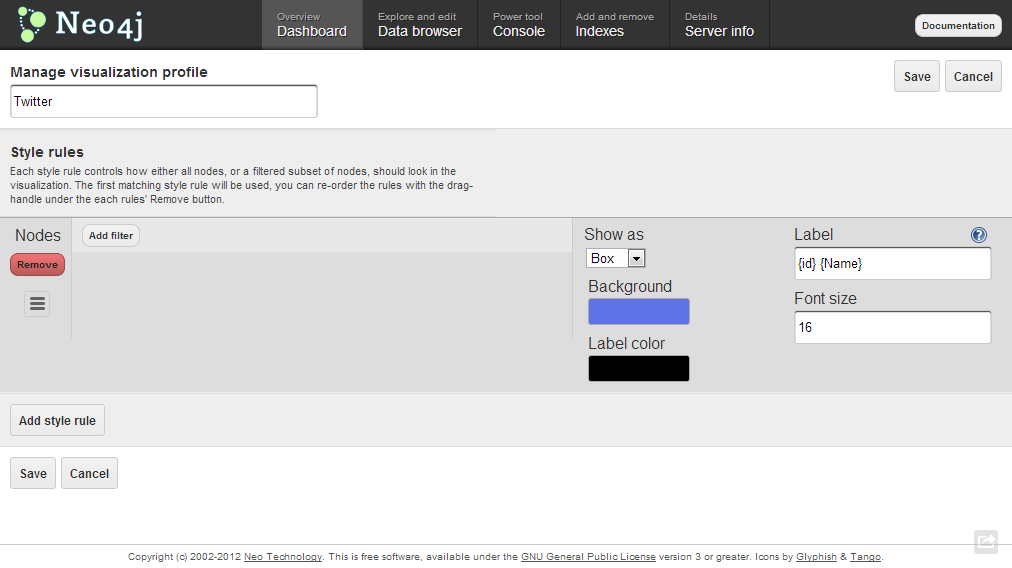
Neo4j has a cool web UI, where you can not only maintain server, but browse, edit and query your data.

Let’s open Data Browser tab, click on the Layout button and add a new layout. Here we can define rules for how we want to show entities based on their internal properties values. Please fill the form according to the picture below.

Neo4j_Layout

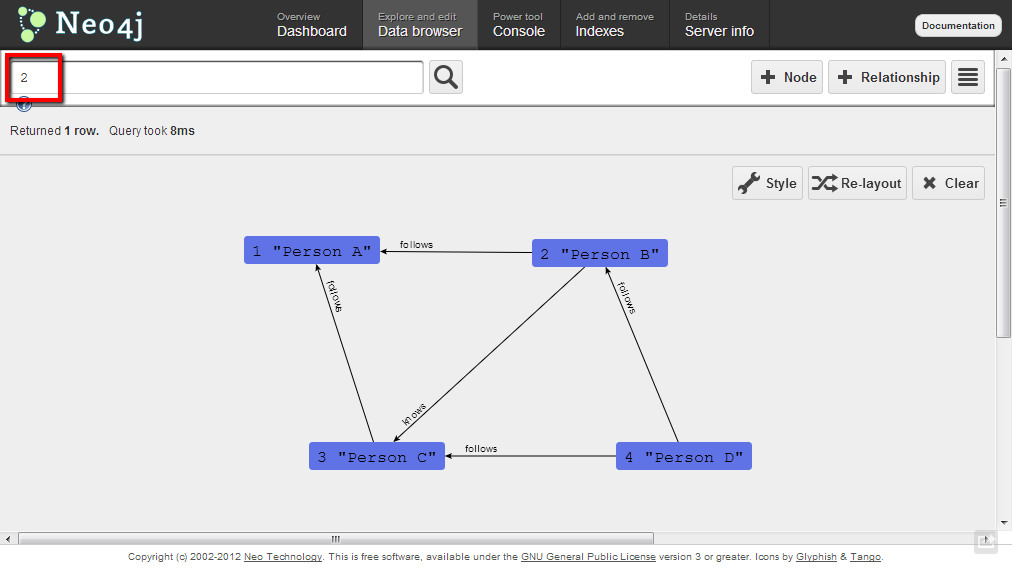
After that save the layout, open Data browse tab one more time and search entity by id 2. You should see the following beautiful graph.

Neo4j_graph

Have a good time playing with graphs! 🙂

Using Neo4j with F# – Cypher 2.0” is a new version of this demo that is updated to VS2013 and Cypher 2.0. Thanks to Chris Skardon.

Getting started with 3D XNA in F#

XNA Game Studio is one of the main pure managed 3D data visualization tools. It is widely used for game development and operates not only on PC but on Xbox and Windows Phones too.

As you probably know, The F# Software Foundation has a “Game And Visualization Stacks” page with description of options available from F#. On this page you can find a link to the “F# With XNA Game Studio” post by AzerDark (@azer89). In the post you can find the detailed guide of how to create a new F# project, reference all required assemblies and create minimal XNA application that shows up an empty window.

I have tried to create something a bit more interesting than an empty window. It is a rotating cube :). A full description of how it works you can find in the post “Getting started with 3D XNA” by David Conrad (with source code in C#). In this post you can see F# code that create XNA game object and model of cube, initialize basic effect (turn on light and configure light, projection and view), create an animation(rotating) for cube and render it in XNA window. As a result, you will see something like that (but with animation 😉 ):

XNA

open System
open Microsoft.Xna.Framework
open Microsoft.Xna.Framework.Graphics
open Microsoft.Xna.Framework.Input

type Game1() as this =
    inherit Game()
    let graphics = new GraphicsDeviceManager(this)

    let cube =
        let texCoords = new Vector2(0.0f, 0.0f);
        let face = [|Vector3(-1.0f, 1.0f, 0.0f); Vector3(-1.0f, -1.0f, 0.0f);
                     Vector3(1.0f, 1.0f, 0.0f);   //TopLeft-BottomLeft-TopRight
                     Vector3(-1.0f, -1.0f, 0.0f); Vector3(1.0f, -1.0f, 0.0f);
                     Vector3(1.0f, 1.0f, 0.0f);|] //BottomLeft-BottomRight-TopRight
        let faceNormals = [|Vector3.UnitZ; -Vector3.UnitZ;   //Front & Back faces
                            Vector3.UnitX; -Vector3.UnitX;   //Left & Right faces
                            Vector3.UnitY; -Vector3.UnitY|]; //Top & Bottom faces
        let ang90 = (float32)Math.PI / 2.0f;
        let faceRotations = [|Matrix.CreateRotationY(2.0f*ang90); Matrix.CreateRotationY(0.0f);
                              Matrix.CreateRotationY(-ang90); Matrix.CreateRotationY(ang90);
                              Matrix.CreateRotationX(ang90); Matrix.CreateRotationX(-ang90)|];
        Array.init 36 (fun x ->
            let i,j = x%6, x/6
            VertexPositionNormalTexture(
                Vector3.Transform(face.[i], faceRotations.[j])
                    + faceNormals.[j], faceNormals.[j], texCoords))

    let mutable effect = null
    let angle = ref 0.0f;

    override Game.Initialize() =
        effect <- new BasicEffect(graphics.GraphicsDevice,
                    AmbientLightColor = Vector3(0.0f, 1.0f, 0.0f),
                    LightingEnabled = true,
                    View = Matrix.CreateTranslation(0.0f,0.0f,-10.0f),
                    Projection =
                        Matrix.CreatePerspectiveFieldOfView(
                            (float32)Math.PI / 4.0f,
                            (float32)this.Window.ClientBounds.Width
                                / (float32)this.Window.ClientBounds.Height,
                            1.0f, 10.0f));
        effect.DirectionalLight0.Enabled <- true;
        effect.DirectionalLight0.DiffuseColor <- Vector3.One;
        effect.DirectionalLight0.Direction <- Vector3.Normalize(Vector3.One);
        base.Initialize()

    override Game.Update gameTime =
        angle := !angle + 0.005f
        if (!angle > 2.0f * (float32)Math.PI) then angle := 0.0f;
        let R = Matrix.CreateRotationY(!angle) * Matrix.CreateRotationX(0.4f);
        let T = Matrix.CreateTranslation(0.0f, 0.0f, 5.0f);
        effect.World <- R * T;
        base.Update gameTime

    override Game.Draw gameTime =
        this.GraphicsDevice.Clear(Color.CornflowerBlue)
        graphics.GraphicsDevice.RasterizerState <- new RasterizerState();
        effect.CurrentTechnique.Passes |> Seq.iter (fun pass ->
            pass.Apply()
            graphics.GraphicsDevice.DrawUserPrimitives(
                PrimitiveType.TriangleList, cube, 0, 12))
        base.Draw gameTime

[<EntryPoint>]
let main argv =
    use g = new Game1()
    g.Run()
    0

ServiceStack: F# Client Application

In the previous post “ServiceStack: New API – F# Sample (Web Service out of a web server)” we implemented a self-hosted service with ServiceStack. That service has multiple out-of-the-box endpoints, including a REST one.

The next interesting question is “How to call this service?”(preferably in a strongly-typed way). The answer is simple, ServiceStack team have already made ​​this for us.  We can reuse types that designed for server-side code to make client code prettier. ServiceStack provides a list of different service clients for client applications.

open System
open ServiceStack.ServiceHost
open ServiceStack.ServiceClient.Web

[<CLIMutable>]
type HelloResponse = { Result:string }

[<Route("/hello")>]
[<Route("/hello/{Name}")>]
type Hello() =
    interface IReturn<HelloResponse>
    member val Name = "" with get, set

let baseUri = "http://localhost:8080/"

// Option 1 : Json call
let jsonCall() =
    let client = new JsonServiceClient(baseUri)
    client.Post(Hello(Name="json"))

// Option 2 : Xml call
let xmlCall() =
    let client = new XmlServiceClient(baseUri)
    client.Post(Hello(Name="xml"))

// Option 3: Jsv call
let jsvCall() =
    let client = new JsvServiceClient(baseUri)
    client.Post(Hello(Name="jsv"))

[<EntryPoint>]
let main args =
    printfn "Json call : %A" (jsonCall())
    printfn "Xml call : %A" (xmlCall())
    printfn "Jsv call : %A" (jsvCall())
    Console.ReadLine() |> ignore
    0

ServiceStack: New API – F# Sample (Web Service out of a web server)

Two weeks ago in F# Weekle #6 2013 I mentioned Don Syme’s “F# + ServiceStack – F# Web Services on any platform in and out of a web server” post. There were two samples of  using ServiceStack from F#. One of these examples is given on ServiceStack wiki page in Self Hosting section. It is also detailed in Demis Bellot’s “F# Web Services on any platform in and out of a web server!” post.

Unfortunately, this example is already obsolete. Some time ago, ServiceStack released a brand new API that significantly changed programming approach, especially routing (for details see “ServiceStack’s new API design“). But I am happy to say that you can find an updated example below!

New design is more typed. In the previous version IService‘s methods returned the Object, but now Service returns concrete type that is defined by IReturn<T> interface of request message.

open System
open ServiceStack.ServiceHost
open ServiceStack.WebHost.Endpoints
open ServiceStack.ServiceInterface

[<CLIMutable>]
type HelloResponse = { Result:string }

[<Route("/hello")>]
[<Route("/hello/{Name}")>]
type Hello() =
    interface IReturn<HelloResponse>
    member val Name = "" with get, set

type HelloService() =
    inherit Service()
    member this.Any (request:Hello) =
        {Result = "Hello," + request.Name}

//Define the Web Services AppHost
type AppHost() =
    inherit AppHostHttpListenerBase("Hello F# Services", typeof<HelloService>.Assembly)
    override this.Configure container = ignore()

//Run it!
[<EntryPoint>]
let main args =
    let host = if args.Length = 0 then "http://*:8080/" else args.[0]
    printfn "listening on %s ..." host
    let appHost = new AppHost()
    appHost.Init()
    appHost.Start host
    Console.ReadLine() |> ignore
    0

For comparison, the previous version is:

open System
open ServiceStack.ServiceHost
open ServiceStack.WebHost.Endpoints

type Hello = { mutable Name: string; }
type HelloResponse = { mutable Result: string; }
type HelloService() =
    interface IService with
        member this.Any (req:Hello) = { Result = "Hello, " + req.Name }

//Define the Web Services AppHost
type AppHost =
    inherit AppHostHttpListenerBase
    new() = { inherit AppHostHttpListenerBase("Hello F# Services", typeof<HelloService>.Assembly) }
    override this.Configure container =
        base.Routes
            .Add<Hello>("/hello")
            .Add<Hello>("/hello/{Name}") |> ignore

//Run it!
[<EntryPoint>]
let main args =
    let host = if args.Length = 0 then "http://*:1337/" else args.[0]
    printfn "listening on %s ..." host
    let appHost = new AppHost()
    appHost.Init()
    appHost.Start host
    Console.ReadLine() |> ignore
    0

Update: An example of ServiceStack New API for F# 2.0 users. F# 2.0 does not have val keyword / auto-properties which were used in the first example.

</pre>
open System
open ServiceStack.ServiceHost
open ServiceStack.WebHost.Endpoints
open ServiceStack.ServiceInterface

type Project() =
    let mutable projectID = 0
    let mutable projectName = ""
    let mutable companyName = ""
    let mutable projectStatus = ""
    member this.ProjectID with get() = projectID and set(pid) = projectID <-pid
    member this.ProjectName with get() = projectName and set(pn) = projectName <- pn
    member this.CompanyName with get() = companyName and set(cn) = companyName <- cn
    member this.ProjectStatus with get() = projectStatus and set(ps) = projectStatus <-ps

type ProjectResponse() =
    let mutable projects = List.empty<Project>
    member this.Projects with get() = projects and set(pr) = projects <- pr

[<Route("/Project/{ProjectName}")>]
type ProjectRequest() =
    let mutable projectName = ""
    interface IReturn<ProjectResponse>
    member this.ProjectName with get() = projectName and set(n) = projectName <- n

type ProjectService() =
    inherit Service()
    member this.Any (request:ProjectRequest) =
        ProjectResponse(
             Projects = [Project(ProjectName=request.ProjectName, ProjectID=1, CompanyName="A")])

//Define the Web Services AppHost
type AppHost() =
    inherit AppHostHttpListenerBase("Project F# Services", typeof<ProjectService>.Assembly)
    override this.Configure container = ignore()

//Run it!
[<EntryPoint>]
let main args =
    let host = if args.Length = 0 then "http://*:8080/" else args.[0]
    printfn "listening on %s ..." host
    let appHost = new AppHost()
    appHost.Init()
    appHost.Start host
    Console.ReadLine() |> ignore
    0
<pre>

F# Image Blurrer

Image blurring is a king of popular task during presentation preparation. For example, if you want show something but hide sensitive information. Of course you can buy Photoshop but it is too expensive for such a simple task. Also you can download Paint.NET, but this is not an option for F# geek – it is too easy=). It is much better to write something by yourself (Binaries are available as well as source code).

open System
open System.IO
open System.Drawing
open System.Drawing.Imaging

let blur (image:Bitmap) blurSize =
    let blurred = new Bitmap(image.Width, image.Height)
    use graphics = Graphics.FromImage(blurred)
    let rectangle = Rectangle(0, 0, image.Width, image.Height)
    graphics.DrawImage(image, rectangle, rectangle, GraphicsUnit.Pixel);
    for X in [0..image.Width-1] do
        for Y in [0..image.Height-1] do
            let (r,g,b,c) =
                [Math.Max(0, X-blurSize)..Math.Min(image.Width-1, X+blurSize)]
                |> Seq.fold (fun sum x ->
                    [Math.Max(0, Y-blurSize)..Math.Min(image.Height-1, Y+blurSize)]
                    |>  Seq.fold (fun (r,g,b,c) y ->
                        let p = blurred.GetPixel(x,y)
                        (r + (int)p.R, g + (int)p.G, b + (int)p.B, c+1)
                     ) sum
                 ) (0,0,0,0)
    blurred.SetPixel(X, Y, Color.FromArgb(r/c, g/c, b/c));
    blurred

[<EntryPoint>]
let main argv =
   try
       printfn "argv = %A" argv
       let (fileName, blurSize) =
       match argv with
       | [|fileName|] -> (fileName, 3)
       | [|fileName; size|] ->
           match Int32.TryParse(size) with
           | (true, blurSize) when blurSize > 0 -> (fileName, blurSize)
           | _ -> failwithf "Incorrect blurSize '%s'" size
           | _ -> failwith "Incorrect parameters. Please enter 'fileName' and 'blurSize'"
       printfn "FileName:%s\nBlurSize:%d" fileName blurSize
       if (not(File.Exists(fileName)))
           then failwithf "File '%s' does not exist." fileName

      use inputStream = new MemoryStream(File.ReadAllBytes(fileName));
      use source = new Bitmap(Image.FromStream(inputStream));
      printfn "Processing..."
      use result = blur source blurSize
      printfn "Saving..."
      let resultFileName =
          sprintf "%s_%dblurred.jpg" (Path.GetFileNameWithoutExtension(fileName)) blurSize
      result.Save(resultFileName, ImageFormat.Jpeg)
      printfn "Done!"
   with
   | e ->
       printfn "Exception : %s" e.Message
       Console.ReadLine() |> ignore
   0
fsharp.org
Origin image
Blurred image (blurSize=3)